thumb-animaltoppers

DIY | Animal Cupcake Toppers

DIY | Wintery Animal Cupcake Toppers from www.highwallsblog.com

Okay, you got me! This post was obviously one of my Christmas posts that didn’t make it up in time for the day. However, as I have been using these little guys as pot plant decorations in lieu of cupcakes, I figured that they could really pass as winter themed toppers, right?

It feels a bit weird to be sharing winter themed projects with scarves and sweaters when it we are in the middle of a heat wave here in Australia. But I know my US readers in particular are freezing at the moment, so hopefully these colourful critters are just the thing to cheer up those cold days!

DIY | Wintery Animal Cupcake Toppers from www.highwallsblog.com

READ MORE

DIY | Stamped Clay Christmas Ornaments

DIY | Stamped Clay Christmas Ornaments by www.highwallsblog.com

The sad passing of my old laptop meant that I am a whole week behind in my Christmas posts this year! The upside of this, is that it means that I have a whole bunch of extra content to get through before Santa gets here next week! So I hope you’re ready for all Christmas-All-The-Time here at High Walls.

Today’s project is simple and dead easy. My favourite. Christmas has a tendency to get a little over the top and kitschy, so there’s something to be said for understated decorations and ornaments. My tree and decorations this year are all in porcelain, glass and silver hues, so I really wanted to create some ornaments to match with this theme.

These ornaments are made with store bought Christmas themed stamps, but if you don’t want to go out and buy a whole set for this project, you can of course make your own indentations with things you can easily find around your house. Think stars or trees traced with toothpicks or knife blades.

DIY | Stamped Clay Christmas Ornaments by www.highwallsblog.com

What You Need:
Air Dry or Oven Bake Clay
Christmas Stamps
A Wooden Skewer
1 Cup of Water
Twine or String
Acrylic/Water based Paint
Extra fine paint brush
Fine sand paper (optional)

What You Do:
1.  Tear off a large pinch of clay, around the size of your thumb. Knead the clay until smooth and pliable and roll into a ball.

2. Line a flat surface with a sheet of baking paper. Using your fingers, press down on the ball of clay to flatten into a disk around 5mm thick.

3. Take a Christmas stamp, ensuring it is smaller than the size of your disk, and press into the clay firmly to leave a strong imprint.

4. Dip your finger into a cup of water and gently smooth over the surface of your clay in circular motions. The water will help to slowly to smooth away any rough marks or square lines made by the stamp block. Take it easy as you don’t want to damage the main imprint. If you find the clay is getting too moist, set aside to dry slightly and continue again later.

5. With the blunt end of a wooden skewer, push a hole in the top of the clay for you to thread  through later. Smooth down any rough edges.

DIY | Stamped Clay Christmas Ornaments by www.highwallsblog.com 6. Depending on what type of clay you are using, set aside to dry overnight or bake in the oven according to the instructions.

7. Once hardened, if you wish, you can further smooth the clay using fine sand paper before proceeding to the next step.

8. Using a small, fine paintbrush, dip the bristles into water based paint and then dip into a cup of water. Swirl around slightly so that the paint turns into a light wash.

9. Very carefully, drip a small amount of paint/water mixture into the stamp indentation, allowing the water wash to fill in the ridges. Repeat if necessary until the imprint is coloured completely. Set aside to dry. If you find that the colour isn’t dark enough you can repeat this step once the first coat has dried.

10. Thread a length of string through the hole in the top and tie off in a loop to allow the ornament to be hung up.

DIY | Stamped Clay Christmas Ornaments by www.highwallsblog.com DIY | Stamped Clay Christmas Ornaments by www.highwallsblog.com

DIY | Paper Snowflakes

snowflakes

Paper snowflakes, in my opinion, are totally underrated. They are one of those things teachers got you to make during the last few lessons of the school year (basically to keep you out of their hair so close to Christmas!) I don’t think many people ever retained this skill into adulthood.

The thing about snowflakes is that all you need to know is how to make the first few folds to get the basic shape. Once you have these folds you can hack away at the sides to create a multitude of completely different snowflake designs. Even the first few folds don’t need to necessarily be all that exact, it’s such a forgiving project and it enables you to be create something completely different every time you attempt it.

I decided to revive my paper craft skills this year to pretty up some ugly windows in my house. Our living room has windows that give us an amazing view of…. our neighbors  outside wall. It is literally about a foot from our house. Ugh.  So I set to creating a winter wonderland to cover up the ugliness…. and now I kind of want to do the same to every window in my house ;)

snowflake-steps

What You Do:
1. Starting with a square piece of paper.
2. Fold in half diagonally to make a large triangle.
3. Fold the triangle in half diagonally again, to make a smaller triangle.
4. Fold in one side of the triangle against itself so that the corner lines up with the bottom point.
5. Fold in the other side over the previous fold. You may need to adjust these folds to get the sides to match up, but don’t worry too much about making the folds perfect.
6. You should be left with a shape like that pictured above in [6] - Once you have this shape, cut straight across the bottom.
7. Now that you have the basic shape, you can start to cut into the sides of the folded paper. Experiment with straight and curved lines, and big and small cuts.
8. Once you have cut away as much as you want too, gently unfold the paper completely to reveal your snowflake. Adhere to a window or surface with double sided tape.

DIY | Wrapped Baubles

DIY | Wrapped Baubles by www.highwallsblog.com

 Christmas drives me crazy in the best possible way. I revert back to my childhood self, and suddenly I’m all about making paper chains and hand made decorations to trim my tree. As a child we use to make the old sequin baubles from polystyrene balls and they were my favourite Christmas craft project. I’m certainly no less obsessed with sequins as I was back then, but this year I thought I’d try a more “grown up” version inspired by some wrapped balls I spotted in a home-ware store. They take half the time to make and wont end in my living room blanketed in sequins.

However fair warning; making these guys can be fiddly, and you will end up with hands covered in PVA glue, but that’s okay? Then you get to peel it off afterwards, in that morbidly satisfying way it peels away like a layer of skin. You guys did that as a kid as well… right?

DIY | Wrapped Baubles by www.highwallsblog.com DIY | Wrapped Baubles by www.highwallsblog.com

What You Need:
Polystyrene Balls - as many as you want to make
PVA / Craft Glue
Sewing Pins
Thin Rope or String

What You Do;

1. Start by putting a drop of glue on the top of the polystyrene ball and smooth out with your finger until it evenly coats the area. You don’t need to use a lot here.

2. Take the end of your rope/string/twine and pin the end into the center of the glue area.

3. Hold the ball in one hand and the string in the other and turning the ball slowly, wrap the string around itself in a spiral. Try to keep your wrap flush against itself so that you can’t see the polystyrene below. The thinner your string the fiddlier this may be - use additional pins to hold the string in place here and there if you need too. (You can always remove them later.)

4. Once you get to the end of the glued area, apply another run of glue below the part you just finished wrapping, smooth out evenly and continue to wrap. It’s best to do this a little bit at a time, otherwise you will end up with a hot mess of glue and string.

5. Repeat step 4 until you reach the opposite end of the ball. It should be fairly simple until you get to the point where the ball starts to curve away again. Slow down when you get to this point as the string will likely try to slip down the Styrofoam. Use more pins to secure if need be.

6. Once you reach reach the end and all the ball is wrapped trim the string away, and secure the end of the spiral with one last pin. Allow to dry completely before using - any extra pins you put in should be easy to remove at this point.

Once you have the bauble made, the skies the limit in what you can do with them! Put a bunch in a bowl or vase as a table display. Make them into hanging baubles by tying a knot in a piece of looped string and pin through the knot into the top of the bauble (See below). Or my personal favourite, make them into a garland or festive mobile! What will you do with yours?

DIY | Wrapped Baubles by www.highwallsblog.comDIY | Wrapped Baubles by www.highwallsblog.com DIY | Wrapped Baubles by www.highwallsblog.comDIY | Wrapped Baubles by www.highwallsblog.com

thumb-threadholders

DIY | Animal Thread Organisers

DIY | Animal Thread Organizers | www.highwallsblog.com

So I decided to do something productive this week, I finally got around to sorting my (multiple) boxes of craft supplies. I’m not all that good at being ‘neat’ with my crafting. As soon as I’m done with a project, I am more likely to sweep everything into a box without actually putting anything away. Sure, it’s fast, but it also leads to everything ending up tangled and mangled. Not so cool.

I came across a box of string and rope and as you can well imagine, it was… a nightmare! The rope and thicker twine was easy enough to deal with, but I had a whole pile of embroidery thread that was in desperate need of organisation. A while back I spotted this awesome DIY String Organizer  over at the blog Little White Whale,  so obviously I decided to whip up my own version of the project for my horrible pile of mess.

DIY | Animal Thread Organizers | www.highwallsblog.comDIY | Animal Thread Organizers | www.highwallsblog.com

What You Need:
Multi-coloured card
Scissors
Thread/String
Marker

What You Do:
1. Cut rectangles from the card, these can be whatever size you prefer, Mine were about 10cm x 20cm

2. Make a small slit in the side, about 1cm from the bottom of the rectangle. This will serve as an anchor point for the thread. Cut another slit in the opposite side, this time around 3 - 4cm from the top. This will leave area for the head.

3. Cut out ears/head shapes from the space you made at the top of the rectangle.  Use a marker to draw on the face.

4. Sort the string and match up similar colours between the card animals and thread.

5.  Slide the end of the string into the cut at the bottom of the rectangle, anchoring it. Wrap the rest of the thread around the body of the animal (making a stripey beastie). Tie it off by tethering it into the other cut at the top of the body.

6. Admire your adorable and super organized menagerie of animals. These guys are easy to store away, and if you’ve kept similar colours together, you will easily be able to identify the correct shade at a moments notice. (You know, for those crafting emergencies)
DIY | Animal Thread Organizers | www.highwallsblog.comDIY | Animal Thread Organizers | www.highwallsblog.com

thumb-washitapestickers

DIY | Halloween Washi Tape Stickers

halloween-sticker-title

I’ve always wanted to get involved in the Halloween craze that hits the blogging world every October. I (unfortunately) don’t really get to celebrate the holiday, so it seems silly to carve a pumpkin or make elaborate Halloween decorations when I’m not really going to use them.  This year however, I finally had a solid reason to get into the spirit! A friend is holding a Halloween Party for her little ones, so after picking up a couple of gifts I thought it would be awesome to style the wrapping appropriately with some home made stickers.

My favourite craft ‘supply’ would have to be washi tape. Ever since I discovered it, I’ve been obsessed. I have a box full of the stuff and I use it for pretty much everything. The best thing about it is that it is strong, but not super sticky. Generally, it wont damage something if you stick it to it. It’s the perfect material for awesome, stripey stickers…

halloween-sticker-AWhat You Need:
Paper & Pencil
Washi/paper masking tape
Baking or parchment paper
Sharp scissors
Exacto knife (optional)

What You Do:
1. Start by choosing your sticker designs; You want images that are made up with block shapes. The more detail required, the more you are going to need to make intricate cuts in the sticker which will weaken the piece as a whole. Once you know what you want, sketch out your design, or find a template online and print out onto standard paper.

2. Place a piece of baking paper (or wax paper if you can get it) on top of your images and weigh down while you trace them onto it. Baking paper has one side that is slightly shiny and one side that is rougher - you want to draw onto the non-shiny side.

3. Flip the baking paper over (onto the shiny side) and, starting from one side of each image, stick down a strips of masking tape  so that they cover the image. Each strip of tape should overlap the previous piece. This ensures that your sticker holds as one whole shape. The tape should cover a little bit more than the template so you can trim away edges later.

halloween-sticker-B

4. When each shape is covered with layers of tape, you can cut out each sticker, trimming away the excess tape. Be careful as you trim as the tape may come away from the paper if you are not gentle.

5. Now you can make any finishing touches to your sticker. For example; I added a stem piece of different coloured tape to the top of the pumpkin sticker. Using an exacto knife or craft blade, cut away any interior pieces like eyes and mouths.

6. Your sticker is now ready to go! To use, just carefully peel the paper away from the tape layer side. Stick down on your chosen surface  and smooth down.

You can use these stickers where ever you like! On cards and gifts, stick onto card and use as decorative art piece, even use as a paint safe wall decal in your home! Basically, you can stick them pretty much anywhere! Go nuts!

halloween-sticker-6 halloween-sticker-5

DIY | Leather Tangram Coasters

tangram

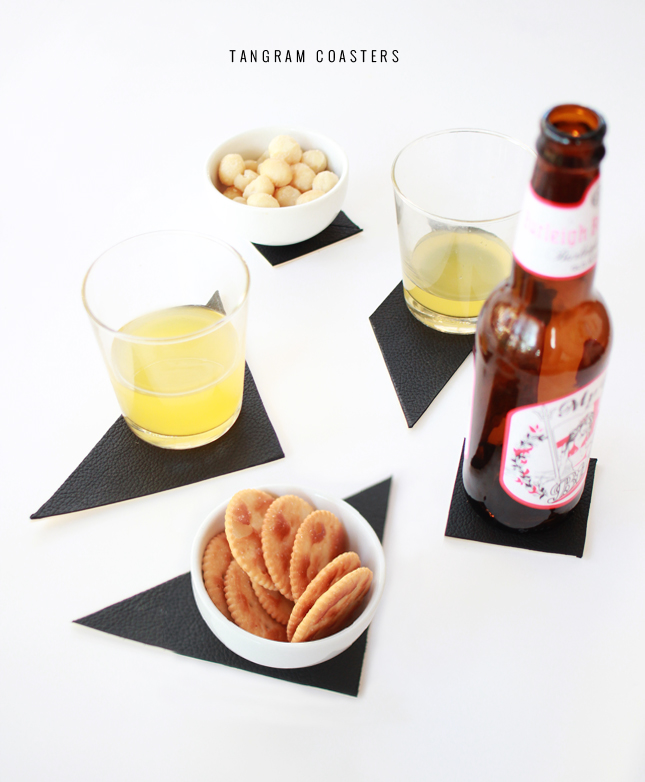
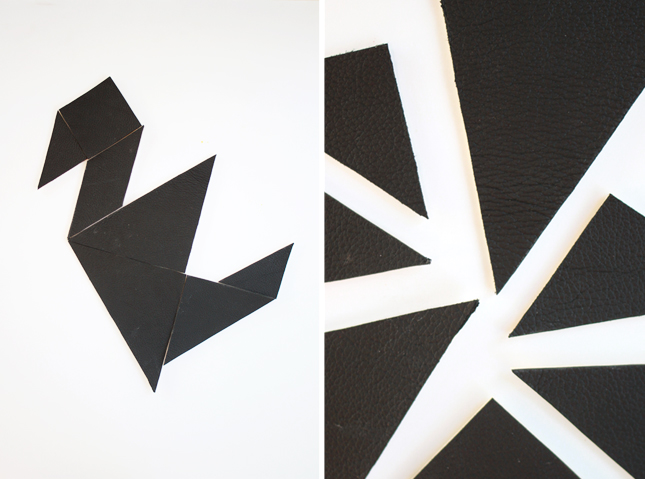
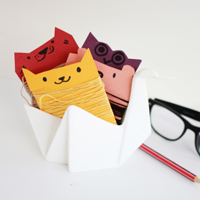
Raise you hand if you remember tangram puzzles. You know the ones I mean? No? Okay, well, a tangram is a dissection puzzle made up of seven shapes, which can be put together to form different shapes. You start with the pieces put together to make a square and you need to rearrange them to form a specific shape using all seven pieces, without any pieces overlapping (they look like this.) So anyway, I love these things! Hours of entertainment (mainly because I’m not very good at solving each puzzle, but who cares, right?) I was thinking, they would make pretty sweet coasters. You can put them together to make a larger coaster area for bowls and dishes, or keep them separate for cups and bottles!

Unfortunately, I only had a small amount of leather for this DIY, so my coasters are a touch smaller than I would have liked, but they still get the job done. Backed onto an old table place mat and you have the perfect materials to make your own clever coasters!
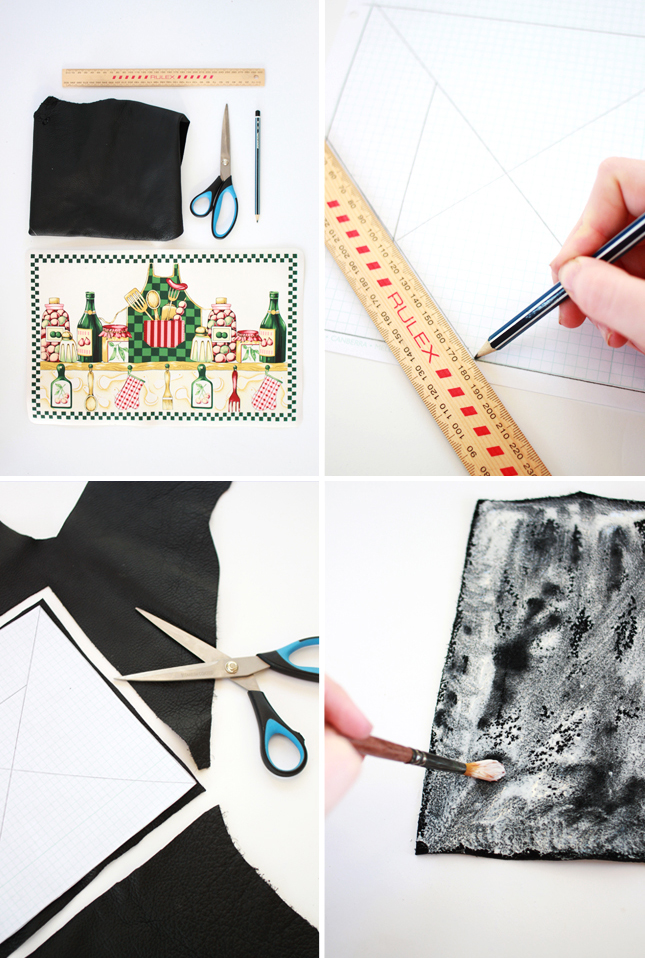
tangram1

What You Need:
Leather
Place Mat
Craft Glue / Mod Podge
Sharp Scissors
Pencil
Ruler

What You Do:
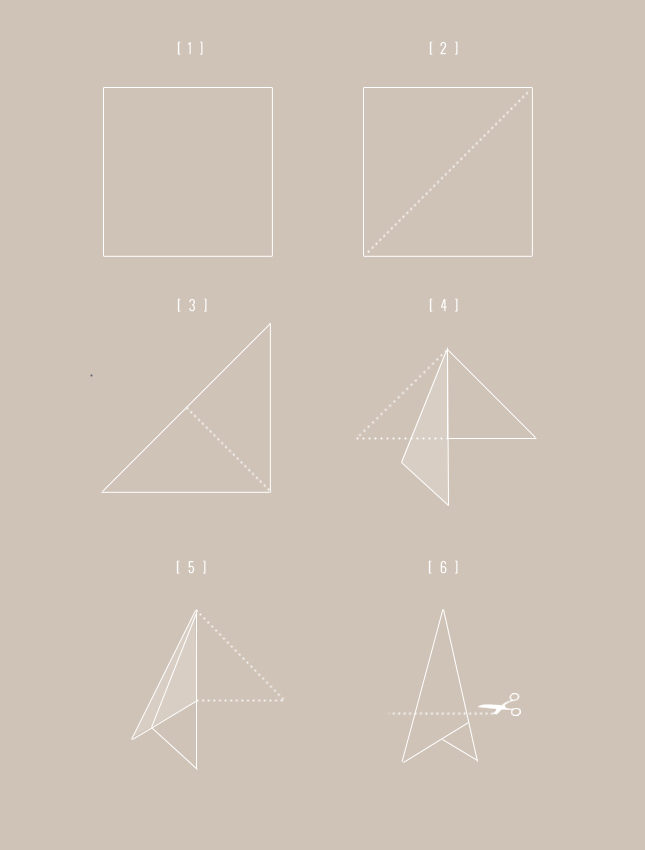
1. Draw or print out a template for your puzzle. I used grid paper to draw mine out easily, but if you prefer you can use this image as a guide.

2. Using your template as a guide, cut out a square of leather, around 1cm bigger than your template.

3. Apply a generous coating of glue to the back of the leather, making sure you cover right to the edges. You want to make sure that the leather sticks down properly so don’t be afraid to use a lot of glue.

4. Stick the leather down onto the face of the place mat. Using a ruler smooth the leather down, making sure there are no air bubbles. Clean away any excess glue from the leather face.

tangram-2
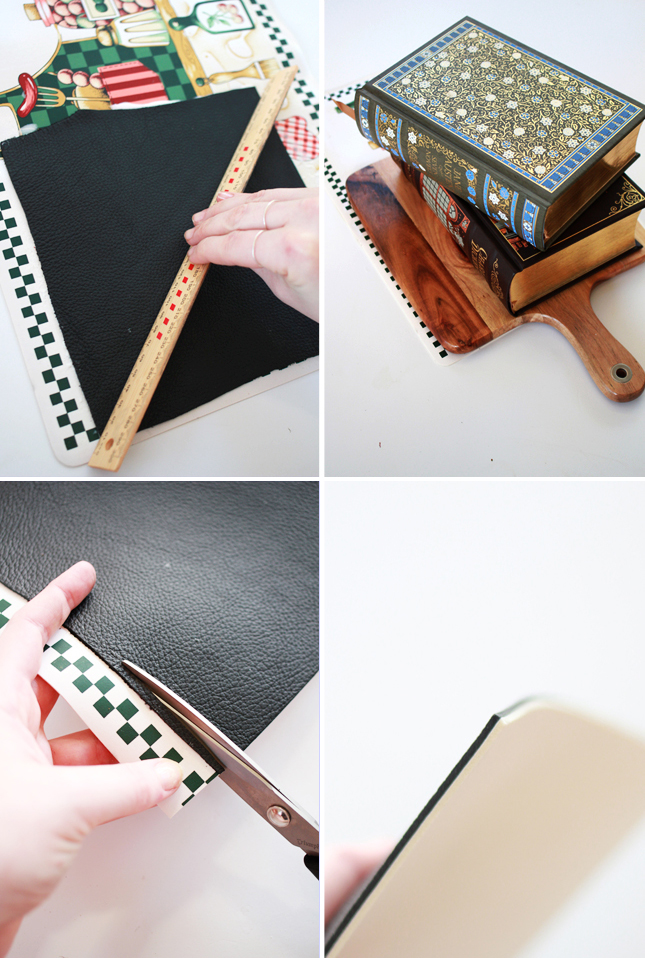
5. Set aside to dry and weigh down with something heavy. I used a couple of books and a chopping block (that was the same size as the leather). Leave to dry completely overnight.

6. Once dry, gently trace the outline of the square with a pencil and cut out, trimming away the excess leather and mat.  This will leave you with clean edges rather than if you had cut out two separate squares and glues them together.

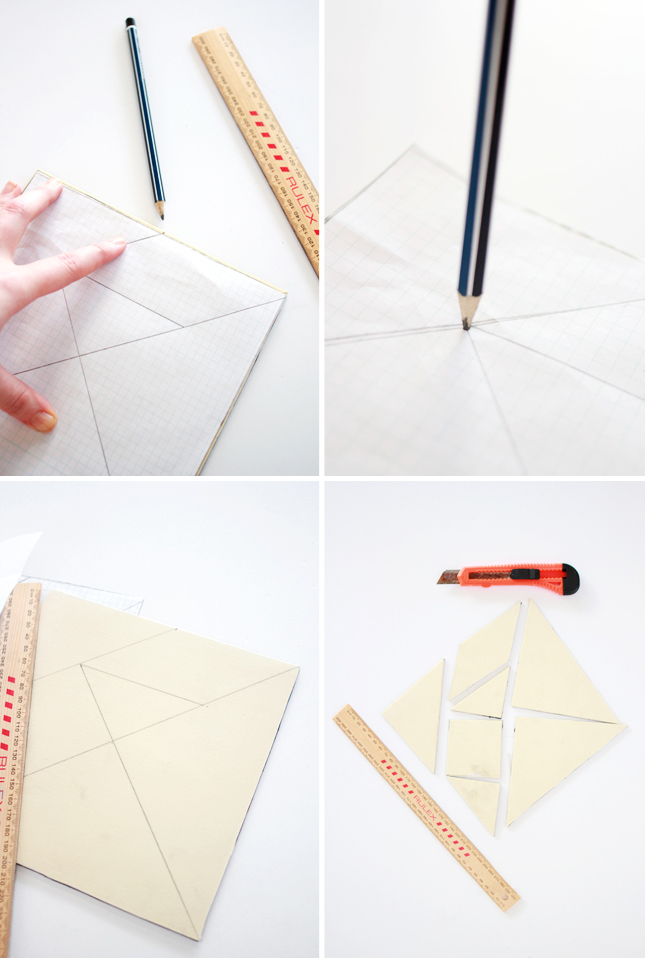
7. Line up your paper template on the back of the square (the place mat side) and mark where the each line intersects. You can press through the paper to mark the line joins in the center of the square. The rubber mat will not be damaged by doing this.  Once you have marked each spot, use a ruler to draw out the lines.

8. Take your scissors (or a very sharp blade)  and carefully cut out each piece of the tangram.

9. If you have any pencil marks left on the back of your pieces, you can clean them off by spraying a cloth with windex and wiping smudges away.

tangram-3

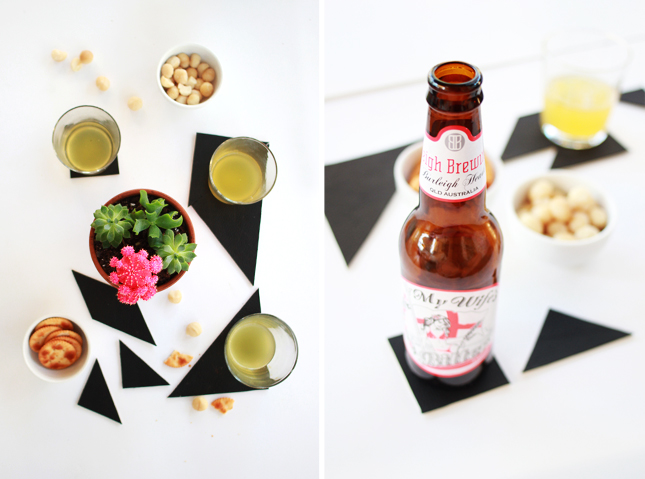
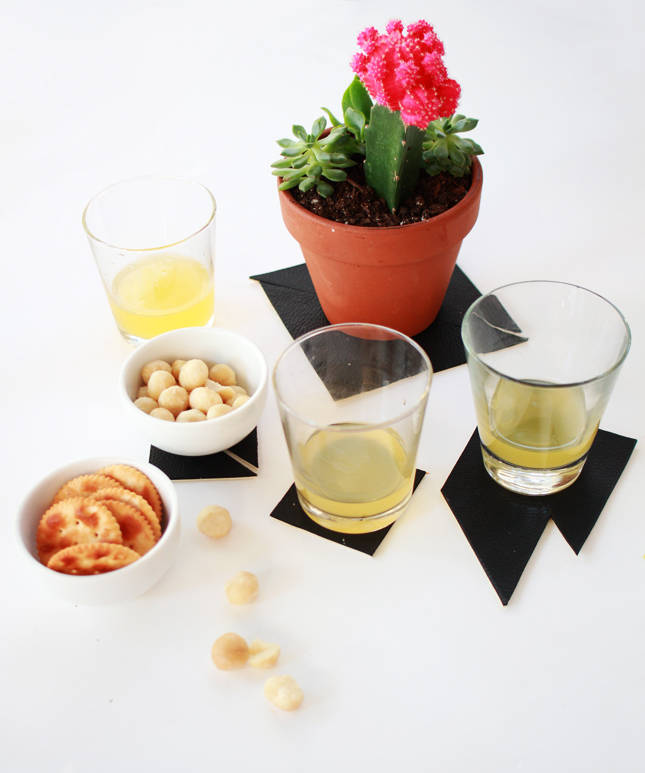
My favourite thing about these coasters is that I can play with them while having drinks. I’m totally that person who is always fiddling around with coasters, or attempting to peel the label of my drink bottle. It’s not even that I’m bored, I just cant help myself sometimes! I’m like a little kid who needs to be constantly entertained! These coasters have been perfect for not just keeping me entertained, but actually pretty fun for when we have guests over as well!

tangram7tangram8tangram9

Redesigned Gift Boxes for Drifter & The Gypsy

Redesigned Gift Boxes for Drifter & The Gypsy | www.highwallsblog.com

My local craft store had a bunch of little boxes marked down after a toddler with a marker rampaged through their gift wrapping aisle. A bargain for sure, but I obviously needed to make them a little more presentable before using them.

The easiest way to freshen up cardboard boxes is to cover them with some paper and washi tape. Its super quick and you can make a whole set of matching boxes without having to go out and purchase new ones when you already have perfectly good boxes in your home.

Head over to Drifter & The Gypsy to see the full instructions ! 

Redesigned Gift Boxes for Drifter & The Gypsy | www.highwallsblog.comRedesigned Gift Boxes for Drifter & The Gypsy | www.highwallsblog.com