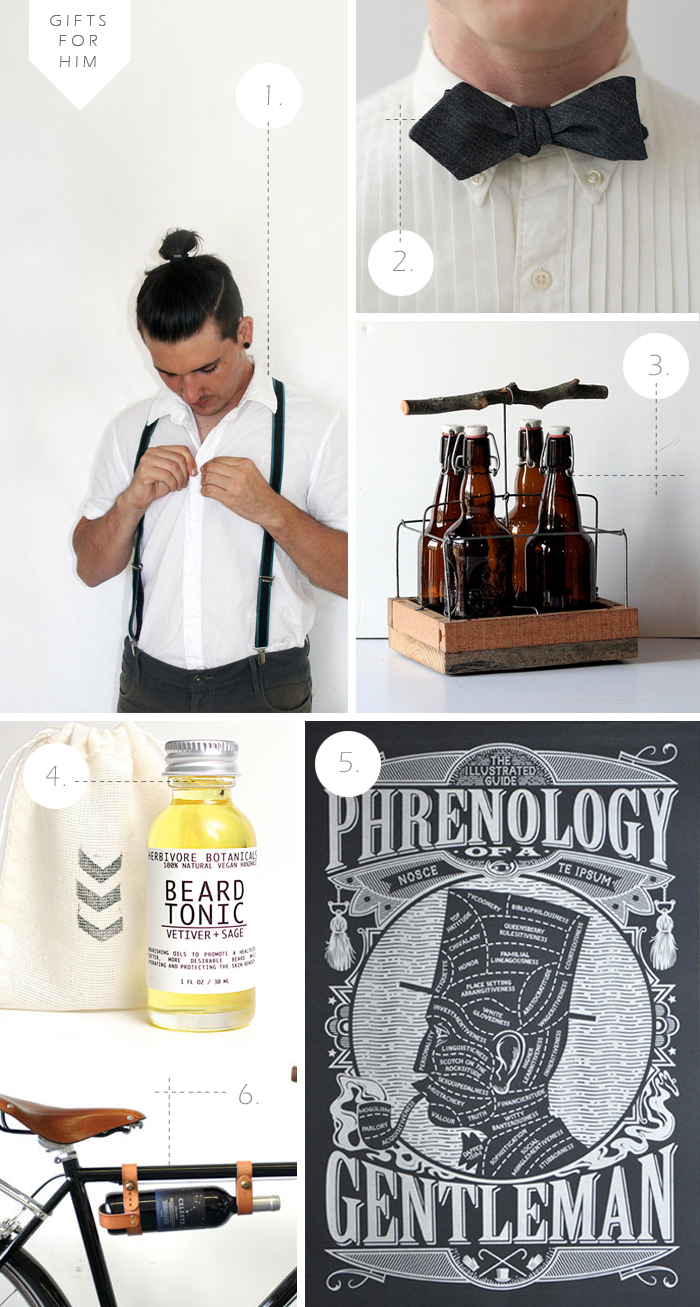
Boys are notoriously difficult to shop for. There’s only so many times you can buy computer games or sports paraphernalia before it starts getting old. You want to add a touch of sophistication to this years Christmas gifts? Looking for something with a little more class and panache? Well, here is the Etsy gift guide you’ve been looking for, chock-a-block full of gentlemanly ideas of gifts to purchase for that special guy in your life!
ONE / Uni-sex Suspenders / Studio Lana / $35
TWO / Dark Wash Denim Bow Tie / Preston & Olivia: New York / $50
THREE / Handmade Twig 4 Pack / Frick and Frack Scrap / $31
FOUR / 100% Natural Beard Tonic / Herbivore Botanicals / $13
FIVE / Phrenology of a Gentleman Poster / Maiden Voyage Clothing /$12
SIX / Bicycle Wine Rack / Oops Mark/ $34
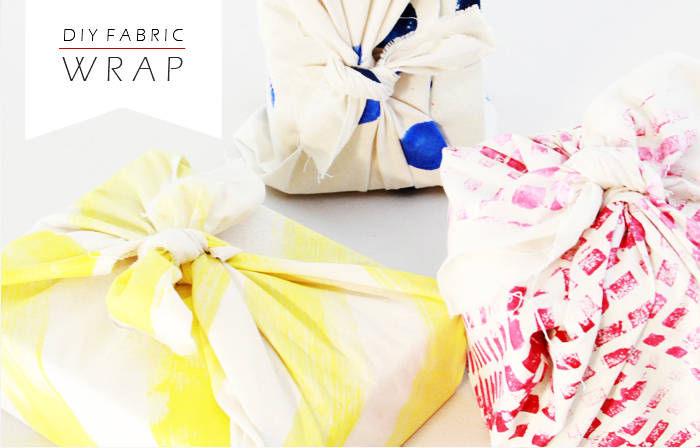
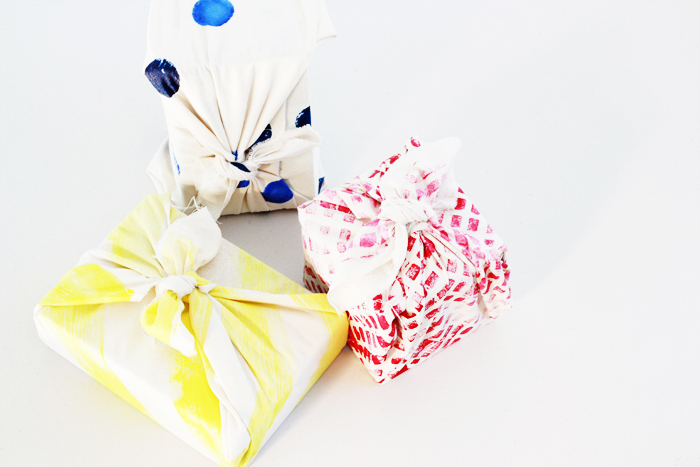
Ever since I went to Japan, I’ve been obsessing over fabric wraps, in particular, for gift wrapping. There are so many different ways to gift wrap presents, but fabric wraps still seems to be one style that doesn’t get used anywhere near as much, which is a shame considering what an art form it can be! Using fabric to wrap your gifts is also a little friendlier for the environment, as they can be used again and again, or even kept to be used as scarfs or linen.
These wraps can definitely be made to last. If you want to go out and purchase some fabric inks and nice material, you’ll make a long lasting gift within a gift. For me however, I chose to use what I had on hand, which still turned out beautifully, but probably wont last the distance long term.
What You Need:
Plain Calico or cotton fabric – as much as you might need to make a few large squares. I got around 2m
Fabric Dye/Paints – I used acrylic paints which worked just as well.
Painting tools – sponges, stamps, brushes etc
What You Do:
1. Take your fabric and cut into large squares. The size of your squares will depend on what you’re wrapping. I made mine around 50cm x 50cm.
2. Iron your fabric so that there are no creases and lay out on a flat surface with paper underneath to catch any bleed through.
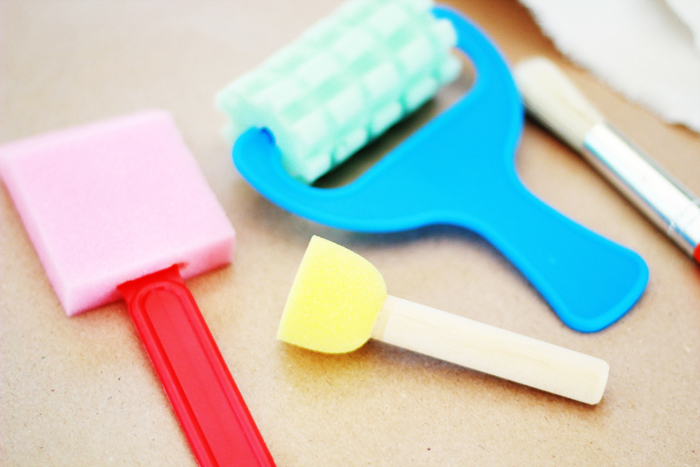
3. Prepare your painting tools; I picked up a kids packet of ‘painter starter kit’ which had a mini textured roller, round sponge stamp, paint brushes etc for about $4. But if you have stamps or shapes you want to use go for it! Pour out a dollop of paint/ink onto a flat pallet and load up your chosen painting tool. Test each one on a scrap piece of fabric until you have even coverage in your pattern.
4. Once you feel confident to start, begin from one side of the fabric creating an even pattern along one edge. Repeat until you reach the alternate side and the whole piece is patterned.
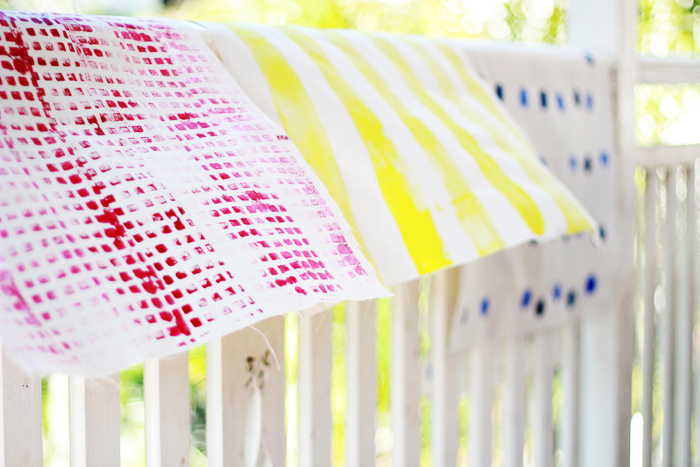
For my three fabrics I chose three patterns:
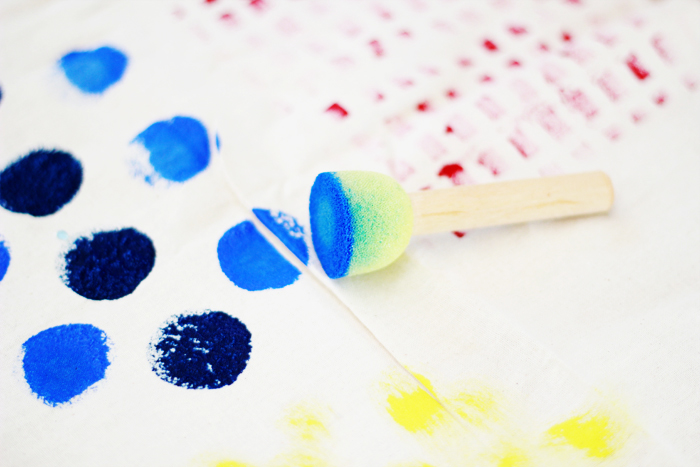
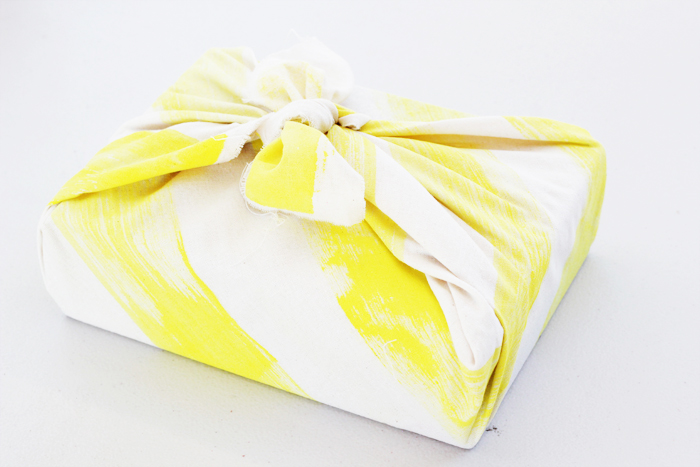
Yellow stripes - Painted by loading up a large flat sponge brush with paint and dragging across the fabric letting it run out as I went across to create a textured line.
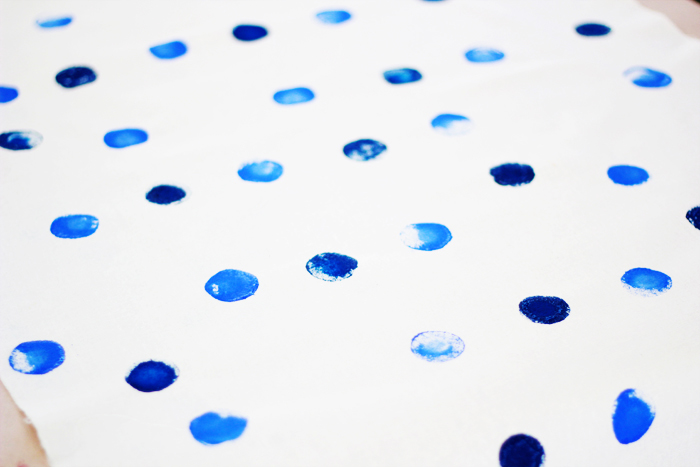
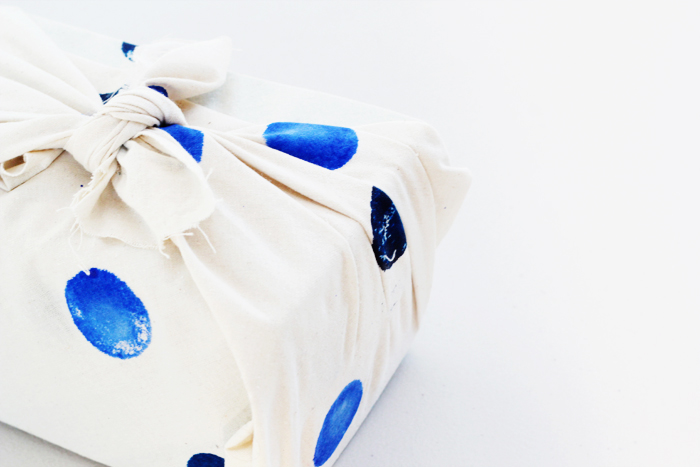
Blue Spots - I chose a light and a dark blue and created even spaced spots across the piece in the lighter colour. I then went back through and added the darker spots here and there.
Pink & Red texture - Using the textured roller, I created a textured effect starting from the middle of the fabric, making the colour lighter as I moved out (by adding a little white paint to the red each time I completed a line)
5. Hang the fabric out to dry. Leave until the paint/ink has completely dried. You can then iron the piece (using a protective sheet so that the paint doesn’t come off on your iron) to set the prints.
6. If you would like to hem the edges of the fabric, now is the time to do so. I liked the raw edges, so I left mine as they were (fraying bits and all!)
You can now wrap your gifts using your super awesome new fabric wrap! There are many great sites out there that can show you how to wrap gifts using material (check out Chewing the Cud) I used a pretty basic method of wrapping a simple box.
1. Lay the wrap face down and place the box in the middle.
2. Take the diagonally and tuck it around the box.
3. Take the opposite end and bring over the top, folding in the edge to line up with the edge of the box.
4. Gather together to two remaining sides and pull towards the middle of the box. Knot together and spread out the ends to make a ‘bow’ look.
What do you think? Will you give gift wraps a try this festive season?
Growing up, we were always encouraged to make homemade gifts instead of spending lots money. As a child I was never able to think of something that I could make that could compare, in my young mind at least, to a store bought gift. Now that I’m all grown up I’ve learnt to appreciate the value of something homemade, and as my parent’s before me, I hope to instill this quality in the younger ones in my life. Starting with my god daughter and her brothers and sisters.
My best friend lives in my hometown with her little family, so I only get to see them when I visit a couple of times a year. I’m determined to be the cool ‘auntie’ who brings awesome presents when she visits, but it’s hard when you don’t get to see the little ones very often. I never know what to get them! But this year I think I’ve nailed it! I figure pretty much anything with sweets involved is going to be a winner with kids and although their mother is probably going to kill me for supplying them with this much sugar, at least it’s ultimately a useful gift…
What You Need:
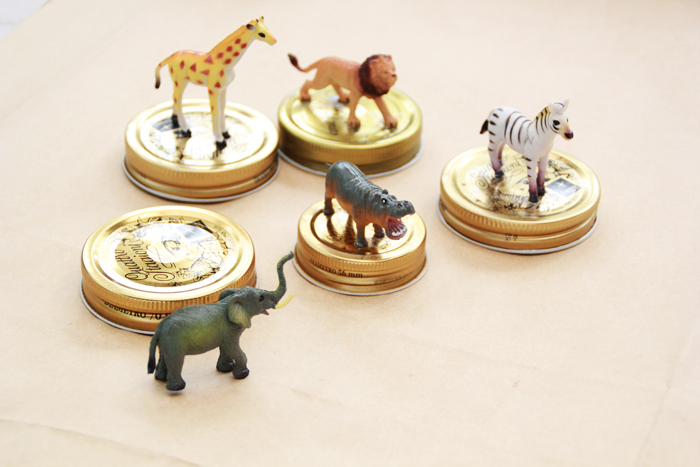
Various sized Jars (I used mason jars, but any screw top jars will do)
Small Toy Animals
Spray Paint in colour/s of your choice
Sealer or Top Coat (optional)
Sealer or Top Coat (optional)
Delicious Fillings
Paper/drop sheet
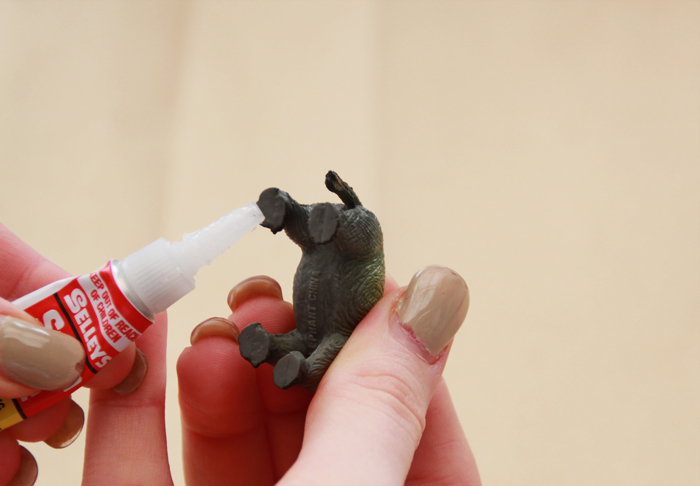
Superglue
Paper/drop sheet
Superglue
What You Do:
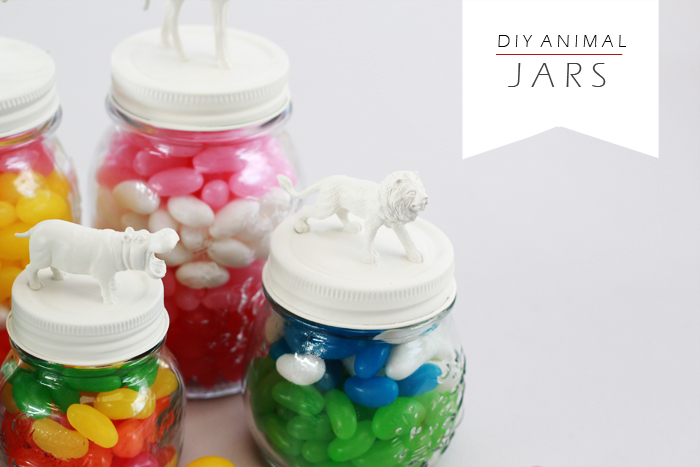
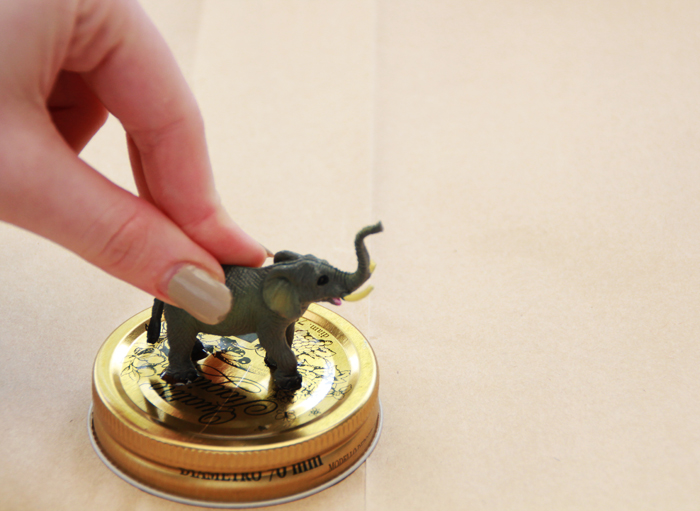
1. Take your toy animals and arrange them on your jars to your liking. Try different combinations until you are happy with the combinations of jar and animal sizes.
2. Remove the Jar lids and carefully glue the base/feet of the animals, pressing down firmly for 30 seconds. Allow to dry completely.
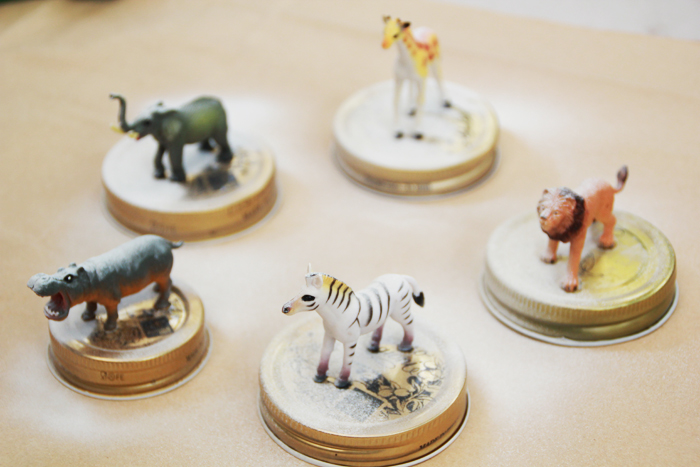
3. Place the animals/lids evenly spaced out on your paper/drop sheet. Shake the spray paint well and cover each lid/animal with a light even coating of paint. If you are painting your animals different colours you may want to do a base coat of white paint before moving onto the colour.
4. Once your animals/lids are a clean white colour - roughly 2-3 coats (and are completely dry) you can start on your colours if you so choose. I decided to keep my animals white so that the fillings really pop with colour! Allow the paint to dry completely in between coats and ensure each coat is light and even. Be patient.
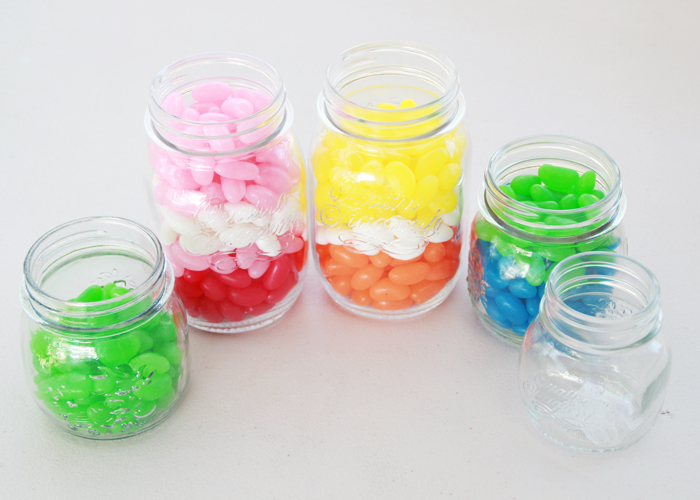
5. Once you have achieved the depth of colour you are after, now is the time to add your top coat if you have it and allow the animals/lids to dry overnight. Once dry you can fill your jars with whatever you like and screw your animals back onto the jars. Voila! You’re done!
2. Remove the Jar lids and carefully glue the base/feet of the animals, pressing down firmly for 30 seconds. Allow to dry completely.
3. Place the animals/lids evenly spaced out on your paper/drop sheet. Shake the spray paint well and cover each lid/animal with a light even coating of paint. If you are painting your animals different colours you may want to do a base coat of white paint before moving onto the colour.
4. Once your animals/lids are a clean white colour - roughly 2-3 coats (and are completely dry) you can start on your colours if you so choose. I decided to keep my animals white so that the fillings really pop with colour! Allow the paint to dry completely in between coats and ensure each coat is light and even. Be patient.
5. Once you have achieved the depth of colour you are after, now is the time to add your top coat if you have it and allow the animals/lids to dry overnight. Once dry you can fill your jars with whatever you like and screw your animals back onto the jars. Voila! You’re done!
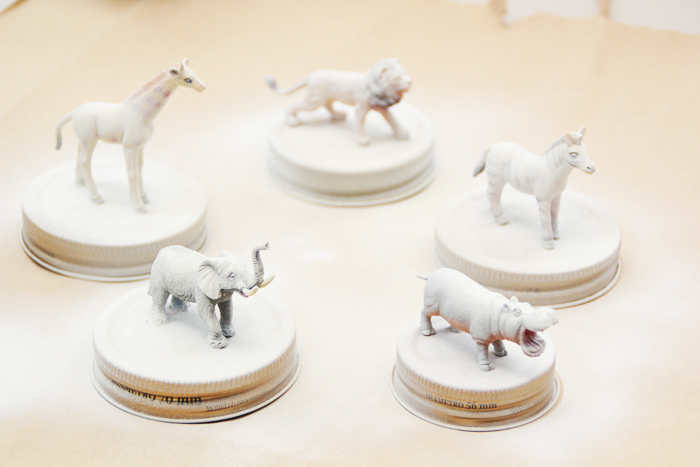
I love how the animals look after the first coat of white. It’s like they got caught in a snowstorm with little patches of their stripes and spots peeking through.
My whole house smelt like jellybeans the day I put these together. I had the spread out in piles on our dining table, I felt like a little kid sorting them into their colours - it was so much fun! Honestly, I had a little too much fun in general making these guys. Now my biggest problem is that I kind of love them where I have them sitting on my shelf waiting for Christmas. I’m probably going to have to make some for myself!
[Image Via: Paper n Stitch]
With Christmas just around the corner (and maybe some office Secret Santa’s or Gift Swaps to start shopping for) I thought I’d share some tips that I have learnt for buying the perfect gift. Now, I don’t like to blow my own horn, but I’m pretty awesome at buying gifts. I would even go so far as to say that its kind of ‘my thing’. This certainly isn’t due to any hidden gift giving talents. I’m no more insightful than the next person, but I have some clever tricks to ensure you’re always buying your loved ones something they’ll really enjoy and not just candles or socks this Christmas.
1. LISTEN
So, this sounds pretty basic, but I know so many people who don’t do this. Listen to the people you care about; what do they like? What are their interests? And I don’t mean just around Christmas or birthdays, I mean all year round. If a loved one mentions that book they’ve been wanting to read or that hobby they’ve been wanting to get into, I open up the notebook app (or even a draft message) make a quick note in my phone. Something like “Tom - Carl Sagan book” and save it for later. The best thing about doing this is that it just looks like you are sending a text message so your target is none the wiser and you have a handy reminder for later.
Speaking of which…
2. Set Up Reminders
In your phone, on your computer, in your calendar. Put a reminder in for the most important people’s birthdays. Not just for the day itself, but a few weeks in advance. This way you will know that birthday is coming up and have ample time to plan what you want to buy for that special someone. Especially if you are like me and you do a lot of your shopping online, you will appreciate the extra time when there is a 2 week wait on shipping!
3. Use Online Searches
And I don’t mean Google; sites like Ebay and Amazon are a veritable treasure chest of items you’ve never even thought of! Whenever I am stuck for gift ideas I head over to Ebay and start searching topics that my recipient might enjoy. Try names of television programs, hobbies, favourite actors or even general items like ‘leather bag’ and see what comes up! I can’t count how many times this has saved me when I was out of inspiration!
4. Bookmark it!
So you come across the perfect art print for your mum on Society6 and you think, ‘oh I should buy this for her birthday!’ But her birthday is months away and you’re a bit poor until payday, so you decide you’ll come back later, closer to the date and get it then.
No, you wont. You’ll forget and then when it comes time to buy her a gift you’ll be sitting there thinking ‘now what was that thing I saw back in June…?’ Bookmark that shit! And don’t let your bookmarks get lost in between links to funny pictures of cats… I have a ‘Buy’ Folder set up, with sub-folders for each of my family members/housemates/close friends. I save anything cool I see in these folders over the year, so when it approaches Christmas or Birthdays I can just open up the relevant folder and browse a ready made list of gift ideas. Just remember to name your bookmarks as what they actually are, (ie: ‘Owl Measuring cups from Anthropology’) instead of the default name so that if you come across a broken link when you come back, you can Google the item and try to find it elsewhere.
5. The Final Test
Many people may disagree with this last tip but it’s my number one rule: Buy something that you would like to receive. This doesn’t necessarily mean that you should buy something to your own taste, but if when you put yourself in the recipients shoes, would you be happy to receive this gift? This is my final test when deciding on gift purchases. Even though tastes may differ, when someone can see the thought and care that has gone into a present, even if it’s not something they would have bought for themselves, chances are they are going to enjoy it regardless. Some of the best gifts I have ever received were items that I would have never in a million years picked out for myself, but I could see the love and thought that went into the purchase and that made me cherish the gift all the more.
So there you have it. Nothing ground breaking or crazy, just some simple ideas that will hopefully help you get through this festive season.
OMG. My first DIY! I wanted to get the happy couple something special for their wedding gift as they are pretty important to me. They have lived together for a while now, so they certainly didn’t need any toasters or punch bowls, so I was on the hunt for something original. I had seen similar cartography sets around online, but most of them were selling for more than I wanted to spend. Then it dawned on me how easy it would be to make one myself, and how much more it would mean being handmade…
SAY HELLO!


FEATURE POSTS


SUBSCRIBE