#Hashtag

hashtag-blackandwhite1(img source )

I’ve recently taken to browsing hashtags on Instagram. As much as Instagram can be full of selfies and re-posted memes, there are also some amazing artists and photographers who have created an art form through the lens of their smart phones. With the simplest of words, a quick hashtag search gives you a ready made collected of themed images. I thought I would share some of my favourites I have found. While it can be argued that taking a photo in black and white makes everything look better, the hashtag #blackandwhite really does have some striking images. What do you think? Do you ever go hashtag browsing?

hashtag-blackandwhite0(1234)

thumb-housecutout

Cut Out Art

DIY Cut Out Art | www.highwallsblog.com

Sometimes you come across something and you think ‘oh my god! I must have this!’ Maybe you see it in a magazine, or on TV. Somewhere there are no handy links to where you can pick one up yourself. So you cry. Curse the heavens for bestowing such sorrow on your life. Then you realise you’re being a little melodramatic and really, if you think about it, that thing you wanted so bad is really quite simple. You could probably make one yourself, so stop whining about your stupid first world problems and get off your ass and make one! You quietly wonder when you started being so mean to yourself, but come to the conclusion that you’re probably right…

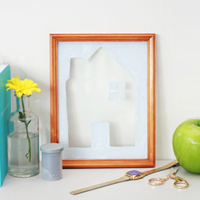
So maybe this happened to me recently. I spotted this adorable house art piece in a friends house. It was basically a little frame with a house cut out of a white board so the house shape was transparent. I was instantly smitten with the simplicity of the piece and demanded to know where she got it from. As always seems to happen when you ask someone where they got something, she had been gifted the piece from her husbands family (overseas family no less!) Feeling a little disappointed, I vowed to attempt my own, home made version.

DIY Cut Out Art | www.highwallsblog.com DIY Cut Out Art | www.highwallsblog.com

What You Need:

An old photo frame
Plain white paper or stock card
PVA Craft Glue
Super Glue
Pencil
Craft Knife
A clean, damp Cloth
Window Cleaner
Cotton Bud/Cotton Swabs

What You Do:

1. Choose an old photo frame to use, ensuring that it still has the glass. I picked up a frame from my local thrift store for a couple of dollars. I chose a frame that had the proper tacks and framing tape instead of the re-usable frames as it meant it was a little cheaper and  as we are discarding the backing of the frame, you don’t need the stand part anyway.

2. Carefully remove the backing from the frame. Take away any tape, staples, tacks etc so that all you have is the wooden frame part and the glass panel.

3. Separate the glass from the frame and give the panel a good wash in warm soapy water. Dry thoroughly making sure that there is no water or dust residue left on the glass.

4.  Take a piece of white paper or card stock and cut to match the size of your glass panel. With a pencil, lightly sketch out the shape you would like to cut out. I decided to stick with the house shape, but you can really do what ever you want here. Using craft knife carefully cut out your design and erase any pencil marks left.

5. Take you glass panel and, using a paintbrush, coat all the areas that the paper will cover with an even coat of glue. Be generous, but ensure that the coat is even all the way across. Dont worry if your glue covers more that the paper does.

6. Carefully, starting from one corner of the glass, line up the paper cut out onto the glass panel. Smooth out the paper against the glue as you go, ensuring there are no air bubbles as you will be able to see these from the other side of the glass. Once you are happy with the positioning and you are sure there are no air bubbles visible, coat the paper with a generous coat of glue.

DIY Cut Out Art | www.highwallsblog.comDIY Cut Out Art | www.highwallsblog.com

7. Take a clean cloth and dampen with warm water. Carefully and gently use the cloth to clean away glue from any areas of glass that are not covered with paper. Don’t worry to much about the immediate edges and light smudges for now. Once you have cleaned the bulk of the glue, leave until the glue and paper are completely dry (Overnight if possible)

OPTIONAL STEP: If you find that your paper has dried a little transparent, paint a couple of layers of acrylic paint over the paper to ensure you have a nice opaque finish.

8. Once dry, take a cotton ball and cotton swab and spray with  Windex or any similar glass cleaner. Gently wipe the clear areas of glass until completely clear. Use the cotton swab to go around the edges.

9. Using super glue, run a line of glue around the inside of your frame and press the glass panel back into it with the paper side facing inwards (so it will face the wall when you display it). Make sure the glue is not visible from the front and allow to dry.

10. Flip over to see your finished piece. If required clean off the front of the glass with some more window cleaner and prop your art piece up on a table or shelf. Admire how brilliant you are.

DIY Cut Out Art | www.highwallsblog.com

I’m all about clean lines and simple design (as I’m sure you would have picked up from reading this blog), but I’m also inherently lazy. I like low maintenance additions to my home. While the original was simply a frame and some thick card, I opted to make something a little more sturdy and (hopefully) something that will last the distance and be easy to clean.

Another way you can complete this project would be if you had two frames the same size. Instead of gluing the paper to the glass what you can do is sandwich the paper between the panels from the two frames and glue together. However this will rely on you purchasing two frames the same size, which could be difficult if you go the second hand route like I did. You can also rig your piece to hang if you ensure that your hanging wire or hooks are also white and will be covered by the paper.

 The best part of this piece is the transparent ‘cut out’. I love the effect it gives, the white background, especially against a white wall is so subtle and effective. But then again, I’ve always been a sucker for a bit of minimalism art :)

thumb-xmascake

White Christmas Cake

White Christmas’s are not really something we have in Australia. Christmas day falls in the middle of Summer, so usually our Christmas day involves a lot of seafood, swimming and relaxing in the heat. It’s nice, but it doesn’t mean I don’t sometimes wish I could have a ‘traditional’ snowy Christmas like in the movies. With this in mind, I thought I’d make something a little festive this close to Christmas.

Now, I’ve never been super great at decorative icing on cakes. Hell, I only just mastered getting an even, smooth icing! But I found this adorable little fondant Christmas tree at my local supermarket and I couldn’t resist putting together a little scene. The teeny tiny deer is made of glass. I picked him up from some Christmas markets when I was in Paris a couple of years ago. That trip was the closest I’ve ever come to having a white Christmas. It was the beginning of December, so everywhere was in full festive mode in preparation for Christmas. It only snowed briefly but as it is the one and only time I have ever even seen snow, it is a time I will never forget!

For my first attempt at a Christmas Themed cake, I’m pretty happy with how it turned out. The cake itself is a delicious vanilla cake, but the butter cream icing makes it that little bit decadent. It certainly didn’t last long in my house (admittedly, I think I ate the most of it though!) My favourite thing about it is that it made me feel like I have a little piece of white Christmas in my house, even if it is 30 degrees outside.

What You Need:
For the Vanilla Cake - 
5 large egg whites
¾ cup of whole milk
2½ teaspoons of pure vanilla extract
2½ cups of sifted plain flour
1¾ cups of sugar
1 tablespoon and an additional 1 teaspoon of baking powder
¾ teaspoon of salt
¾ cup of unsalted butter

For the Icing -
1½ cups plus 2 tablespoons of softened butter
3½ cups of sifted icing sugar
3 tablespoons of milk
1½ teaspoons of pure vanilla extract
A pinch of salt
Extra icing sugar for decoration

What You Do:
1. Preheat your oven to 180 degrees and grease two round cake tins.
2. Whisk together the egg whites, ¼ cup of milk, and the vanilla and set aside.
3. Place the dry ingredients in a large bowl and mix until combined. Add in the butter and the remaining ½ cup of milk. Mix with an electric beater on low speed until just moist. Increase the speed to medium and mix for a further 1½ minutes.
4. With the beater on medium speed, add the egg mixture in 3 separate parts, beating for 20 seconds after each addition.
5. Divide the batter evenly into the cake tins and bake in the oven for 20-30 minutes or until a toothpick inserted into the center comes out clean.
6. Allow to cool in the tins for 10 minutes before loosening the sides of the cakes with a knife and remove to cool on wire racks. Ensure the top of the cakes are facing up and leave to cool completely.
7. For the icing; In a large bowl whip the butter on medium speed until pale and creamy, about 8 minutes.
8. On low speed, add in the remaining ingredients and mix for 1 minute. Increase the speed to medium and continue to whip until the icing becomes light and fluffy (about 6 minutes.)
9. To assemble the cake, place the bottom cake layer bottom/flat side down on a plate. Spoon about 1 cup of icing into the center and spread evenly across the cake with a spatula.
10. Gently place the 2nd cake layer top/rounded side down onto the first layer. Place a small amount of frosting on top of the cake and create a crumb coat by spreading a thin layer of icing over the top and sides with a spatula or butter knife. Place in the refrigerator and chill for about 30 minutes.
11. Remove the cake from the refrigerator and spread the rest of the icing evenly over the top and sides. I dusted the cake with icing sugar and used torn up mini marsh-mellows to create the snowy effect. Place the cake back in the refrigerator and chill for another 30 minutes prior to serving.
Enjoy on Christmas day with your loved ones, or if you’re me, enjoy it a week early and wish it would snow where you are!

Almost There…

[ 1, 2, 3, 4, 5, 6 ]

Hey you guys, it’s almost Christmas! My December of Christmas adventures hasn’t really gone according to plan. As always seems to be the way when I’m feeling extra inspired, I have been crazy busy with work over the last week or so. After Blogshop last weekend I have been so extra pumped to work on my posts and layout. Not having time has been so frustrating!

Never mind, this week is my last week at work  while we shut down for a couple of weeks over Christmas. I’m finally getting back into the Christmas Spirit. I’m the biggest fan of Christmas so it feels good to be getting excited all over again. We put up our tree recently and decorated the living room. All of my decorations seem to have ended up in shades of white, silver and gold this year. Seems as though, even though there is no chance of snow here in Australia, I’m pining for a white Christmas.

thumb-animaljars

DIY Animal Jars

Growing up, we were always encouraged to make homemade gifts instead of spending lots money. As a child I was never able to think of something that I could make that could compare, in my young mind at least, to a store bought gift. Now that I’m all grown up I’ve learnt to appreciate the value of something homemade, and as my parent’s before me, I hope to instill this quality in the younger ones in my life. Starting with my god daughter and her brothers and sisters.

My best friend lives in my hometown with her little family, so I only get to see them when I visit a couple of times a year. I’m determined to be the cool ‘auntie’ who brings awesome presents when she visits, but it’s hard when you don’t get to see the little ones very often. I never know what to get them! But this year I think I’ve nailed it! I figure pretty much anything with sweets involved is going to be a winner with kids and although their mother is probably going to kill me for supplying them with this much sugar, at least it’s ultimately a useful gift…

What You Need:
Various sized Jars (I used mason jars, but any screw top jars will do)
Small Toy Animals
Spray Paint in colour/s of your choice
Sealer or Top Coat (optional)
Delicious Fillings
Paper/drop sheet
Superglue

What You Do:
1. Take your toy animals and arrange them on your jars to your liking. Try different combinations until you are happy with the combinations of jar and animal sizes.
2. Remove the Jar lids and carefully glue the base/feet of the animals, pressing down firmly for 30 seconds. Allow to dry completely.
3. Place the animals/lids evenly spaced out on your paper/drop sheet. Shake the spray paint well and cover each lid/animal with a light even coating of paint. If you are painting your animals different colours you may want to do a base coat of white paint before moving onto the colour.
4.  Once your animals/lids are a clean white colour - roughly 2-3 coats (and are completely dry) you can start on your colours if you so choose. I decided to keep my animals white so that the fillings really pop with colour! Allow the paint to dry completely in between coats and ensure each coat is light and even. Be patient.
5. Once you have achieved the depth of colour you are after, now is the time to add your top coat if you have it and allow the animals/lids to dry overnight. Once dry you can fill your jars with whatever you like and screw your animals back onto the jars. Voila! You’re done!
I love how the animals look after the first coat of white. It’s like they got caught in a snowstorm with little patches of their stripes and spots peeking through.


My whole house smelt like jellybeans the day I put these together. I had the spread out in piles on our dining table, I felt like a little kid sorting them into their colours - it was so much fun! Honestly, I had a little too much fun in general making these guys. Now my biggest problem is that I kind of love them where I have them sitting on my shelf waiting for Christmas. I’m probably going to have to make some for myself!

Oh Etsy: 29.08.12

Sometimes a girl just needs a touch of gold… Even though I prefer silver most of the time, every now and then I start craving a bit of shiny gold in my life. When done right (as these examples show), a touch of gold can bring that little bit of je ne sais quoi to an outfit or room, especially with my staple favourites: white and greys. Beautiful!

ONE / Black and Bowl Paper Mache Bowletco / $13
TWO / Great Gatsby Original 1930’s ShoesMiss Farfalla / $135
THREE / Gold Nuggets NecklacePetitor / $27
FOUR / Aya Metallic Gold & Natural Handprinted PillowsMeLongings Studio / $70
FIVE / Vintage Brass NecklaceJulie Garland Jewelry / $27

Monochrome

Hoo boy! What a week! Work and social life have been hectic to say the least! I am so tired (and a little hungover) so here are some pretty things to get you through the weekend:
5/ Snapshots Camera Flask / Urban Outfitters / $24

Oh Etsy… 30.05.12

There was no way I could choose a favourite item out of this weeks ‘Oh Etsy‘ collection. I came across so many brilliant and unique items!For example I adore the idea of a knitted light (#1), such a simple, stylish and clever concept! But then, if we’re speaking of clever; the re-purposed industrial stands (#6) are so great! They especially look awesome as a set! And while I love everything in the iluxo store, I couldn’t go past the Rainyday wall clock (#5) - it is the perfect juxtaposition to the ‘You are my Sunshine’ pillow case (#3) which would sit perfectly on my couch.  I would totally have a couple of giant letters (#2) in my living room as well… I could kick back and admire them with a glass of wine from a lovely vintage wooden wine rack (#4). You See! I simply cannot choose a favourite! It is just too difficult!

1. Sweater Light - Handknit Pendant Light from Sunderland Stitch and Salvage / $125
2. Wood Letters from Hindsvik / $145
3. ‘You are my Sunshine’ Pillow Cover from The Shabby Creek Shop / $24
4. Vintage Wine Glass Rack from Lovintage Finds / $42
5. Rain Drop Clock- Rainy Day Wall Clock from iluxo / $75
6. Industrial Lab Stands from AMradio / $90 - $98 (each)

OE 07.03.12

It’s been a few weeks since I shared a Oh Etsy collection. To be honest, I haven’t even been on Etsy for a while. I’ve been saving my money so I haven’t had any spare cash to spend on random finds (as I tend to do whenever I start browsing). However, it’s the boyfriend’s birthday this month and in my search for awesome, unique gifts for him, I may have gotten a little distracted by some black and white geometric and patterned beauties…