
Last week Twitter finally launched their much anticipated new profiles. Like me you might not really venture from your main Twitter feed all that often, so you may not have even thought about making the switch to the new layout. But if you use your account for your blog/website/shop/business, you are going to have potential new customers checking out your page on a daily basis; and don’t you want to give the best first impression?
To get the obvious out of the way: Yes. The new layout looks a hell of a lot like the Facebook profile pages. I have to admit, it was a bit of a turn off (for me at least) initially. That said, having lived the new profile for a few days, I’m getting used to it and noticing all the things that make it a little more unique.
The new changes may seem drastic, but the new profiles are actually a lot simpler and easier to navigate than the previous design (especially for people new to Twitter). Getting switched over to the new layout is easy as pie, but as I know a lot of people are hesitant to try it out, I thought I would run through the process and give some feedback on the new changes.
Let’s do this…
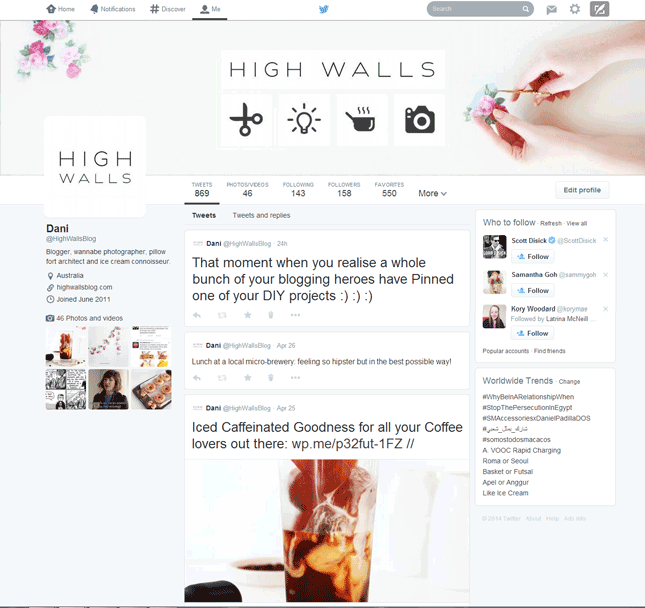
The main thing you’ll notice with the new profiles is that everything is BIGGER! Your tweets all stand out more and will display bigger or smaller depending on how popular each tweet is (Ie: how much engagement it receives). This makes your page a whole less text heavy and easier on the eyes, but as I said before, makes it very similar to Facebook. If you’re not sure about the new look, you’re not alone. I wasn’t 100% sold on it either, but I definitely liked it a lot more once I had my own page set up.

Okay, to make the switch to the new profile is so easy: Twitter will prompt you to upgrade your profile from your feed, but if you have previously declined or it hasn’t shown up, you can find a big blue button (as seen above) on your profile page that will allow you to see how your new profile will look. From here you can actually set up your whole profile before publishing it in the new layout, but I have skipped this part for ease of viewing on these images.

Assuming you have previously had all your in formation filled in, the main thing we want to do is upload a new cover image. Sadly, the old background image option has been replaced with a plain background, which is kind of sad from a individuality standpoint but admittedly is much easier on the eyes.
The default setting on your cover is a plain blue background, but when you go into editing mode, it will come up with a black screen asking you to upload an image. Click this and a drop down menu will appear. If you are creating a personalized image for your cover, the new dimensions are 1500px wide and 500px high, however (as with Facebook) you can simply upload any large image and zoom in or out to crop it to your liking as shown below. Click apply to save your new cover and a confirmation window will drop down from the top navigation bar letting you know your change was successful.

Next up you’re going to want to upload a new profile image. The new profile pics are almost double the size they were before which is pretty exciting, however as the thumbnail image size on your feed hasn’t changed size, still be wary of text based profile pics (like mine) - remember to check that they are still legible when shrunk down. The process is simple - the same as the cover image: Click the image area to access the drop down menu that will allow you to upload and you can zoom in or out to crop to your liking. Profile images must be at least 400 x 400 px wide.

Now that you’ve put up your new images, why not take the time to update your profile information (which you can also do from the same profile editing page). Just remember to click the blue ‘Save Changes’ button on the top right hand side of your profile to ensure all changes are accepted. Twitter will once again show a confirmation window from the navigation bar to let your know everything has been successfully changed and saved. That’s it! Super easy!
NOTABLE NEW FEATURES:
My most favourite new feature is that the default landing page only shows your recent tweets and not any replies or conversations you have recently had. You can easily see both if you wish too by loading replies from above your top tweet, but I love it as it makes sure that you wont be pushing down any important information every time comment on a friends tweet. This was my pet hate with the old profile, so I am really excited that they have made this change!
Pinning Tweets - You can now ‘Pin’ a tweet to the top of your page which is pretty awesome news for those of you who tweet a lot! If you have a competition or a promotion that you have ongoing, you can Pin the tweet to the top of the page so that all new visitors will see it first up. The main thing to remember with this is that there is no time period on pinned tweets, so you will want to remember this if you are pinning a tweet with information that may expire/change in the future. I’m hoping that in the future, Twitter may give an option to schedule pinned tweets (*fingers crossed*).
To Pin a tweet, simply click the ‘More’ button below the tweet in question (represented by the icon with three dots) and select ‘Pin to your Profile Page’. This tweet will now be the first thing visitors to your page will see. To un-pin, simply follow the same steps, as the option to pin will have been replaced with the option to un-pin. Easy!


New Look Pages - Your ‘Followers’ and ‘Following’ info now each have their own pages, which are completely different from before! Now you will find a grid of thumbnail cards for each person (almost similar to Pinterest) which is much more engaging than the previous text based lists, but I do wish you had the option to switch between the two as this would be really overwhelming the more followers/following in your list.

Photos and Favourites - While, you have always had access to these features, the new profiles have a renewed focus on these areas, both now having its own tab predominately displayed at the top of the page. The Favourites option is something I now realise I use quite cavalierly (over 500 favourites!), which wasn’t a big deal in the old layout. It’s not a big change, but it’s something to think about. now that your followers will have much easier access to this information, you may want to decide what kind of tweets you want to keep in this section.
Not surprisingly, with the new photo-centric layout, your tweeted images and video will also have their own dedicated page. These items now have an extra-large thumbnail display (again similar to Pinterest), making them much easier to navigate that the old slideshow styled option.
—————————————————————————-
Overall, I quite like the new profile layouts. Hopefully as time goes on, Twitter will tweak a few things here and there to improve the overall experience. I think the new changes will especially benefit those of us who use Twitter for any form of business and self promotion. Whether the new layouts are better or worse remains to be seen, but for me, personally, I am enjoying the fresh feeling of a new shiny profile page and really digging some of the new features!
But what do you think? Have you made the switch and are you loving or hating the new design?


Looks great! Thanks for the explanation, I saw the update and haven’t implemented it yet. I always feel like I should prepare a new image shot specifically for a certain purpose (yours works great) but I should probably just do /something/ and get the a shoot when I can. Loving the new image display idea, I hadn’t delved into that yet
xo