Valentine’s Day sure brings out the cynicism in people, doesn’t it? You are definitely FOR or AGAINST Valentine’s Day, there is no middle ground it seems. Online especially, all I see is Valentine’s gift guides and angry posts boycotting the whole event. Me? I’m a fan of Valentine’s Day. While I believe in showing love for the doesn’t people in your life should be an all year round kind of thing, what’s the harm in having a day that’s extra special? Yes, Valentine’s Day, like most other holidays has become completely commercialized, but I don’t know about you, but I enjoy buying gifts for my significant other! I don’t know, I guess I just like to see the potential for good these kind of holidays can bring, rather than the negative aspects.
If you feel like me, then hopefully you’ll enjoy this simple little DIY. It’s not flashy or extravagant, nor is it meant to be. It can be for your boyfriend, girlfriend, best friend, old friend or even that friendly barista at the coffee shop who always remembers your order.
What you need:
Tracing Paper, Baking Paper, any semi-transparent paper
A small box the size you want your bags to be.
Clear Tape
Mail Label sheets
A colour printer
Lollies or chocolates
What you do:
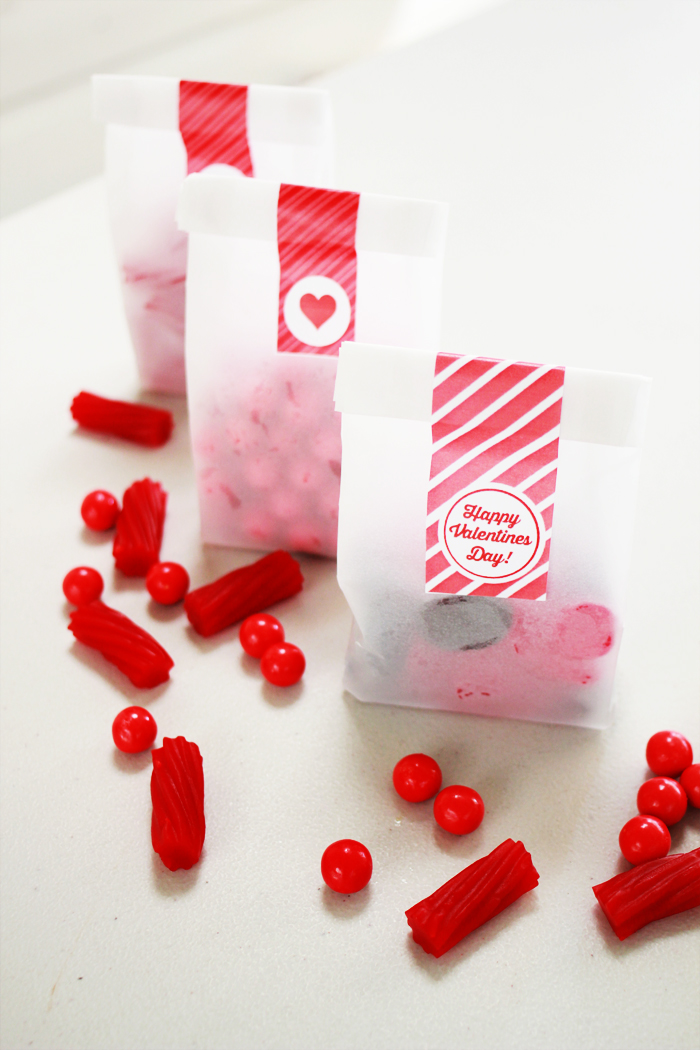
1. To make your bags take a small box approximately the same size as you would like your bags to be. Place in the center of a sheet of transparent paper - We will wrap the box as you would a gift.
2. Wrap the paper around the box so that it forms a cylinder arund the box. Before taping down, fold the paper at each of the corners around the box so that the cylinder is firmly square. Tape down the join, this will be the back of the bag.
3. Gently slide the box to approximately 4cm from the bottom of the ‘cylinder’ (this may vary depending on how big your paper and box is. I’m using an A4 sheet of tracing paper)
4. Fold down the top flap of paper and square off against the bottom. Fold in the sides until you have a semi-triangular flap and tape this against the box sealing one end. This is now the bottom of your bag.
5. Carefully extract the box from inside the paper and fill the bag you have just made with lollies and/or chocolate.
6. I whipped up these quick Valentine’s Day themed labels in Photoshop – you can download mine here and here, or even better, make some of your own! Just be sure to make them rectangular.
7. Microsoft word generally has a mail labels template you can use, simply past the labels into the template so that you have one label per sticker and print out. If your labels are smaller than the label itself just cut the down to size.
8. Take the bags and fold over the top 2 or three times and secure by sticking the label over the top.
And that’s it! I made a bunch of these over the weekend. It is quick, easy, cheap and a lovely simple idea to give to someone you love. Nothing flashy, just a bit of sweetness! Happy Valentine’s Day!


What say you?