
DIY | Flowers & Bees - Paper Garlands for Spring

At this point, garlands of any kind are basically a DIY staple. Pinterest is a veritable encyclopaedia of all the different ways and styles in which you can make this versatile decoration. And there-in lies the source of its popularity; no matter how many different craft projects you may come across on the subject, there are always different ways to make a garland for your home! As far as decorating goes, it is super easy and cost effective and can be used for so many different reasons or occasions. So with all this in mind; here’s yet another garland DIY. I hope you’re still as into them as I am, because I really love this one!
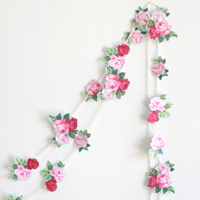
There is an amazing stationary store in the city that specializes in cards and high end wrapping paper. When I cam across this bee and rose wrapping paper I just knew I needed to buy it and make something pretty out of the beautiful prints! Because the paper was good quality, it is quite thick and strong, so it was ideal for this project as it still holds its shape when cut out. Keep this in mind when choosing your own paper for this project as if it is lighter paper you may need to adhere it it to something stronger before starting if you want your garlands to last.


Guys, this is super easy: get yourself some paper with a reoccurring pattern or image (I found a couple of sheets of good quality paper, one with roses and the other with golden bees), string and some scotch tape (the non-shiny kind so it’s not as obvious if any pieces flip over).
Start by cutting out your images. How many you need will depend on the size of your garland and the size of your images, so cut as many as you think to start off with and you can always get some more later. Depending on how detailed your images are, this could be slightly fiddly and could take a while. Don’t rush it, sit yourself down with a movie or your favourite TV show and cut away - it’s quite therapeutic once you get going.
Once you have all your images cut out, sort them into the order you want them to appear: for example, my roses came in 4 different shapes and sizes so I sorted them into alternating patterns. The bees, of course, were all once size and shape, so they didn’t need any sorting.
Flip your pictures over and stick them securely to the string using the scotch tape. Space each image evenly along the string, leaving around 5 - 10cm in between each. It’s easiest if you don’t cut your string at this stage, just unravel around a rulers length (30cm) at a time and stick your images as you go, otherwise you will find yourself getting tangled in string!
Trim the string from the ball when you have your desired length and you’re done! Hang on the wall, over your mantle, around a window, wherever you like! The paper I used had pretty patterns on both sides, so I wasn’t worried - but if you are concerned about the images flipping over to the blank side you can always double up your images and stick them on both sides of the string. Just make sure that your images can be reversed so they will fit snugly against each other back to back (ie: the Bees are a perfect example of this, but the roses are too irregularly shaped for it to work with them).
So, are you digging my take on the old paper garlands? What kind of images would you put on yours?


Eve Sabary
April 23, 2014 at 11:12 pmbeautiful ! <3
DIY avec des chutes de papier peint
April 24, 2014 at 11:51 am[…] 1 . DIY | FLOWERS & BEES – PAPER GARLANDS FOR SPRING // HIGH WALLS […]
mary musumeci
April 26, 2014 at 8:40 amThis is an awesome and beautiful idea Can’t wait to try this for my bedroom
Lyndsay // Coco Cake Land
April 27, 2014 at 2:00 pmwhat a beautiful garland, and so clever! i am garland crazy and when i saw this on pinterest i loved it! thanks for sharing Dani!
aya karpinska
April 28, 2014 at 12:02 pmwhat kinds of scissors are good for this kind of work?
Dani
April 28, 2014 at 12:34 pmI used a pair of little sewing scissors that were perfect, but really as long as they are sharp (with a pointed end) you should be okay. It will all depend on how intricate your images are! :)
Kathleen
April 29, 2014 at 2:57 pmLovely! What is the name of the stationery store? Thanks.
Dani
April 29, 2014 at 3:10 pmCard and Caboodle (https://www.cardandcaboodle.com.au/) Great store full of so so pretty things!
Kathleen
April 30, 2014 at 2:20 pmThanks! I took a look at their website and it looks like lots of fun!
DIY: Guirnalda de Papel con Flores
April 29, 2014 at 6:31 pm[…] un elemento esencial en la decoración de cualquier fiesta y más si son tan bonitas cómo esta de High Walls. Con este tutorial ya no tienes excusa para no hacer una original y vistosa guirnalda de papel, que […]
The Perfect Mother's Day - 6 Things You Must Do For Her - Arabic Style | The Ananasa Blog
May 3, 2014 at 8:01 pm[…] this adorable handmade garland by Dani from Australia. You can get it done in no time with this simple 4 step process. We suggest you do it the night before, and hang it in front of your mother's bed so when she wakes […]
Getting Crafty | Metdehand Blog
May 7, 2014 at 1:30 am[…] Inspiration from cafenoHut | Cloudy garland 4. Lindsey McLaugh | How to marble 5. High Walls | Flower and Bees […]
jet
May 8, 2014 at 11:50 pmlovely and pretty, like this, well done!!
thank you for the sharing and your tute;-D
Jenni @The Common Creative
May 10, 2014 at 4:40 amThis is just so beautiful. I love it so much, I’ve featured in on my latest round-up! http://thecommoncreative.blogspot.ca/2014/05/curated-byvol-6.html
Gushmag | Relooking con le rose: un po’ romantico e un po’ design
May 14, 2014 at 6:52 pm[…] Infine, come creare una simpatica ghirlanda con rose découpage: tutorial proposto da High Walls […]
on sundays we: | hjartesmil
May 25, 2014 at 8:04 pm[…] - fordjupa seg i gjer det sjølv-prosjekt. […]
DIY: Pappersgirlang med rosor. | Volang
May 27, 2014 at 2:58 am[…] här pappersgirlangen med rosor från bloggen High Walls kan vara något av det finaste jag […]
Throw a Crafty Birthday Party for a Flower Child | Ecka & Pecka's BlogEcka & Pecka's Blog
June 10, 2014 at 1:45 am[…] 7. Floral Garland DIY […]
7 CHIC AND FABULOUS DIYS | Best Friends For Frosting
June 13, 2014 at 2:01 am[…] you’re looking for a flower garland that you can reuse again and again, then try making one out of cut paper flowers! Eye-catching and […]
My Friday Favorites: Top 5 DIYs
June 14, 2014 at 4:00 am[…] 5. Wedding DIY: Paper Garlands […]
Regina
June 24, 2014 at 9:28 pmThat’s such a good idea, and it’s so pretty!
Dani
June 24, 2014 at 9:43 pmThanks Regina :) and thanks for visiting!
30 Pretty Floral DIY Ideas | My great WordPress blog
August 6, 2014 at 5:29 am[…] People blog Above left: Fresh Flower Cupcake Toppers by The Crafted Life | Above right: DIY Paper Garland by High Walls Above left: DIY Floral Heart by A Pair & A Spare | Above right: Wallpaper […]
jacqueline Sialer medina
March 11, 2015 at 11:27 amMe encanta
40 Happy Floral DIY Projects for This Spring - Bravely
March 11, 2015 at 1:06 pm[…] 2. DIY | FLOWERS & BEES – PAPER GARLANDS FOR SPRING […]
10 DIY SPRING PROJECTS -
March 12, 2015 at 3:35 am[…] 2. Beautiful paper garland! [full project here] […]
Guirnaldas en el cuarto del bebé | Niceparty
March 16, 2015 at 7:30 pm[…] Diy en Highwallsblog […]
5 DIY primaverales/ 5 Spring DIYs |
March 31, 2015 at 4:23 pm[…] Imágenes/Images:Highwalls, The House that Lars Built,The Crafted Sparrow, Studio DIY, Design Love Fest. […]
6 Pretty DIY Flower Decorations Ideas
April 25, 2015 at 5:52 am[…] Check out the full DIY tutorial HERE […]
DIY. Round-up of the Party Garlands | My Jewelry Channel
May 28, 2015 at 2:26 am[…] FLOWERS & BEES – PAPER GARLANDS FOR SPRING […]
Pinterest Feature Friday - Mine for the Making
May 29, 2015 at 8:43 pm[…] simple DIY Paper Flowers Garland pinned from Highwalls is so pretty! It look so simple to make too - I think I need to hunt up some flower […]
non
September 7, 2015 at 3:44 amIts beautiful idea .i really like it. U have very creative mind.carry on.thanx for such a great idea .