Sometimes you come across something and you think ‘oh my god! I must have this!’ Maybe you see it in a magazine, or on TV. Somewhere there are no handy links to where you can pick one up yourself. So you cry. Curse the heavens for bestowing such sorrow on your life. Then you realise you’re being a little melodramatic and really, if you think about it, that thing you wanted so bad is really quite simple. You could probably make one yourself, so stop whining about your stupid first world problems and get off your ass and make one! You quietly wonder when you started being so mean to yourself, but come to the conclusion that you’re probably right…
So maybe this happened to me recently. I spotted this adorable house art piece in a friends house. It was basically a little frame with a house cut out of a white board so the house shape was transparent. I was instantly smitten with the simplicity of the piece and demanded to know where she got it from. As always seems to happen when you ask someone where they got something, she had been gifted the piece from her husbands family (overseas family no less!) Feeling a little disappointed, I vowed to attempt my own, home made version.


What You Need:
An old photo frame
Plain white paper or stock card
PVA Craft Glue
Super Glue
Pencil
Craft Knife
A clean, damp Cloth
Window Cleaner
Cotton Bud/Cotton Swabs
What You Do:
1. Choose an old photo frame to use, ensuring that it still has the glass. I picked up a frame from my local thrift store for a couple of dollars. I chose a frame that had the proper tacks and framing tape instead of the re-usable frames as it meant it was a little cheaper and as we are discarding the backing of the frame, you don’t need the stand part anyway.
2. Carefully remove the backing from the frame. Take away any tape, staples, tacks etc so that all you have is the wooden frame part and the glass panel.
3. Separate the glass from the frame and give the panel a good wash in warm soapy water. Dry thoroughly making sure that there is no water or dust residue left on the glass.
4. Take a piece of white paper or card stock and cut to match the size of your glass panel. With a pencil, lightly sketch out the shape you would like to cut out. I decided to stick with the house shape, but you can really do what ever you want here. Using craft knife carefully cut out your design and erase any pencil marks left.
5. Take you glass panel and, using a paintbrush, coat all the areas that the paper will cover with an even coat of glue. Be generous, but ensure that the coat is even all the way across. Dont worry if your glue covers more that the paper does.
6. Carefully, starting from one corner of the glass, line up the paper cut out onto the glass panel. Smooth out the paper against the glue as you go, ensuring there are no air bubbles as you will be able to see these from the other side of the glass. Once you are happy with the positioning and you are sure there are no air bubbles visible, coat the paper with a generous coat of glue.


7. Take a clean cloth and dampen with warm water. Carefully and gently use the cloth to clean away glue from any areas of glass that are not covered with paper. Don’t worry to much about the immediate edges and light smudges for now. Once you have cleaned the bulk of the glue, leave until the glue and paper are completely dry (Overnight if possible)
OPTIONAL STEP: If you find that your paper has dried a little transparent, paint a couple of layers of acrylic paint over the paper to ensure you have a nice opaque finish.
8. Once dry, take a cotton ball and cotton swab and spray with Windex or any similar glass cleaner. Gently wipe the clear areas of glass until completely clear. Use the cotton swab to go around the edges.
9. Using super glue, run a line of glue around the inside of your frame and press the glass panel back into it with the paper side facing inwards (so it will face the wall when you display it). Make sure the glue is not visible from the front and allow to dry.
10. Flip over to see your finished piece. If required clean off the front of the glass with some more window cleaner and prop your art piece up on a table or shelf. Admire how brilliant you are.

I’m all about clean lines and simple design (as I’m sure you would have picked up from reading this blog), but I’m also inherently lazy. I like low maintenance additions to my home. While the original was simply a frame and some thick card, I opted to make something a little more sturdy and (hopefully) something that will last the distance and be easy to clean.
Another way you can complete this project would be if you had two frames the same size. Instead of gluing the paper to the glass what you can do is sandwich the paper between the panels from the two frames and glue together. However this will rely on you purchasing two frames the same size, which could be difficult if you go the second hand route like I did. You can also rig your piece to hang if you ensure that your hanging wire or hooks are also white and will be covered by the paper.
The best part of this piece is the transparent ‘cut out’. I love the effect it gives, the white background, especially against a white wall is so subtle and effective. But then again, I’ve always been a sucker for a bit of minimalism art :)
LINE ONE: These birds eye view images are made from numerous frames from recordings, layered to create a singular image of an event or place. Katrin Korfmann links the series of occurrences to look as if they took place at the same moment. Fascinating!
LINE TWO: Loving these clever vases made from action figures. Flower Power demonstrates how perfect action figures little hands are for holding flowers instead of plastic weapons! I totally want to make these myself!
LINE THREE: Did you know that puzzle pieces are interchangeable within a brand? I had no idea until I came across this project from Brooklyn-based artist/photographer Kent Rogowski. He took flowers and skies from over 60 store bought jigsaw puzzles to create a series of landscapes entitled Love = Love.
LINE FOUR: Kyle‘s takes two photos from other people’s instagram feeds and blends them together to make fabulous new images. Check out #FromWhereIStandBlended to see all of the images.
LINE ONE: I’ll admit, when I first heard that there was a store in LA called The Pie Hole I was instantly intrigued (Photos from here, here and here)
LINE TWO: This mural by Hense on a Church in Washington DC is magical. If only he could come to Australia and make my house look as amazing!
LINE THREE: Ever since I started blogging, I’ve become a little obsessed with typography, so it comes as no surprise that I’m smitten with the series of travel images by Istanbul-based photographer Gokhun Guneyhan. Each image mixes photography and typography by juxtaposing typographic elements over the photographs and in doing so tells the story of each place.
LINE FOUR: These knitted wigs by Louise Walker are so great! I especially love the pink and long turquoise ones. I would love to rock out in one of these for a day.
PS. It got a little delayed with all the changes going on around here, but I hadn’t forgotten about the Frankie Gift Paper Book Giveaway! Thank you to everyone who entered, but the lucky duck who will be receiving a copy of the book is:
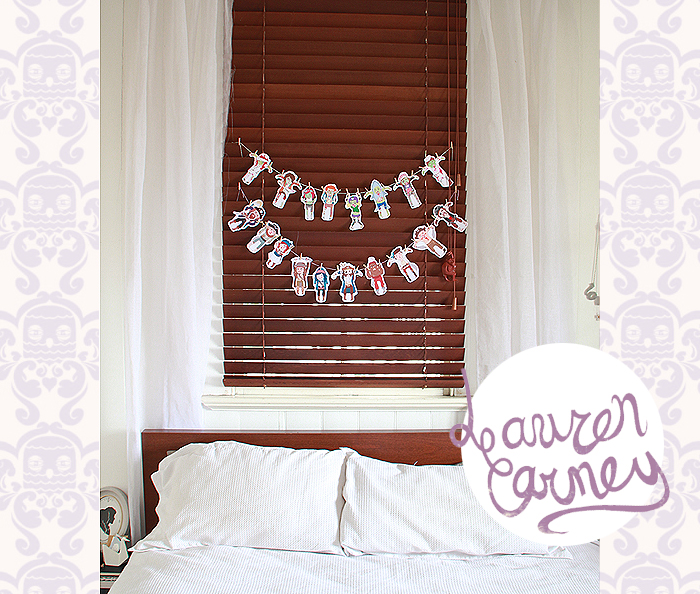
If you were to ask me to name my favourite Australian illustrator, (and what a great question, thank you for asking!) the answer would without reservation be Lauren Carney. My love for Lauren’s whimsical and adorable illustrations has been well documented on this blog, so, to say that I was excited when Lauren recently contacted me to collaborate, would be the understatement of the year!
If you’re not familiar with her work, Lauren’s illustrations are mostly a combination of traditional pen and ink drawings which are then brought to life through Photoshop colouring. The multi-talented lady not only has an amazing portfolio of illustrated prints, but also a fabulous range of printed tee’s, brooches (like this one), wrapping paper, printed stationary, cards, and the most adorable concept I’ve ever seen – clothespin dolls!
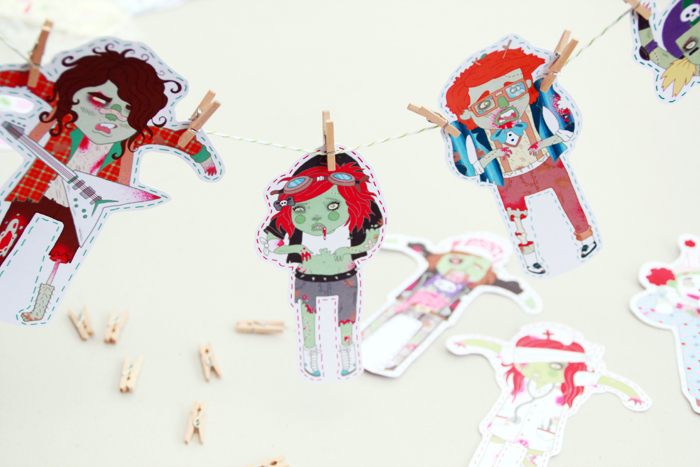
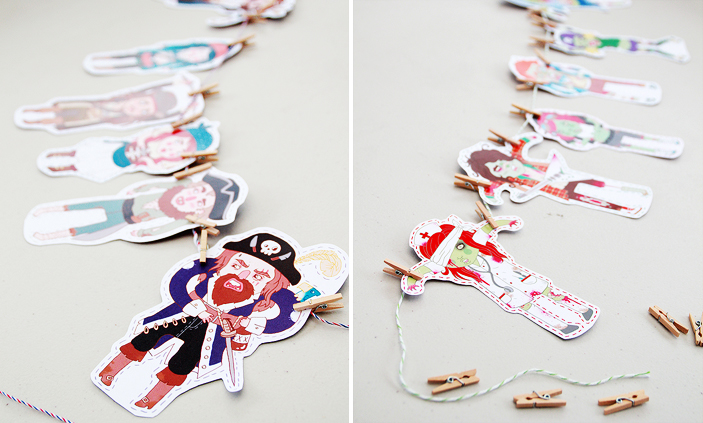
Lauren asked me if I would be interested in reviewing her newest collection of clothespin dolls; Zombies and Pirates! Uh… Hellooooo! Of course I would! Is a duck Catholic?!… wait…. that’s not right. Anyway, My answer was obviously yes!
Without being totally biased here, but I absolutely adore these little guys! The afternoon I received them I spent a good hour using the dolls as puppets to harass my housemates, spurting pirate clichés and making zombie noises. Once I’d gotten that out of my system I then wandered around the house tying the lines to random items in an attempt to find the perfect place to display them, simultaneously ensuring that I was completely in everyone’s way. “Oh you’re trying to cook dinner? Sorry, I need to string these Pirates above the oven top – excuse me!” (I’m the best housemate ever.)
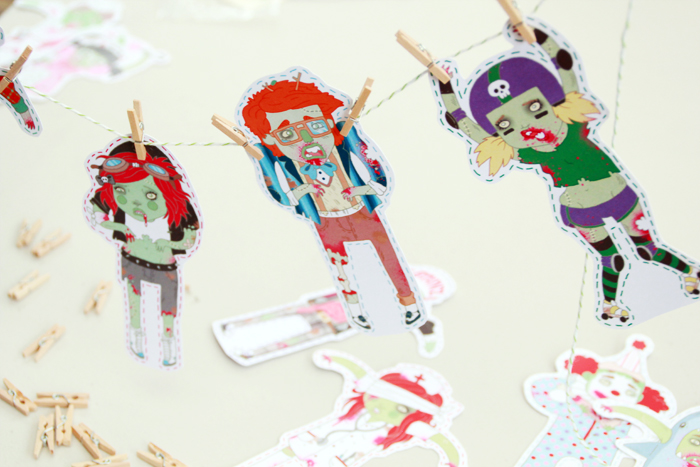
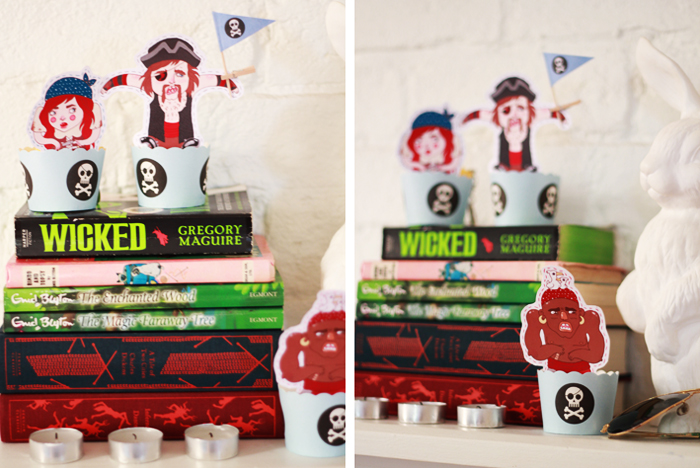
I did finally find the perfect (and in hindsight, most obvious) spot to hang them; over my bed. Good thing my boyfriend likes them as much as I do! A couple of those rascally pirates made a break for it and spent a few days sailing the seven seas of my bookshelves, in search of distant lands. Although my cat’s insistence on eating anything made of paper or cardboard meant that I eventually had to round them up and return them to the safety of clothes line after I discovered him batting them around the floor on more than one occasion.
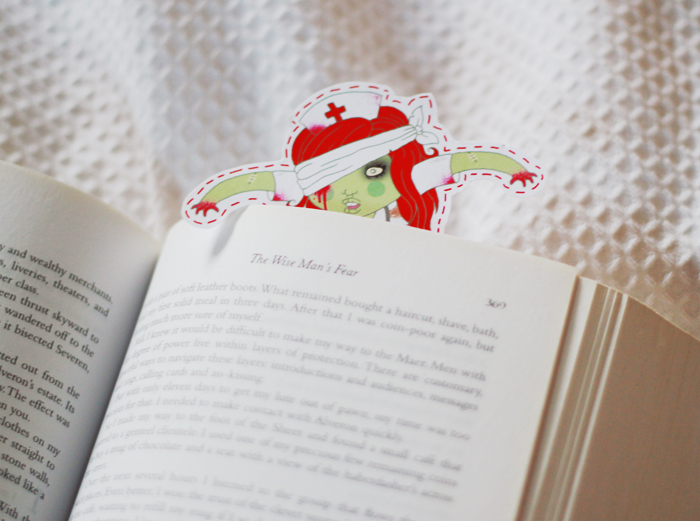
Now they hang above my bed, making me smile whenever I walk in the room. With one exception, one of the zombie ladies has been helping me keep my place in a book I’m reading. Zombie’s love brains; and I think she’s trying to fatten mine up…
 Now that you’re in love with Lauren like me, go check her out!
Website: http://www.laurencarneyart.com/
Blog: http://www.laurencarneyart.blogspot.com.au/
Etsy Store: http://www.dizzylittledotty.etsy.com/
Big Cartel Store:http://dizzylittledotty.bigcartel.com/
or say hi (and tell her how awesome she is!) Facebook / Twitter
Blog: http://www.laurencarneyart.blogspot.com.au/
Etsy Store: http://www.dizzylittledotty.etsy.com/
Big Cartel Store:http://dizzylittledotty.bigcartel.com/
or say hi (and tell her how awesome she is!) Facebook / Twitter
LINE ONE: There’s something so whimsical and serene about a room full of balloons! Dancer and choreographer William Forsythe has traveled with his audio/visual installation Scattered Crowd in which thousands of balloons are suspended in galleries, museums, banks and other architecturally significant spaces. I wish I could experience the full impact of these installations in person, it looks so magical!
LINE TWO: Ohhhhhh! French designer and woodworker Malet Thibaut just released this limited edition “Art Toy” clearly inspired by the well known Lego figures. They were on sale in his Etsy Store but appear to be sold out now. Damn! I would have LOVED one of these to sit on my mantle!
LINE THREE: When Alma Hazer was asked by a fellow artist to submit a self-portrait to his Pop Art project, she decided to disguise herself in a wig and borrowed outfit. She found that the wig gave her confidence and began to wonder if other people would feel empowered by dressing up in a disguise. The result is a fascinating series of photo’s called “On the face of it,” all featuring the same outfit on various models. This makes me want to try this for my new blog portraits - I hate taking photos of myself!
LINE FOUR: Loving these adorable, iconographic illustrations of famous rival characters by designer Dan Matutina. The Samurai Jack one is especially fitting as my housemate has just introduced me to the show!
When I decided to share this little DIY (Is it really a DIY? Maybe more a simple idea?) I was super excited at the prospect of taking some photos with my fancy new tripod I received for my birthday. It seems, I may need some more practice with it as these photos aren’t the best… room photography is hard you guys!
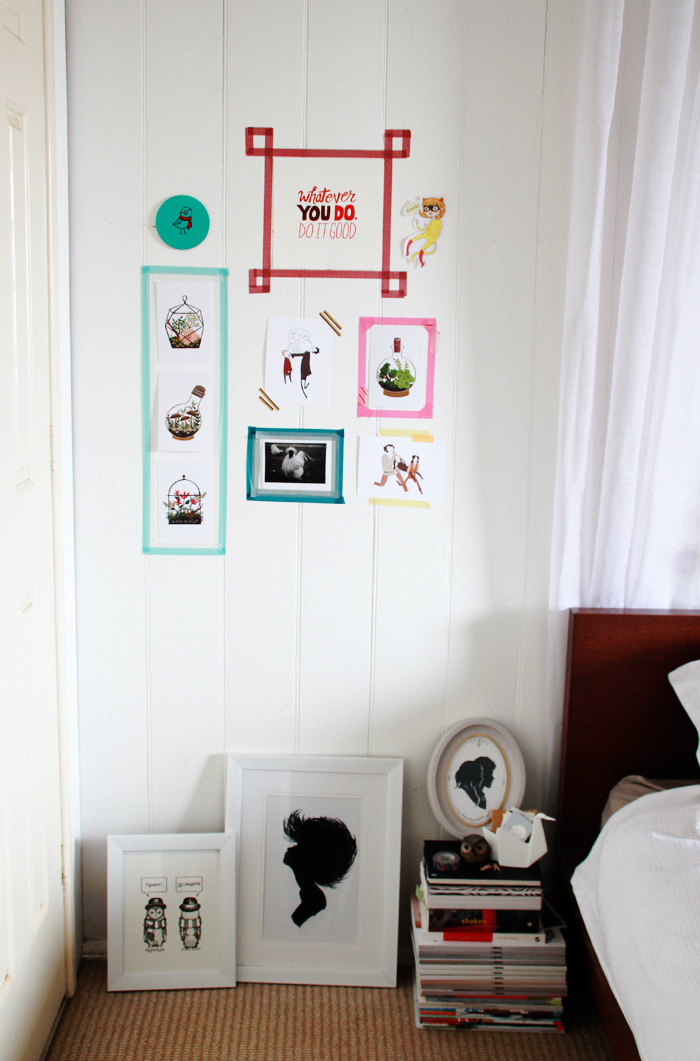
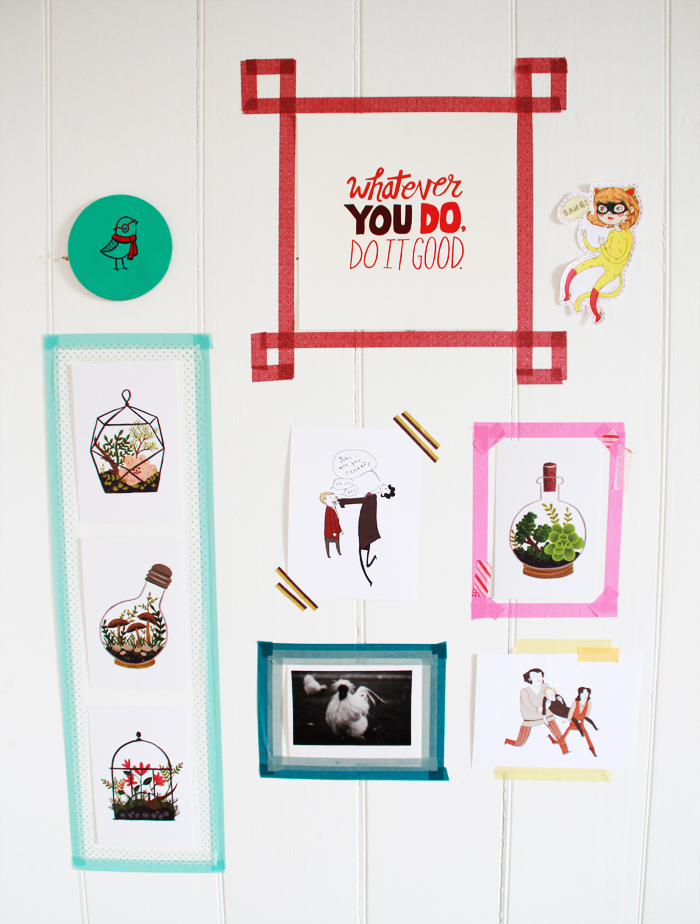
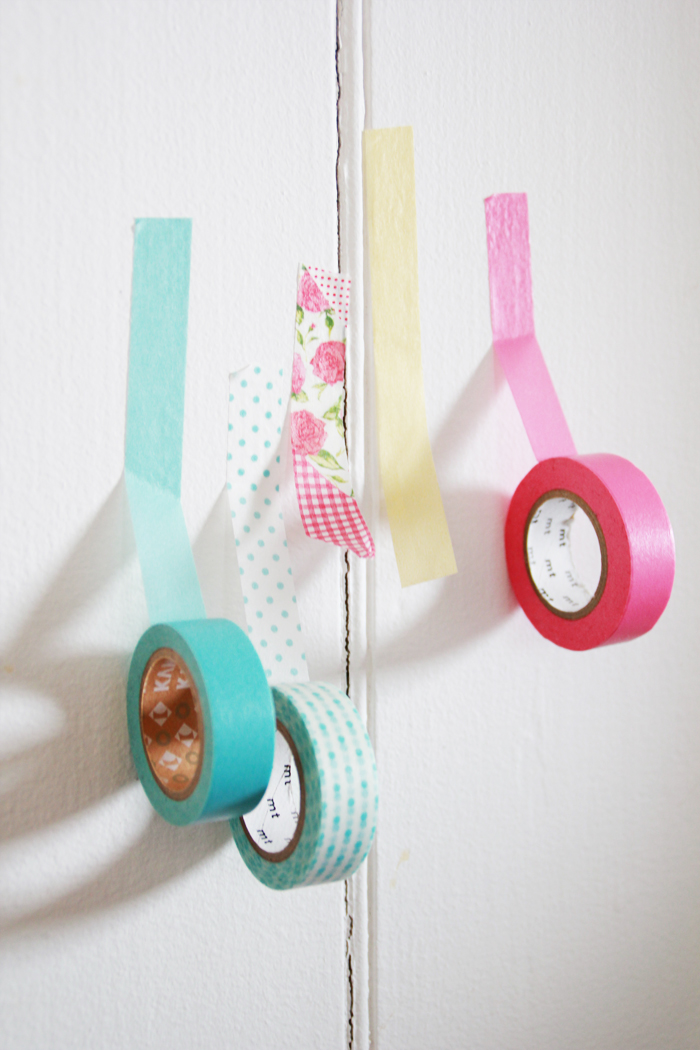
I don’t know about you, but I rent the house I’ve lived in for the last couple of years. While renting is super convenient, and hooray for no mortgage, it can be a bit of a deterrent to making our space a little more stylish than it is. One of my weaknesses is buying art prints and while my collection is growing slowly, I have limited space to hang them. I obviously can’t put nails in the walls and we’ve had some bad experiences with those stick on wall hangers. A few of my favourites are propped up in frames around the place, but I recently found a new way to display my art collection; washi tape ‘frames’!
Thankfully, washi tape/MT tape isn’t super strong, so I’ve had no issues with it peeling paint off the walls. I’ve been experimenting with different styles and shapes, but I feel it gives the wall a much more ‘purposeful’ feel, rather than just sticking up some pictures. What do you think? Would you try this at home? Or do you have clever ways to display your pictures?
LINE ONE: Illustrator Andrew Kolb has created this fictional concept story book of David Bowie’s magical song ‘Space Oddity’ and it is quite breathtaking, especially when read along with the song itself. Head over to his (aptly named) website Kolb is Neat and check out some of his other works like the Arrested Development Show and clever DIY Cards. (I have a feeling I’ll be featuring Andrew again in the future…)
LINE TWO: German street artist EVOL creates these beautiful and lifelike cityscapes and urban environments on pieces of cardboard (among other things). If I hadn’t seen the pieces as a whole, I would have sworn they were photos of old buildings! Amazing!
LINE THREE: Don’t lie, you totally want these technicolor-ed photographs by Andrew B Myers on your wall. I know I do! The beautiful composition and contrast between the backgrounds and objects is superb, I cant stop looking at them!
LINE FOUR: I’m totally in lust with these low watt lightbulbs from Plumen. I love how the whole look and shape changes depend which angle you look at it from. I would love to have a whole stack hanging from my ceiling. Plus they last 8 times longer than a regular light bulb!
Here is a prime example of one of the things I love about going online; there will never be a shortage of cat related paraphernalia. Whether it be in fashion, home wares or just photos and art, the internet loves cats. And I’m totally okay with this…
(Inspired by this ink painting by Retoyman )
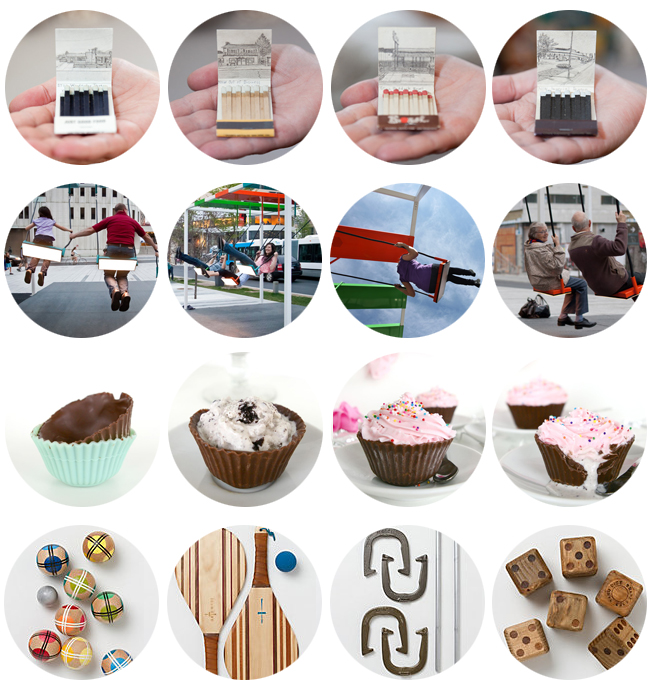
LINE ONE: Krista Charles collects vintage matchbooks and illustrates the building that currently exists at the address listed on each matchbook. I’d love to have a little set of these framed on my wall! (1, 2, 3, 4)
LINE TWO: I spotted these Musical Swings over at Colossal and I am officially in love! I’ve always been a big fan of clever installations, and this is just such a lovely concept. (Be sure to watch the video to see the full effect.)
LINE THREE: Oh my goodness! This is probably the most simple and brilliant (and delicious?) ideas ever! Check out the Ice Cream Cupcakes with Chocolate Liners from Ash over at her wonderful blog Sugar & Cloth.
LINE FOUR: Now I’m not usually one to be interested in any kind of sporting equipment, but I am enamored with both the photos and the actual collection of back yard games available from Terrain. Maybe it’s seeing Moonrise Kingdom recently, but I’ve been attracted to vintage looking additions to my home as of late…

LINE ONE: Cute and a little bit creepy, check out this series of illustrations ‘Nightmare of Sesame Street‘ by Isaac Bidwell. I’d love some prints of these guys!
LINE TWO: I’ve been seeing these Tshirt & Necklace sets by Luft und Liebe around everywhere this week! Such a brilliant (and simple) concept! I’ll take one of each thanks…
LINE THREE: Everyone loves a nice envelope clutch and how great are these prints available over at Falcon Wright! I’m such a sucker for a statement piece as lovely as these! (1, 2, 3, 4)
LINE FOUR: I think I’ve mentioned before how I’m usually not really into knitted items, however I’m willing to make an exception for Amy Lawrence Knitted Designs. Her necklaces are so beautifully made and so elegant, how could I not love them?
SAY HELLO!


FEATURE POSTS


SUBSCRIBE