thumb-recipe-frozen-yoghurt-bars

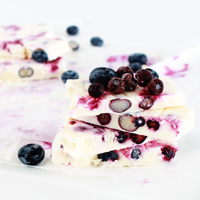
EAT | Frozen Yogurt & Berry Bars

A sneaky treat that is totally healthy! Frozen Yogurt and Berry Bars! (click for the full recipe)

Oh, hey! Remember me? It’s been a while, but I used to blog around these parts! Where I’ve been is a story for another time, because right now I have something sweet and creamy to distract you from my neglect.

It’s no secret that I have a bit of sweet tooth, which makes it all the harder for me when I try to buckle down and reduce the amount of sweets in my diet. With Christmas practically beating down the door already, I just know the holiday season is going to be the usual cavalcade of cakes, chocolate and candy canes (I’m sure somewhere my dentist is shuddering at the thought!) So I’ve been trying to behave myself… it’s…. kind of lame.

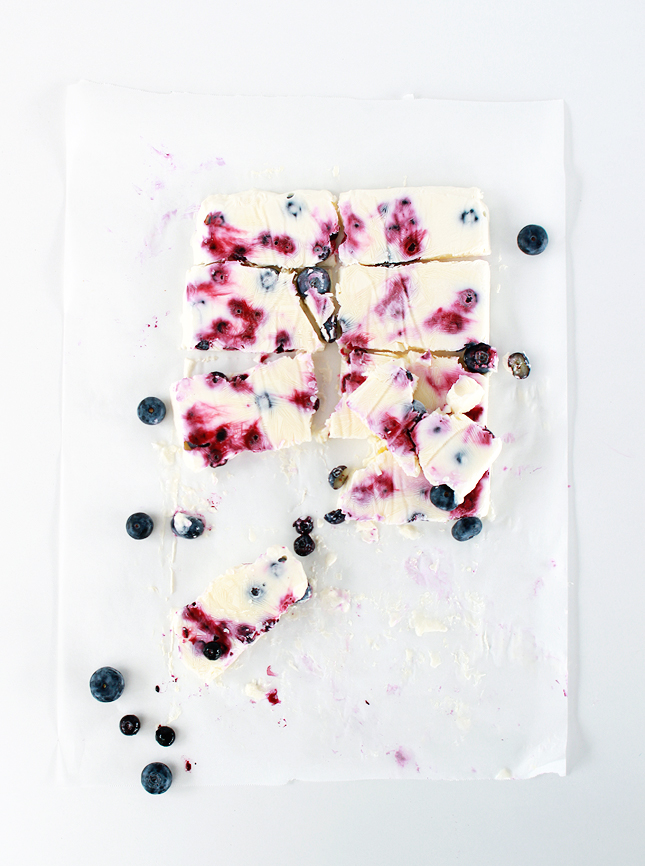
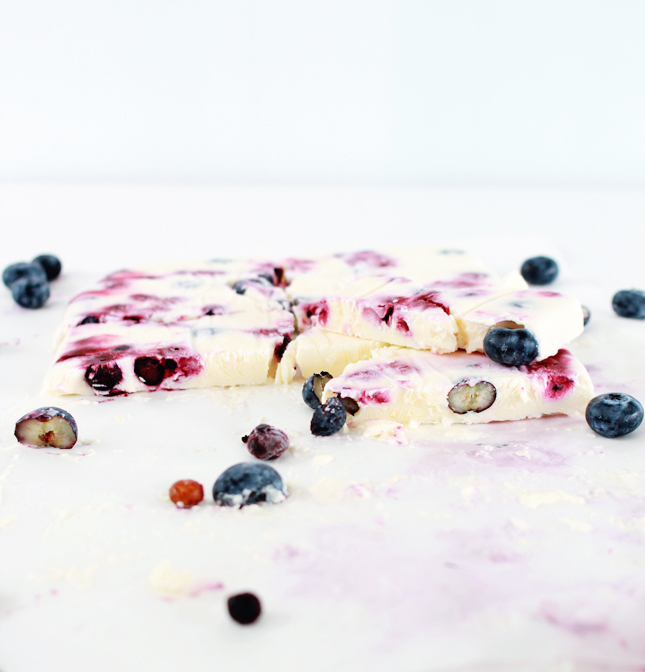
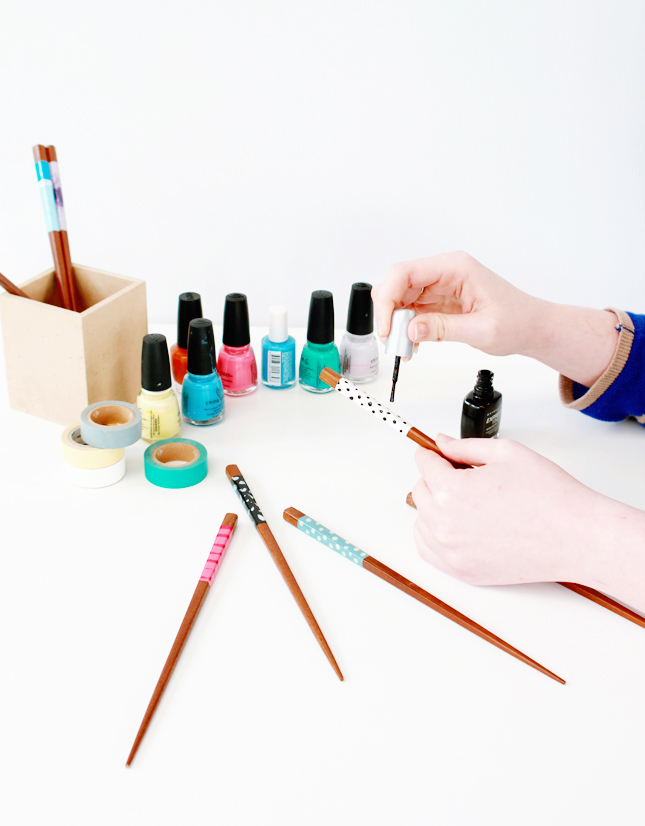
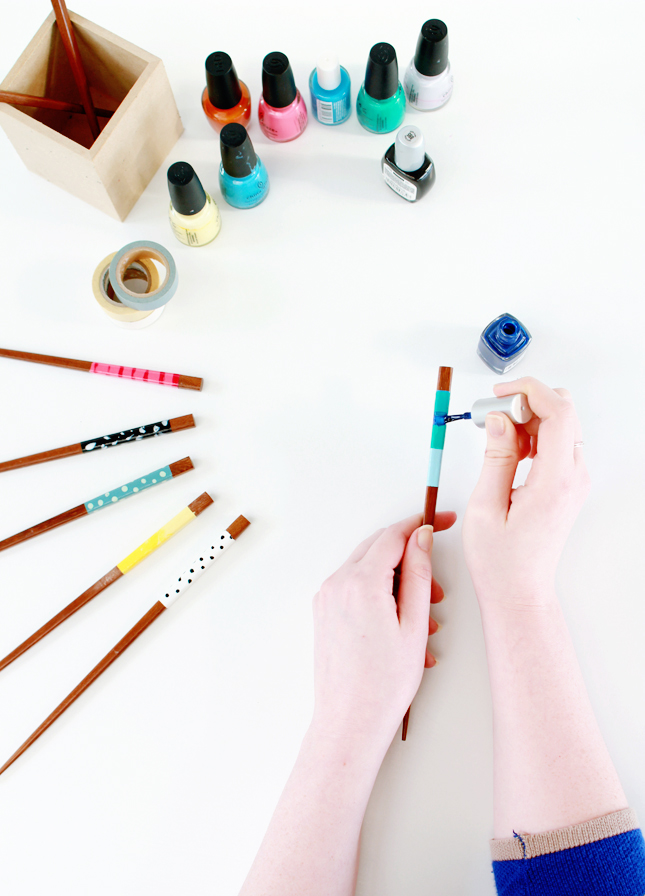
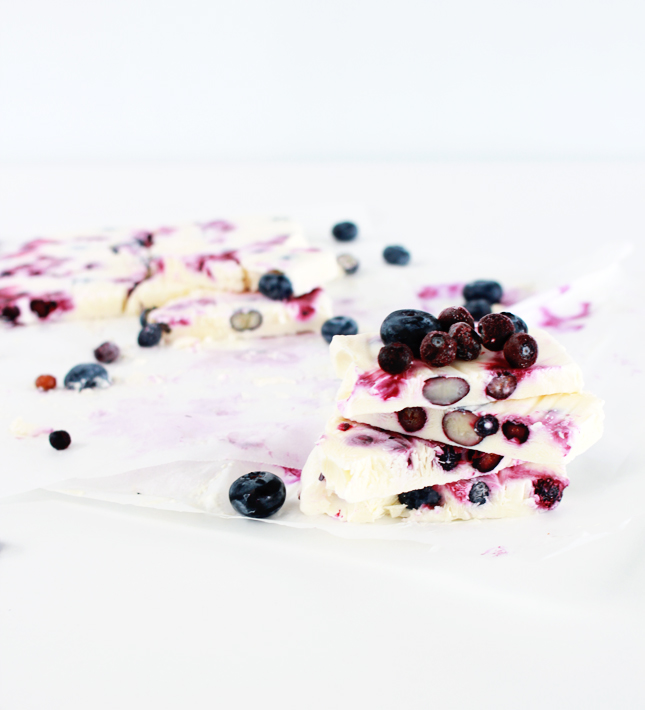
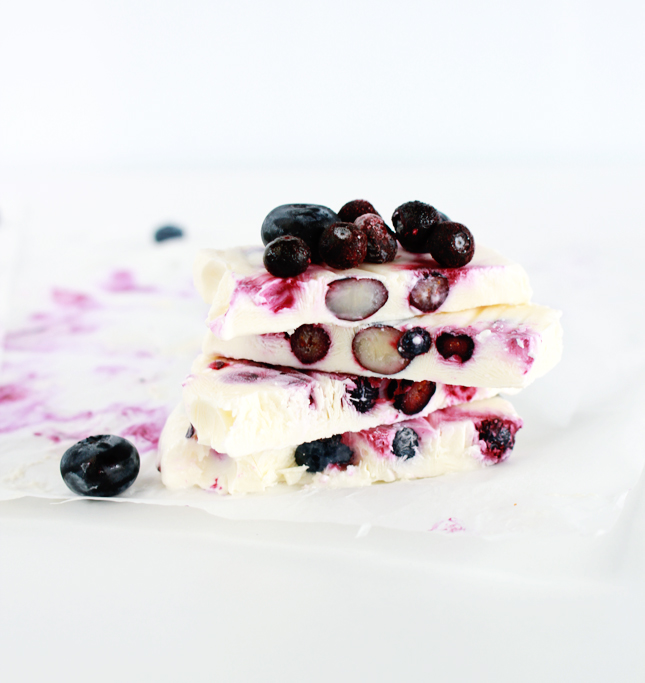
Because I have absolutely no will-power, I have to trick myself into believing that I am still getting that sweet sweet sugar hit I crave so much. Doing this is simple: freeze anything and it gives the impression what you’re eating is a sneaky treat, even if its actually healthy! Add the tangy bite of berries, and you have a winning combination my friend! Take some good old fashioned Greek yogurt, mix in a bit of honey and berries, there ain’t nothing bad for you in these icy snacks!

A sneaky treat that is totally healthy! Frozen Yogurt and Berry Bars! (click for the full recipe)     A sneaky treat that is totally healthy! Frozen Yogurt and Berry Bars! (click for the full recipe)      A sneaky treat that is totally healthy! Frozen Yogurt and Berry Bars! (click for the full recipe) A sneaky treat that is totally healthy! Frozen Yogurt and Berry Bars! (click for the full recipe)

Frozen Yogurt & Berry Bars

Ingredients

  • 2 cups of greek yogurt
  • 1/3 cup of honey
  • 1 tbsp vanilla extract
  • 2 cups of berries (fresh or frozen)

Instructions

  1. Place the yogurt, honey and vanilla in a bowl and mix to combine.
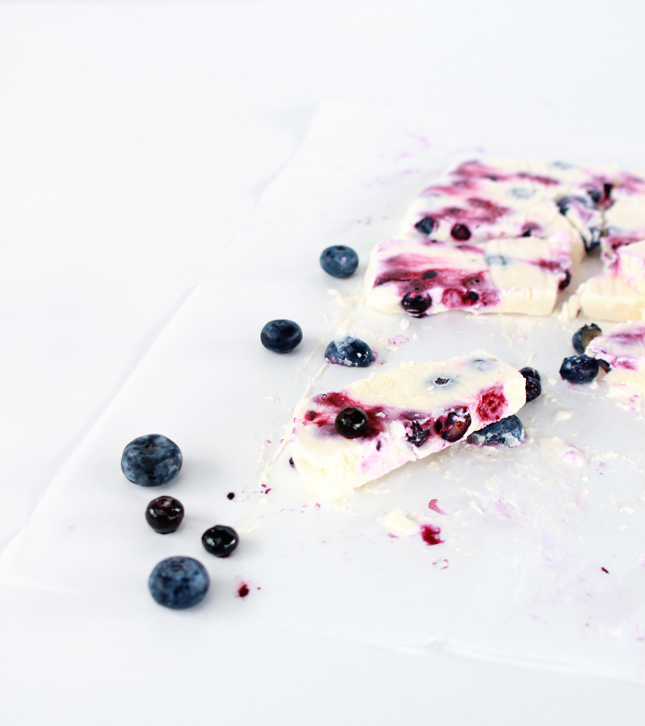
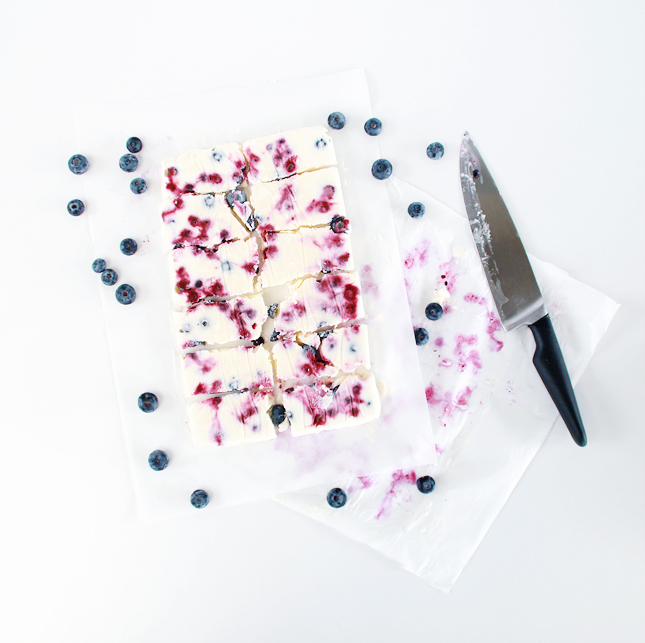
  2. Line a small slice tray with baking paper and scatter the berries evenly across the tray.
  3. Pour the yogurt mixture onto the berries, spreading out across the whole tray making sure that all the berries are covered.
  4. Place in the freezer overnight to set.
  5. To serve, remove from the freezer and and allow to sit for 5 minutes before eating. Slice into squares and enjoy!
http://www.highwallsblog.com/2014/11/frozen-yoghurt-berry-bars/

A sneaky treat that is totally healthy! Frozen Yogurt and Berry Bars! (click for the full recipe)A sneaky treat that is totally healthy! Frozen Yogurt and Berry Bars! (click for the full recipe)

thumb-animalcracker

EAT | Animal Crackers

animal-crackers2

I have a serious question for you: What the hell happened to animal crackers? They were the BEST thing EVER! Sweet little, chocolate covered, cookies in the shape of your favourite circus animals; you know the ones. Where did they go? Do they still exist in other parts of the world? Guys, you gotta tell me if they do! But don’t even try to pass off the non-chocolate covered versions, because you know those do not count!

Any ways, a few weeks ago I finally found some awesome animal cookie cutters and ever since I’ve been keeping our kitchen well stocked with chocolate covered beasts. My childhood self must be so damn proud of me! (My adult self is less impressed with the impact these tiny zoo animals are undoubtedly going to have on my waistline…)

EDIT: I found these cookie cutters on ebay!

animal-crackers5

INGREDIENTS:1 Cup of butter
1 Cup of white sugar
1 teaspoon of vanilla extract
1 egg
2 teaspoons of baking powder
3 cups of all purpose flour
1 packet of chocolate melts
1. Preheat oven to 180 degrees celcius.2. Place the butter (softened) and sugar into a large mixing bowl and cream together using an electric mixer until smooth.3. Add the vanilla and egg and beat again to combine.4. Combine the flour and baking powder together and add to the butter mixture in small amounts, mixing in between each addition. When the dough becomes too thick to mix with the electric mixer, turn out onto a floured surface and knead with your hands.5. Place in the fridge for 15-20 minutes or until the dough is firm.6. Divide in half and roll the dough onto the floured surface, to about 1/4 of an inch thickness.7. Using the animal cookie cutters, cut as many cookies as you can, transferring to a baking tray lined with baking paper. Roll any left over dough into a ball and repeat steps 6 and 7 until the dough has all been used.

8. Bake for 6 - 8 minutes or until the cookies are just golden. Allow to cool completely on a wire rack. (Set the paper lined tray aside to use again in the next step.)

9. Once the cookies have cooled completely, take half a cup of chocolate melts and place them in a shallow dish in the microwave for around 30 seconds, or until the chocolate is mostly melted. (Stir to ensure it all melts together). Place each cookie, face up, into the chocolate, ensuring the whole back of the cookie is covered. Transfer to the paper lined tray and put directly into the freezer to set.

animal-crackers3animal-crackers4

Oh Etsy | You are GOLD

oe-gold

01 Bowls | 02 Leggings | 03 Planter

When I was a kid, I would have the TV on all day, everyday during the school holidays.  Even if I wasn’t watching it, it was still on in the background.  My parents worked and I would be at home by myself, so there was no one to tell me that just because I could didn’t mean I should. 

Back then, the cartoons were over by mid morning and didn’t start again until late afternoon, so I was mainly stuck with infomercials and soap operas. There was this one infomercial for a “Best of the 80’s” compilation album and it was on every. damn. day. God, I hated that commercial. (Although apparently, not enough to actually turn the TV off?)

For me the worst part was the fact that the song ‘Gold’ by Spandau Ballet would play numerous times throughout the duration of the ad, but Just the chorus. And because informercials play on a bloody loop, that was all I would hear. Every day. “You are GOLD!! (gold) Always beleeiive in your soouuuulllll” Oh my god it drove me insane.

But here’s the thing. Even though that was a million years ago, the damage has been done; Now, any time I hear anyone say the word ‘gold’, in any context, even if I just read  it -  I instantly have that damn song stuck in my head. Every time without fail. It’s like I brainwashed myself in the most useless way possible.

If you’re wondering what the point of this story is, it’s that I have that damn song stuck in my head again! Thanks to these pretty things I spotted on Etsy, I will be humming this song over and over again for the rest of the week. I hope you guys appreciate the things I do for you…

etsy-tastemaker-button

Giveaway | Ciera Design Celebrates 5 years!

Ciera-Design-400-Dollar-Blogiversary-Giveaway

Giveaway time! I’m super excited to be taking part in Ciera Design‘s 5 years celebrations! It’s such an exciting accomplishment and what better way to celebrate than by giving away a special gift to our amazing readers? One lucky person will receive a $400 prepaid MasterCard that can be spent anywhere in the world that accepts Debit MasterCards. Ummm… best prize ever! It’s super easy to enter, just use the Rafflecopter widget below to enter!

a Rafflecopter giveaway
Thanks to my fellow sponsors who made this possible!

Ciera Design | Kory Woodard | Yellow Heart Art | Rebecca Lately
Patti Murphy Designs | Anna Delores | Cocorrina | Rachel The Hat | Fashiony Fab
Sugar and Type | Squirrelly Minds | High Walls | The Nectar Collective
The Proper Pinwheel | Ex Vitae | Fry Sauce & Grits | A Ruffled Life
Pinegate Road | Buckets & Spades | A Girl Named PJ | Sarah Hearts | Tara Victoria

This giveaway will be running until October 27th, 2014 and is opened to international readers! Yaaaaaay!

thumb-clipboard

DIY | Geometric Clipboard Notice Board

DIY Geometric Clipboard Notice Board

Let’s get organised folks! I’m sharing a fun DIY over at Drifter & the Gypsy, a quirky little notice board you can customize to your liking! As someone who is forever trying to find pen and paper, I am seriously loving this project! It’s not only fun and colorful, but super useful as well! Check it out!

clicktoreadDIY Geometric Clipboard Notice Board


thumb-chopsticks

DIY | Decorated Chopsticks

DIY Decorated Chopsticks | highwallsblog.com

Just like sandwiches taste better if you cut them into triangles, noodles are enhanced by eating them with chopsticks. It’s a scientific fact! Sure, using chopsticks is a skill that takes time to master, but you know I’m right when I say that they certainly improve the whole dining experience! We always keep a stack of pilfered chopsticks in our cutlery draw for when we have noodle based dishes. Chopstocks stolen from our local take out store are fun and all, but we are grown ups.  So we need grown up chopsticks…. you know, ones painted with polka dots and stripes…. That’s pretty grown up, right?

DIY Decorated Chopsticks | highwallsblog.comDIY Decorated Chopsticks | highwallsblog.comDIY Decorated Chopsticks | highwallsblog.com

I don’t know what to say, guys; this project is pretty self explanatory! You’re going to need some washi/masking tape, nail polish and of course some sealed wooden chopsticks - but other than that, it’s all up to you!

Tape off the chopsticks at least 1/3rd of the length of the handle (the thicker end) and again at the very tip. Keep your lines straight and ensure that all chopsticks are taped at the same levels. Paint the taped area with thin, even coats of nail polish. Allow to dry in between coats. Once you have a base color you can decorate to your hearts content! Use skewers to stamp polka dots, paint lines free-hand or tape off alternating color-blocked areas. Go nuts!

You can of course, paint your chopsticks in matching pairs, but Pfffft! Fuck pairs! Make ’em all different! That way, not only do you get to be super creative - you also don’t have to worry about trying to match up your patterns. Just think, you will never have to dig through your draws to find the right pair. Grab any two and get busy stuffing yo face!

DIY Decorated Chopsticks | highwallsblog.comDIY Decorated Chopsticks | highwallsblog.com

On a more serious note: please remember to keep your chopsticks clean while you are working. Always use sealed chopsticks and try to keep your painted areas away from the ‘eating’ end of the chopsticks. Remember, these things have to go in your mouth, so keep it food safe!
DIY Decorated Chopsticks | highwallsblog.com

Sunday Sessions | 28.09.14

ss28.09.14

- I don’t know if its the vibrant colors or the delicious pastries, but  I am so digging these DIY color blocked trivets from Sugar & Cloth

- Oh. My. Glob. I need this David Bowie print shirt. Look at the tiny Bowies! This is literally the best thing I’ve seen in a long time!

- Bold and beautiful, the ‘Komon’ series of  Japanese bowls from Kihara are gorgeous!

- I find this Butterfly Garden pattern, by Wendy Kendall, somewhat soothing. Don’t you?