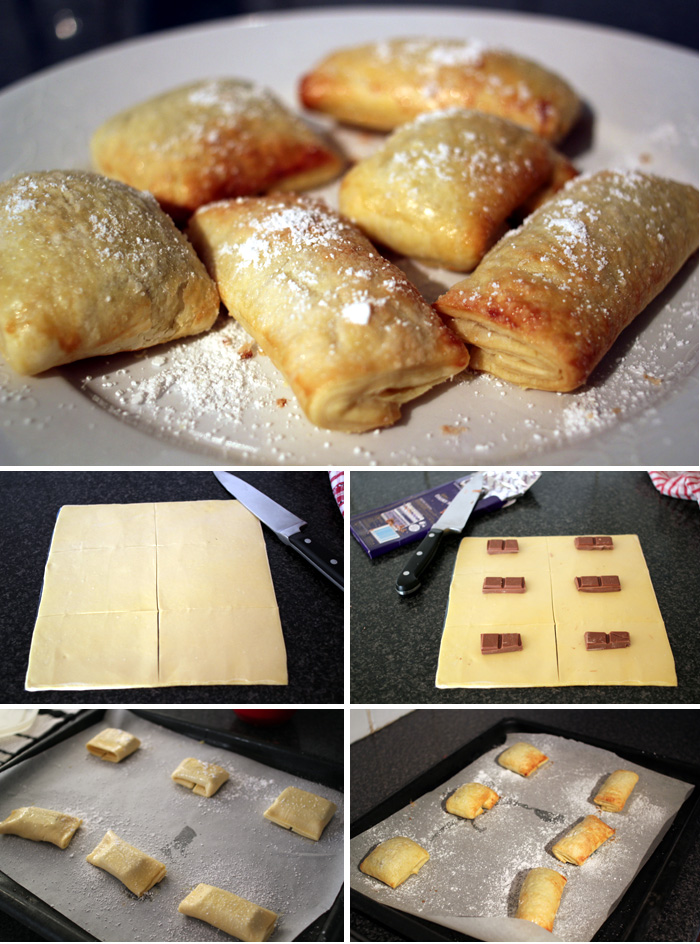
Homemade Strawberry Pop-tarts

Strawberries are going out of season now, so they are super cheap at the supermarkets. I bought a bunch on the weekend that were a bit bruised and while still okay, not really nice enough to eat buy themselves.  I keep buying punnets expecting delicious fruity goodness but am always sadly disappointed. So what is a girl to do with a bunch of too-soft strawberries? Well, make baked goods of course!Now, Pop-tart’s are so not a ‘thing’ in Australia. I never had them as a kid, so I can’t  be like “Oh these bring back memories” and so we can’t bond over sugary breakfast treats. However, when I saw Emma’s recipe for Mini Blueberry Pop-tarts and I just had to try my own version and they seemed a great way to use my strawberries that would have otherwise gone to waste!
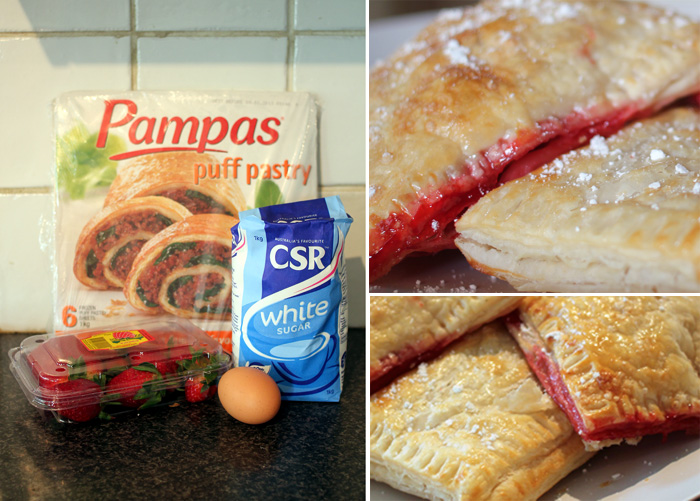
WHAT YOU NEED:
(makes 6 large pop-tarts)
~ Strawberries - 1 punnet (or any filling of your choice really… I may have also made a sneaky nutella pop-tart with some left over pastry.. shhhh)
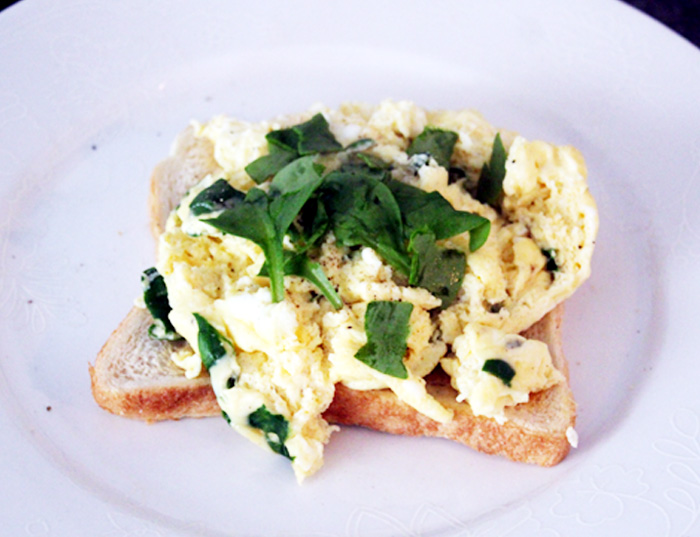
~ Puffy Pastry - 2 sheets
~ I egg, beaten
~ 1-2 tablespoons of sugar
~ 1 to 2 tablespoons of Icing Sugar (optional)
WHAT TO DO:
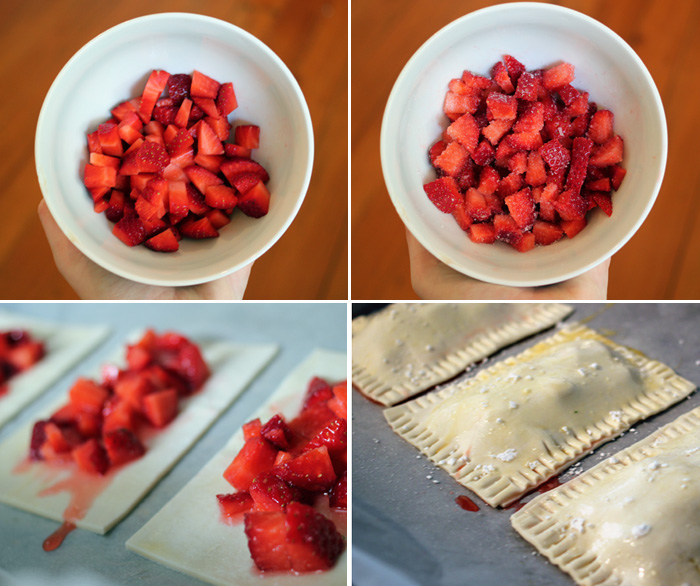
1. Preheat the oven to $180 degrees (celcius). Don’t forget and then have to wait ages like I do every time I bake something.
2. Cut the Pastry sheets into 12 rectangles (6 each sheet) and separate into separate pieces.
3. Dice the strawberries and place in a bowl. Sprinkle the sugar over the strawberries and mix until all the pieces are coated in sugar. Allow to sit for a few minutes so that the juices and residual sugar start to mix together to form a syrup.
4. Brush 6  of the pastry rectangles with a light coating of egg and spoon the strawberry pieces (and syrup) onto each, ensuring you leave about 1.5 - 2cm around the edge of each piece.
5. Press the remaining 6 pieces over the top of each piece and seal the edges by pressing the prongs of a fork down around the permeter. Brush the top with a liberal coating of egg.
Optional: Sprinkle icing sugar over the pastries.
6. Bake for 15-20 minutes on a lined tray or until the pastries are golden and crisp.
7. Try not to burn your tongue on the piping hot strawberry centers!
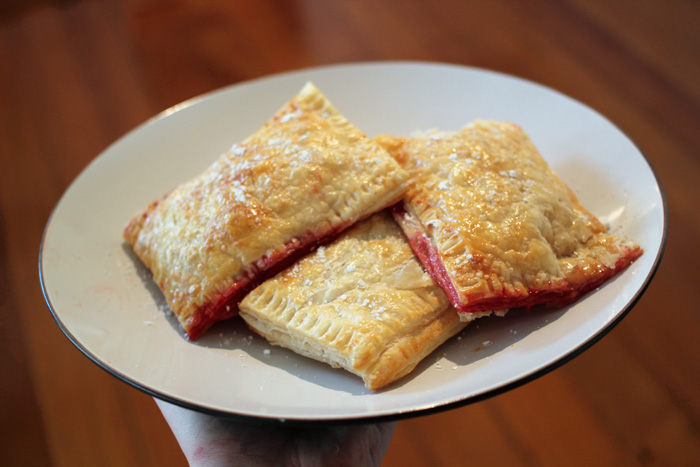
I ate about 4 of these over the weekend! They were pretty much the easiest and most delicious snack for a Saturday afternoon, and I mean, they have fruit in inside, so that means they’re  totally healthy! Right…?

Jewelry Boxes

I have some lovely jewelry boxes that I have been given over the years, but none of them are big enough to house all my jewelry, and certainly when I fill them to the brim its impossible to find anything quickly and without tangling everything together! Aside from all of that, I’m a person who needs to be able see what I have or else I forget what I own and end up wearing the same things every day. It’s a problem I had for years until I found the perfect solution.I’ll be honest. I can’t take credit for this idea, it was actually my mum who did this originally and passed her wisdom down to me.

Except for my nicest and most sentimental pieces (which I keep in my proper jewelry box), I store all of my jewelry in plastic hardware boxes normally used for nuts and bolts and drill bits. They are perfect for keeping jewelry pieces separate and neat. I have boxes for each type of piece (ie; rings, necklaces, bracelets, larger pieces) and because the boxes are clear I can easily see at a glance what I have without digging through everything to find something. All the boxes are the same size so they stack on top of each other perfectly and for about $8 a pop, when one fills up its easy to pop down to the hardware store and pick up another one!
I’ll tell you now, my jewelry is the most organised stuff in my house! If only I could get big giant versions for my clothes and shoes….

Oreo Cookies & Cream Cheesecake Cupcakes

Sunday was rainy and cold so I couldn’t go out or do anything too interesting. I was bored. When I get bored I tend to be easily distracted from things I should actually be doing. While browsing Pintrest I came across this recipe and seeing as Oreo’s were on special this week, how could I not do a bit of Procrasti-baking…
(Recipe from Handle that Heat/Martha Stewart’s Cupcakes) 

I halved the original recipe which was supposed to make 30 cupcakes, but I found even the halved recipe made about 28 cupcakes in the end, so I guess it depends how deep you fill the paper liners etc.Mine definitely aren’t as pretty as the ones in the original recipe, but they tasted delicious, even a little bit addictive. I’m not a huge cheesecake fan normally. I don’t mind cheesecake in small doses but find it a bit sickly. Because these cakes are so small they are the perfect size!

Pain Au Chocolat Recipe

Friday night I went to my work’s Christmas party. What’s that? No, I’m not having some kind of memory lapse. I know its the middle of the year. My work’s social club organizes a Christmas in July party every year. It’s always an awesome night. We exchange Secret Santa gifts and one of the managers dresses up as Santa and we drink copious amounts of free drinks. It’s not always dignified but its always one of the highlights of the social calendar.My gift was a book of chocolate recipes (Do my workmates know me or what!?) I was so excited. When I got home I raided my fridge to see what I had so I could make something from the book. Turns out I only had the ingredients for what seems to be the easiest recipe in the whole book. Didn’t make it any less delicious :)

INGREDIENTS: (to make 6)
225g or 1 sheet pre-made Puff Pastry - preferably butter pastry (you could make it yourself if you’re really into that kind of thing, but I’m way to lazy for that)
12 squares of plain chocolate
1 egg - beaten
Icing SugarMETHOD:

1. (Roll out the dough into a rectangle (if required) around 27 x 35cm). Cut into three strips lengthways, ten cut across the middle horizontally so you end up with six retangles about 10 x 18 cm
2. Place two squares of chocolate just above the middle of each rectangle and bring the bottom edge to the top edge. Then fold the two edges back down to the middle. Turn the pastries over and place on a baking tray lined with baking paper. (or if you’re dumb like me, you will just fold them up however you like….) Chill for 15 minutes and Preheat the oven to 180 degrees Celsius.
3. Brush the pastries with beaten egg and dust with the icing sugar. Bake for 15 to 20 minutes or until puffed up and golden. Leave to cool for 5 to 10 minutes before serving.
4. Om nom delicious pastry and chocolate!What could be easier? If anything, I would even add an extra square of chocolate. That’s just how I roll.

Thank you Secret Santa, whoever you are! I love my present so much! I’m going to cook every recipe in the book and get big and fat :) It will be awesome.

Microwaved Scrambled Eggs

So, scrambled eggs are not a very exciting recipe, and I’m fairly sure most people know how to make them. But on a lazy Saturday morning, when I don’t feel like cooking a big meal I have recently started done since I was a kid.

During school holidays, my mum would go to work a leave me at home to fend for myself. One of the main things I would make for myself was microwaved scrambled eggs as I was to young to use the stove alone. Now that I’m all grown up, I still use this little trick when I’m feeling particularly lazy, however now (you know, because I’m a grown up) I have added a couple of extra ingredients.

Microwaved Scrambled Eggs

INGREDIENTS
2 eggs (this will make enough to cover about 1 - 2 slices of bread)
A dash of milk
Grated mozzarella (or any cheese really)
Baby spinach, torn
Salt, Pepper & dried basil to taste
Slices of Toast
METHOD
1. Put the eggs into a small bowl  and whisk with a spoon until the yolk and whites are mixed.
2. Add a dash of milk, salt, pepper and basil and whisk again to combine.
3. Add 3/4 of the baby spinach making sure to tear up into small pieces to make it easier to combine.
4. Put into the microwave and heat on high for about 2 minutes (this will depend on your microwave, so keep an eye on it while its cooking) Put the toast on now.
5. I like to stop the microwave about half way and stir in the remainder spinach to ensure an even mix.
6. Take out of the microwave while still hot, fluff and place onto your lovely hot toast.
7. Eat in your dressing gown in front of the TV (because lets face it, if you’re making scrambled eggs this way, you probably aren’t doing anything more productive than this!) :)

Doughnut Muffins

I love to get my bake on sometimes, even if I don’t have a reason. Today’s reason was simply that I cam across this recipe from Jen at How to: Simplify and it sounded so delish that I thought I’d give it a go!
Doughnut Muffins
Ingredients:
(For the muffins)
1 3/4 cup flour
1 1/2 teaspoons baking powder
1/2 teaspoon salt
1/2 teaspoon nutmeg
1/2 teaspoon cinnamon
1/3 cup oil
3/4 cup sugar
1 egg
3/4 cup milk

(For the coating)
1/4 -1/2 cup butter, melted
1/3 cup sugar
1 tablespoon cinnamonDirections:

1. Preheat oven to 180 degrees Celsius and grease a muffin tin.
2. Combine flour, baking powder, salt, nutmeg and cinnamon in a medium bowl.
3. Combine oil, sugar, egg and milk in a large bowl. Add dry ingredients and stir only to combine.
4. Bake degrees for 15-20 minutes - My oven is pretty hot so it only took about 15 minutes for them to be pefect.
5. While muffins are baking, melt butter in a small bowl. In another small bowl, combine the sugar and cinnamon.
6. Using a skewer, gently push in at the sides of the muffins to loosen and shake muffins out of the muffin tin while still hot.
7. Lightly Dip muffins in the melted butter (one half at a time) and then into the sugar and cinnamon mixture. Place on a wire rack and allow to cool.
8. Nom Nom Nom Nom
Loki is loving it when I use the oven at the moment. Poor little guy is feeling the cold, so he loves to sit right in front of the oven and soak up all the warms. He doesn’t even move when I open the door, he just crouches down and patiently waits. He’s my little assistant :)
I’m not a big fan of nutmeg so I used a little less than the recipe asks for. I would also recommend  being extra careful when dipping these guys in the butter, if you dip too much they end up a little soggy (still yum though!)

Maxibon Cake

Let me apologize in advance for the random and sheer stupidity of the content of this post.I don’t know if I can call this a recipe. It barely qualifies really. It’s actually quite insane. No, its totally insane. Let me explain: My housemate always has ice cream cake for his birthday, its tradition. Yesterday while discussing cakes and food, we joked about ice cream and he made a comment about making a cake out of Maxibons. In case you haven’t experienced the wonder that is a Maxibon, basically it is an ice cream sandwich with biscuit on one side and dipped in chocolate on the other. They are amazing. Anyway, our joke was mainly because we do have a habit of buying these ice creams in bulk, and someone joked about stacking them on top of each other to make a cake….Challenge accepted.

You are looking at 8 Maxibons and 4 layers of creamy goodness! I used cookies & cream ice cream as the ‘frosting’ and as cement to hold the whole thing together. It was gloriously disgusting. I’m a little ashamed of how delicious it was. I think my fingers are still frozen from handling so much ice cream, and I still feel quite ill, but it was totally worth it.

Spinach & Feta Mini Quiche Recipe

Sometimes, usually when its just me at home, I decide to make up recipes for dinner, and just hope for the best. Last night the boyfriend and I ended up being the only ones at home, and instead of cooking what we had planned for 4 people and having WAY too much food, I raided the fridge and came up with these mini quiches.This recipe is by no means exact, in fact, I just guessed at the quantities of cheese and spinach.  Feel free to experiment.  I’m pretty sure you could use use any combination of your favorite cheeses and even add any vegetables you happen to have lying around.

INGREDIENTS: 
A splash of olive oil
2-3 cloves garlic, finely chopped
1 Small onion, finely chopped
Fresh baby spinach, about 2 loosely packed cups or a couple big handfuls
Salt and freshly ground pepper to taste
Feta cheese, crumbled 1/2 cup
Cheddar cheese, shredded 1/4 cup (mozzarella would be even better if you have it)
Parmesan cheese,shredded 1/4 of a cup
2-3 large eggs
3/4 cup milk
3 sheets of puff pastry
METHOD: 
1. Preheat oven to 375˚ and grease a muffin tray VERY WELL (even line with baking paper if you are that patient)
2. Defrost the puff pastry sheets. Once it starts to soften cut into quarter squares and line a muffin tray with the pastry, folding and pressing into the shape of the pan. Roll up the edges.
3. In a medium pan or saucepan, saute the garlic and onion in the olive oil until tender.
4. Add the spinach, coating it in the olive oil mixture and cook until spinach is soft and wilted down. Season with salt and pepper. Add all three cheeses, saving a small amount of Parmesan for sprinkling later, and mix well.  Remove from heat.
5. In a medium bowl combine the milk with the eggs and beat well.  Add salt and pepper to taste.
6. Spoon the spinach mixture into the pastry cups.  Then, spoon the beaten eggs and milk over the spinach mixture, lightly stir each one to make sure its all mixed properly. (You may have too much egg mixture)
7. Bake uncovered in the oven for about 15 minute.  Sprinkle the extra Parmesan cheese on top, turn the heat down to about 180˚ and bake for another 20-30 minutes until the eggs are set through to the center and the crust and top of the quiche is nicely browned. Allow to cool for about 10 minutes before serving.
8. Nom Nom Nom :)

Vegetarian Pizza

Obviously pizza is pretty basic, not really something you need a recipe for, but I thought I’d share a yummy pizza I made recently. I’ve been attempting to find healthier alternatives to some of my favourite foods and this topping is definitely one of my favourites. Plus its super easy and only takes about 20 minutes to make.INGREDIENTS:

(The amount of ingredients will depend on how many pizza’s your making and how much topping you like so I will leave it up to you!)
Wholemeal Pizza bases
Tomato and Basil sauce (we usually buy the ready made jars of pasta sauce)
Onion finely diced
Red and Green Capsicum finely diced
Baby Spinich roughly torn
Sweet Potato
Fetta Cheese (I use a marinated fetta in olive oil and use the olive oil over the pizza, but you will need your own oil for your pizza)METHOD:

1. Preheat the over to the temperature specified on the packet (for ours we set it to around 180 degrees celcius)
2. Spread the sauce evenly on the bases
3. Sprinkle the onion and half the capcicum over the base.
4. Peel and slice the sweet potato into thin slices (about the thickness of a potato chip) and spread pieces evenly across the pizza base.
5. sprinkle the rest of the capsicum, the spinach and crumble the fetta over the base.
6. Drizzle olive oil over the pizza just enough to lightly cover the potato pieces.
7. Cook for 15-20 minutes checking occasionally to make sure the potato doesn’t dry out (add more oil if need be)
8. When the potato is soft and the edges start to crisp - Serve and Enjoy!

Chorizo, Capcicum and Tomato Pasta Recipe

This recipe is a new favourite in my house. So not good for you but so very delicious :) I do love Chorizo. Plus its super easy to make and only takes about half hour/45 minutes, which is great on days like today where I just wanted to relax. I received a couple of more parcels today with some beads for my new necklaces. Just waiting on one more set and my chains to arrive and I will be halfway to having some new sets ready!
INGREDIENTS:
500g spiral pasta (or any pasta you want really) 2-3 chorizo sausages, thinly sliced 1 medium brown onion, chopped 2 garlic cloves, crushed 1 large red capsicum, diced
1 large green capsicum, diced1/2 teaspoon dried chilli flakes
2 teaspoons of basil and oregano
1/2 cup of chicken stock2 x 400g cans diced tomatoes

METHOD:
1. Boil water and cook pasta while cooking the sauce. 2. Heat a large, deep frying pan over high heat. Add chorizo and cook until it starts to crisp up.
3. Add onion, garlic and capsicum and cook, stirring until the capsicum starts to soften.
4. Add herbs, chilli, tomato and stock. Cook for 5 to 7 minutes or until sauce has thickened. 5. Serve and Enjoy!
6. Nom Nom Nom Nom