
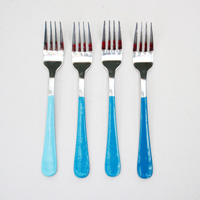
Ombre Enamel Flatware

As soon as people started dipping wooden spoons in bright colours I knew this was the project for me. Simple, elegant and something that can be totally personalized to your own taste.
My researched brought me to the conclusion that enamel paints were the way to go; the glorious thick paint is perfect for even coverage and should stand the test of time. ‘Plain silver and a rainbow of pastel colours,’ I thought, ‘What a good idea! And so much cheaper than buying the same thing in the stores. Dani - you so smart!’ and off I skipped to my local hardware store to choose the perfect shades for my apparently brilliant project.
So… enamel paint is expensive. (Alright, that’s not entirely true.) Hardware stores charge between $10 - $16 per teeny can and when I had my heart set on 8 different colours that’s a pricey DIY! Sure, I could get them online where they are half that price, but then I can’t see the true colour in person prior to buying and besides, ain’t nobody got time for that! (So maybe I’m not the most patient of people…)
Besides my monetary issues, I also couldn’t find the colours that I wanted either! I almost abandoned the whole thing altogether when I suddenly had a stroke of genius: What colour scheme do I love for a DIY? That’s right kids, it’s another ombre DIY! This meant I only had to buy 2 tin’s of paint instead of 8. As I don’t have a lot of use for enamel paints, this was the perfect compromise to not only bring down the cost, but also stop a lot of wastage.
Disclaimer: This method is what I found was best to reduce wastage of your paint. You can of course mix a series of different shades from lightest to darkest, but chances are you will not use all of the paint, so you will either need to store each colour separately for later use, or discard it all.


What You Need:
1 tin of enamel paint in white
1 tin of enamel paint in your choice of colour
A selection of flatware/cutlery to paint
A tall jar or container - the height of your handle
A piece of polystyrene foam large enough to hold your set
What You Do:
1. Take a tall jar or container that is roughly the height of the handle part of your cutlery (narrower is better) and pour some of your coloured paint into said jar. You want to fill around 1/5 of the jar - but this will vary depending on your container.
2. Lay down a drop cloth/newspaper - this is going to get messy! Take the polystyrene foam and set up a “table” over your prepared cloth/paper; I used two cans of spray paint as the ‘legs’ with the foam as the top. This is where we are going to hang our flatware while it dries. Return the foam on a flat surface for now.
3. Take you flatware pieces that you want in the darkest shade; dip the end into the paint and gently tip the jar to one side, allowing the paint to slide down the side of the jar - over the handle until covered to your desired height. Turn the piece over while in this position to ensure even coverage on both sides. If you don’t rush this step you will get nice clean lines.
4. Remove your piece from the paint and hold over the jar so that any excess can run back into the jar. Check the coverage and re-dip if you need to touch up any areas.
5. Once the drips have almost stopped, firmly skewer your piece into the polystyrene foam by the fork/blade end and prop back onto your pre-prepared ‘table’ set up so that it can continue to dry. As the paint dries off it may leave a little lump where it dripped off, so push each piece it at an angle with the front facing up. This way, if you need to smooth down the lump later, any imperfections will be at the back of the handle.
6. Take your neck piece and using the handle end as a kind of spoon, decant a small amount of while paint into the jar and mix with the handle thoroughly until a shade just lighter than your oirginal colour. Be patient and mix slowly so as to avoid making air bubbles. Once ready, repeat Step 3 and 4 to cover the piece you just used to mix with.
7. Repeat for the next pieces, adding a little more white each time to get lighter and light colours. Allow to hang overnight to dry completely. Once dry you can wash and use straight away.
A Few Tips:
- If you find any air bubbles occurring when you dip, take a toothpick dipped in paint and gently pop and smooth out any bubbles. If this doesn’t help, just dip again over the first coat.
- The enamel paint can be peeled away when it is touch dry. If you have any drips, or mistakes on a piece and you want to start again. Just allow it to dry slightly and you can quite easily scratch the paint away. It isn’t as easy once it is fully dry.
- Rotate your pieces while they hang to dry, alternating angles so that they dry evenly (and hopefully without any ‘drip lumps’)
Faith
April 16, 2013 at 11:38 pmYou chose lovely colors! Thanks for the detailed tutorial.
kelsey
April 16, 2013 at 11:47 pmthis is so gorgeous. love ocean blues and the ombre adds a nice effect that wouldn’t otherwise have been there!
kw, ladies in navy
J. Crew giveaway!
McKenna Ryan
April 17, 2013 at 1:17 amI might have to try painting my flatware. I got it for my wedding and I don’t really like it. I thought I did in the beginning but now I wish I had something different. Maybe painting them will do the trick. xx. McKenna Lou
http://www.lynnandlou.com
P.S. Have you entered into our giveaway’s yet? Enter into our Octavia Bloom Giveaway for some lovely jewelry, and/or our Perfect Shirt giveaway (2 winners total)!
Michelle
April 17, 2013 at 5:18 amI love this!!!
Denysia Yu
April 17, 2013 at 7:45 amAwesome DIY! :)
Ally
March 20, 2014 at 2:12 pmGreat tutorial & gorgeous pics. How do you wash them?
Dani
March 20, 2014 at 2:26 pmHi Ally! I wash them by hand in warm soapy water - mainly because I don’t have a dishwasher, but also because I’m not sure they would hold up too well in a mashine. Mine have kept their colour really well! My advice if you’re concerned about longevity is to make sure you’re not using a water based enamel paint.