Last Chance to Sign up
for the Christmas Gift Swap!

giftswap

Just a quick reminder, if you want to participate in this years Christmas Gift Swap you have around 8 hours left to sign up! I know I’ve been talking about it a lot this week, but it really is one of the highlights of the Holiday Season for me and I just know that those of you who have signed up will have a fantastic time!

Click HERE to read the full details and to sign up

Oh Etsy | More Gift Swap Ideas!

oe-cards&prints

One of the things I love about holding our annual Christmas Gift Swap is finding unique and original Christmasy things from independent artists and designers. I feel like most store bought cards and gifts are all kind of the same. Etsy, on the other hand, has the prettiest and most interesting designs. Don’t you agree?

‘deck the halls’ card | chalkboard print | jingle bell ornament
pine tree wrapping paper | merry merry print | bauble print |
christmas tags | holiday home postcards | merry & bright card

etsy-tastemaker-button

thumb-diy-wreath

DIY | Wooden Christmas Wreath

DIY Beaded Christmas Wreaths (click through for the easy steps!)

Can we all agree that it is basically Christmas now and so putting up decorations is totally okay? Phew! I’m glad we agreed on that one, now I don’t have to be embarrassed to admit that I put up my tree and decorations around the house today! Hooray! I never love my house more than when it’s all prettied up for the holiday season.

Every year I like to buy a few new decorations to add to my collection. However, this year I am a little strapped for cash, which is not conducive to my expensive taste in decorations. So instead of going for spending big on pricey baubles, I have been getting my crafting on. Like, a lot! I was going to save my Christmas crafts for December, but seeing as we have all agreed that the Christmas season is well and truly upon us, I think it’s as good a time as any to start sharing some crafty goodness; starting with a super stylin beaded wreath tutorial!

DIY Beaded Christmas Wreaths (click through for the easy steps!)

DIY Beaded Christmas Wreaths (click through for the easy steps!)

 MATERIALS:
Wooden beads
Wire
Pliers/wire cutters
Ribbon
string
 1. Take a length of wire around 1.5 inches longer than you need.

2. Thread the beads onto the wire. If you are using various colors or sizes, thread the beads in patterns of your liking.

3. Once the beads are all threaded on (still leaving exposed wire at each end), bend the wire into a circle - You may wish to bend the wire around a vase or a glass to help shape it correctly.

4. Secure the the wire by wrapping the exposed wire around itself into a knot. Ensure there are no gaps in between the beads and that the wire is knotted neatly. Trim away any excess wire.

5. Cover the wire knot with a strip of ribbon and tie into a large bow.

6. Hang with a length of string, attached behind the bow.

DIY Beaded Christmas Wreaths (click through for the easy steps!)

DIY Beaded Christmas Wreaths (click through for the easy steps!)

Christmas Gift Guide | Swap Ideas for Under $20

gift-guide-swapI can’t put into words how exciting it is to see everyone’s registrations coming in for this years Christmas Gift Swap! This is the third year we have run this event and I gotta tell you, it’s possibly one of my favourite parts of my Christmas! Seeing all the far away places you guys are reading from warms my heart, and hopefully you are just as excited to send and receive a gift from far away lands! To get you thinking, here are a few gift ideas from around the web - all under $20 and all perfect to pop in the post!

gold leaf pot | sketchbook matches | Pudding Purse | Feliz Navidad Card
Phone Cover Owl Frame | Elephant Baggu | Ornament Card | Hot Water Bottle

Sunday Sessions | 23.11.14

ss23.11.14ONE | If this Hipster Mermaid Wedding photo shoot doesn’t speak to your inner child, I don’t know what will. Arial herself would be head over heels to have a wedding as fun and colorful as this one!

TWO | I’ve always been a sucker for a marquee light, but this snowflake DIY from A Beautiful Mess is calling to me. I have a fireplace that would look aaaaamazing with one of these lights up on it… now I just need to get myself some power tools haha!

THREE | Speaking of DIY, totally digging this super quick and easy paper leaf napkin rings. You can download the template from the blog Little White Whale and jazz up your table settings in mere minutes!

FOUR | Have you guys signed up for our Christmas Gift Swap? It was so much fun last year and I cannot wait to host it again! Don’t forget, sign ups close on Friday!

thumb-recipe-almond-cake

EAT | Lemon, Ricotta and Almond Flourless Cake

Lemon, Ricotta and Almond Flourless Cake

Flourless cakes stress me out.There. I said it. Given that my pet hate, when it comes to baking, is when cakes don’t rise enough, the idea of a cake that isn’t supposed to rise should be totally my jam! But that’s just it! Flourless cakes are so moist, so dense and decadent that I simply do not know what to do with them! I constantly second guess myself; is it cooked properly? Did I fold the egg whites correctly? Why does this stress me out so much when it is so damn easy?!

This bout of cake related neuroses is probably why I only make this cake when requested. Sure, the mix of zesty lemon with the creamy ricotta and flakey almond IS pretty friggen amazing. And YES, if you’re gonna hound me about it, maybe I did eat 2 or 3 slices while I was taking these photos. But really, is the completely self-inflicted stress that comes with making this cake worth it in the end? (Yes! YES! A thousand times YES!)

… touché dear readers. You know me too well. Maybe this is more about my own insecurities, than any actual problems with flourless cake. I’m so glad we talked this out. Now let’s celebrate this breakthrough with my 4th a slice of delicious lemon, ricotta and almond cake!

Lemon, Ricotta and Almond Flourless Cake Lemon, Ricotta and Almond Flourless Cake Lemon, Ricotta and Almond Flourless Cake

Lemon, Ricotta & Almond
Flourless Cake

Ingredients

  • 120 grams of unsalted butter, softened
  • 1 1/3 cups of caster sugar
  • 1 vanilla bean, split and seeds scraped
  • 1/4 cup of lemon zest
  • 4 eggs, separated
  • 2 1/2 cups of almond meal
  • 300 grams of ricotta
  • Flaked almonds
  • Icing sugar

Instructions

  1. Preheat the oven to 160 degree Celsius and line the base and sides of a 20cm round cake tin with baking paper and set aside.
  2. Place the butter, 165 grams of the caster sugar, vanilla seeds and lemon zest in an bowl and beat with an electric mixer for 8-10 minutes or until pale and creamy.
  3. Scrape down the sides of the bowl and then add the egg yolks, one at a time, beating in between each addition, until fully combined.
  4. Add the almond meal and beat to combine. With a spoon or spatula, fold the ricotta through the almond meal mixture.
  5. In a separate bowl, beat the egg whites with an electric mixer (using a whisk attachment) until soft peaks form.
  6. Gradually add the remaining sugar to the egg whites mixture and continue to whisk until stiff peaks form.
  7. Add 1 third of the egg whites to the cake mixture and gently fold to combine/ Repeat with the rest of the egg whites.
  8. Pour the mixture into the prepared cake tin and smooth the top.
  9. Sprinkle the top with almond flakes (or place in a pattern) and place in the oven to bake for 40-45 minutes or until firm to touch.
  10. Allow to cool completely in the cake tin. To serve, dust with a generous helping of icing sugar.

Notes

(Adapted from Donna Hay Magazine)

http://www.highwallsblog.com/2014/11/eat-lemon-ricotta-and-almond-flourless-cake/

Lemon, Ricotta and Almond Flourless CakeLemon, Ricotta and Almond Flourless Cake

Oh Etsy | Winter Pine

oe-xmas1
cone ornaments | origami ornament | ‘tree 06′ print snowflake ornament 

Christmas always makes me think of winter.  You know; Warm sweaters,woolly scarves, pine trees and snow. This is despite the fact I live in Australia, and all of my Christmas’ revolve around trying to keep cool during the hottest time of the year! I guess movies and TV have conditioned me to still think of those ‘traditionally Christmas’ images. And I’m pretty okay with it! I might not have pine cones and snowy trees,but at least I can live vicariously through all these lovely Etsy finds…

etsy-tastemaker-button

thumb-diy-xmas-plate-decals

DIY | Christmas Plate Decals

5 Minute Christmas Crafts: Makes these Christmas Tree Plate Decals (click through for the full tutorial)

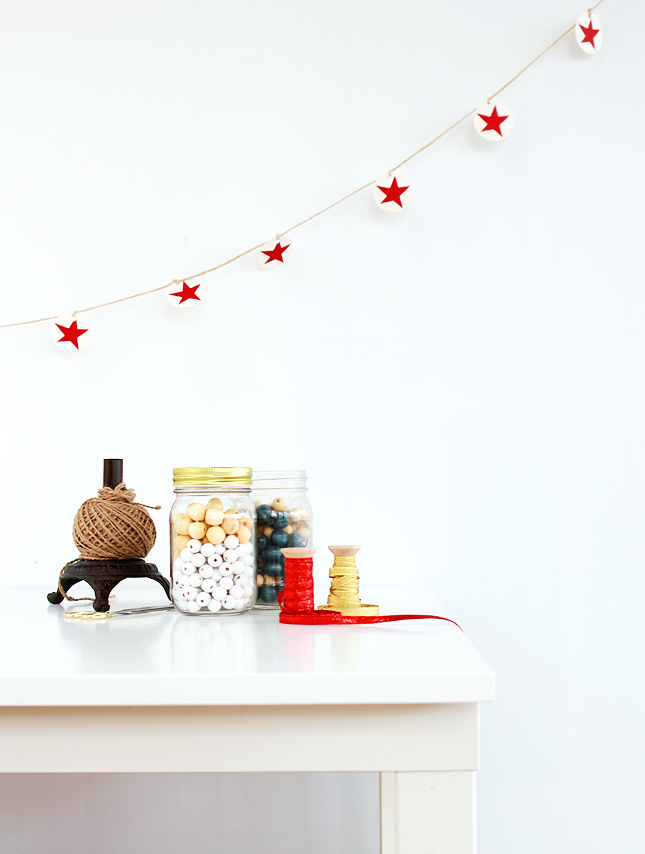
Now that our Christmas Gift Swap is up and running for another year, I’m really getting into a festive mood! I’ve mentioned it many, many times before, but Christmas really is my favourite time of year. I love buying presents, I love coming up with fancy ways to wrap said presents, I love the food, the drinks, the friends and family and of course; the decorations. Last year I didn’t get around to as much Christmas crafting as I would have liked, but this year I’m back - with a vengeance! 

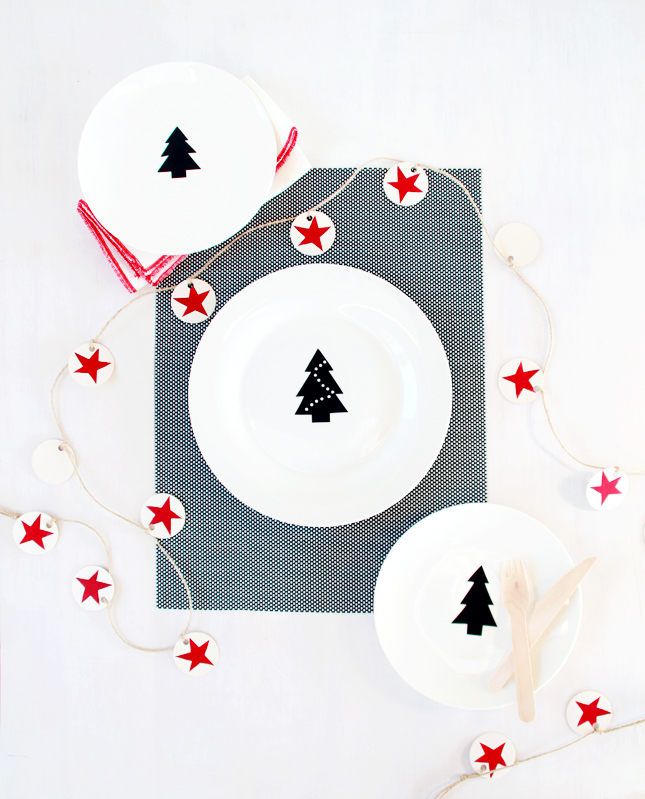
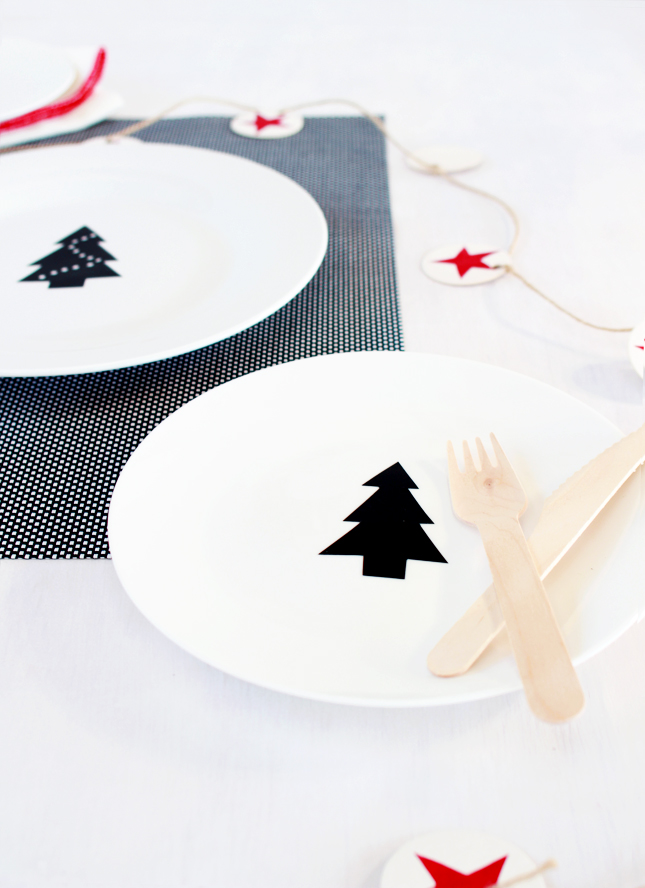
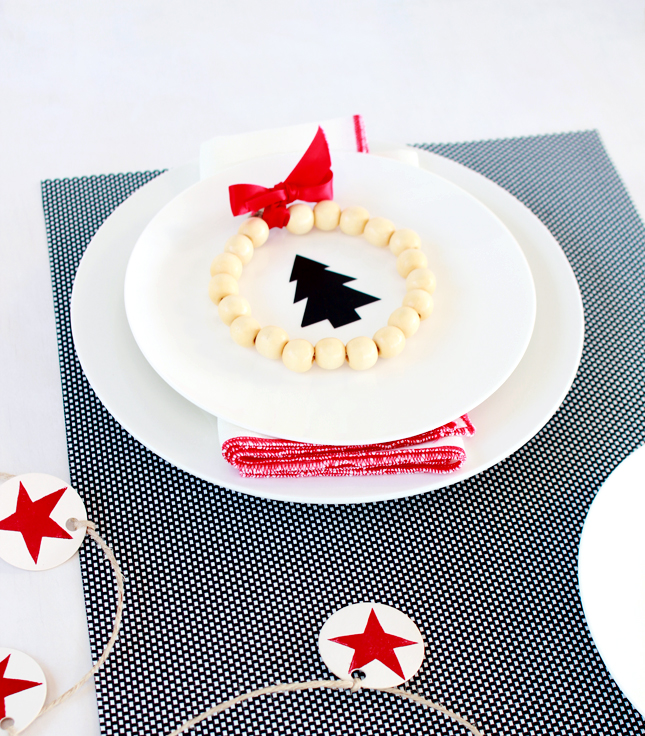
Probably one of my most favourite DIY projects from this year was the Monogrammed Mugs we made all the way back in July. I figured, those mugs turned out so well (and are still going strong after all this time), why not extend my new-found skill to decorating some more kitchenware with something a little more festive! They turned out pretty well, dontcha think? I decided to go with good old Christmas trees for the design, but feel free to experiment with different shapes or even different coloured vinyl.

5 Minute Christmas Crafts: Makes these Christmas Tree Plate Decals (click through for the full tutorial) 5 Minute Christmas Crafts: Makes these Christmas Tree Plate Decals (click through for the full tutorial)

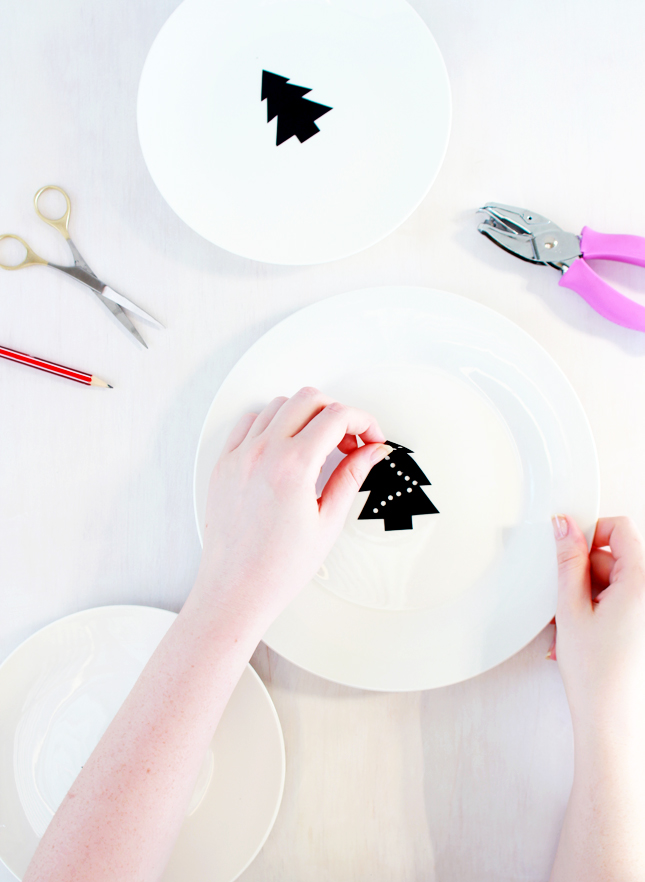
To make these decals yourself is super easy; you’re going to need some adhesive vinyl, a small hole punch, sharp scissors and of course some plates, bowls or cups!

1. Cut a piece of vinyl big enough to accommodate for your shapes.

2. Sketch out a Christmas tree shape (three triangles, stacked on top of each other), or if you are not confident in your tree drawing abilities, you can print out a tree image and use as a guide like we did in the mug tutorial. Your trees should be around 10cm high.

3. Carefully, cut out each tree shape and trim away any rough edges.

4. If you would like to add tinsel/bauble lines onto your trees, take a small hold punch and punch a line of holes in a zig-zag pattern across the tree.

5. Wipe down the surface, where you are going to stick your decals and make sure it is completely dry before proceeding.

6. Remove the backing paper and carefully smooth the vinyl onto the plate surface, making sure there are no air bubbles as you go. You may want to measure out and mark the center before you stick anything down.

Voilà! These decals should stay firmly adhered to your plates or bowls as long as you take care of them. No dishwashers and hand wash with warm soapy water  (do not soak). That said, if you decide you no longer want festive plates, it can always been removed and the glue residue scrubbed off.

5 Minute Christmas Crafts: Makes these Christmas Tree Plate Decals (click through for the full tutorial)   5 Minute Christmas Crafts: Makes these Christmas Tree Plate Decals (click through for the full tutorial)

Christmas Gift Swap 2014

giftswap(Img source)

I can’t believe I’m saying this already, but it’s that time of year again: Time for the Annual Christmas Gift Swap! Hooray!! For those of you who are new around here, let me fill you in with the details of our annual event:

The gift swap is all about making new friends and spreading some Christmas cheer! You will be paired up with someone from somewhere else in the world and charged  with the mission to find a little somethin’-somethin’ to send to your new friend. Kind of like an International Secret Santa trade!  Your gift doesn’t have to be fancy or expensive, it’s just a little token to share some festive joy, and hopefully, make someone smile!

If you would like to take part you will be required to send a Christmas card and small gift to a stranger (and potential new BFF) and you will receive one in return. As a lot of you guys are international, we’re going to keep it small – your gift should be small enough to fit in a small to medium sized envelope (for example; an art print, an ornament, small jewellery etc) but feel free to go bigger if you are feeling generous. In your card you might want to include a little about you – where you are from, blog/website (if you have one), what you are doing for the holidays and a Christmas Message.

READ MORE