Mixtape 05 | 2014 Hottest 100

triplej-2014-b

Tomorrow is Australia Day, which means it’s time for the Triple J Hottest 100 - a massive music poll run by the national youth ratio station, Triple J. The count down is broadcast throughout the day and, to be honest, is the highlight of the day! As always, I’m looking forward to seeing who made it into the top 10 this year, (including seeing if Buzzfeed’s campaign to get Taylor Swift into the running was successful!) I actually forgot to vote, but I thought I’d share 10 of my faves, starting with Chvrches amazing cover of the Arctic Monkeys song, ‘Do I wanna Know’, which sadly wasn’t available on Spotify (check it out on YouTube). Enjoy!

playlist-button

thumb-recipe-elderflower-cake

EAT | Elderflower & Mixed Berry Cake

Elderflower cake with mascarpone frosting & mixed berries. YUM!

I recently came to the conclusion that any cake looks super exciting when it has cream and layers. Take this elderflower cake, for example. By itself it’s sweet and delicious and pretty much your standard little cake. But you layer that baby up, fill it with  cream and fresh berries, and BAM! Look at this fancy lady! Damn gurl! You lookin’ fiiiine!

It might seem a little ‘wedding cake’-esque, but my new favourite layering technique involves two tiers on my cakes. A medium sized base with smaller layers on top. Because this cake is ‘naked’ except for the cream frosting layers, it is super forgiving in the decorating department. The tiered layers of fluffy cream and crisp berries make it so easy dress your cake to impress!

Elderflower cake with mascarpone frosting & mixed berries. YUM!

The elderflower flavour in this cake is sweet yet subtle, which is how I like it. If I’m feeling like it needs a bit more flavour I add it into the cream frosting as well.

Elderflower cordial is something I’ve been trying to track down for ages. (If by ‘trying to track down’ means,  ‘I looked in my local supermarket, couldn’t find it and kind of stopped looking’…) I assumed I would have to get it from a speciality food store, but low and behold; on a trip to rival supermarket what should I find, on special no less!? You got it, elderflower cordial! Now I’m obsessed!

Elderflower cake with mascarpone frosting & mixed berries. YUM!Elderflower cake with mascarpone frosting & mixed berries. YUM!

Elderflower & Mixed Berry Cake
 
Author:
Ingredients
  • 250g of butter
  • 1 cup of caster sugar
  • 3 eggs
  • 2⅓ cups of self-raising flour
  • 3-5 tbsp of elderflower cordial
  • Zest from ½ lemon
  • 250 g mascarpone cheese
  • ¼ cup of powdered sugar
  • ¾ cup of heavy cream
  • 1 tbsp of lemon zest
  • 1 tsp of elderflower cordial (optional)
  • Fresh strawberries, blackberries, for filling
Instructions
  1. Preheat your oven to 170°C
  2. Grease one 25cm and one 15cm cake pan and set aside.
  3. Place the butter (softened) and caster sugar in a bowl and beat using an electric mixer until pale and creamy.
  4. One at a time, add the eggs, beating well after each addition. Add the 3 tablespoons of elderflower cordial and beat until smooth.
  5. Gradually add the flour to the mixture, beating on medium speed. Add the lemon zest and stir to combine. If you mixture is a little too dry, add 1 or 2 more tablespoons of cordial to the mixture and mix until smooth.
  6. Pour the batter into both prepared cake pans and transfer to the oven. Bake for 30-35 minutes or until a toothpick inserted comes out clean. The smaller cake will take less time to bake, (around 25 minutes) Allow to cool completely on a wire rack.
  7. Once cooled, trim away any excess cake and separate each cake into two layers. Set aside.
  8. For the frosting: Beat the mascarpone cheese and powdered sugar in an electric mixer, until smooth.
  9. Add the lemon zest and cream to the mascarpone, and beat on high speed until the mixture thickens and stiff peaks start to form.
  10. Stir in the elderflower cordial (if desired)
  11. To assemble: Place the first layer on a plate and top with a thick layer of frosting.
  12. Layer with blackberries and sliced strawberries and top with the next layer of cake.
  13. Spread another thick layer of frosting and place the first smaller cake piece on top.
  14. Repeat the above steps with the smaller layers: frosting, berries, cake and frosting on top.
  15. Top with whole berries and line the top of the larger tier with berries as well. Dust with icing sugar.

Elderflower cake with mascarpone frosting & mixed berries. YUM!Elderflower cake with mascarpone frosting & mixed berries. YUM!

Oh Etsy | Bold & Beautiful Blues

oe-bluesbracelet | sweater | hat | clutch

I know I’m a little early for winter picks (or late, depending where in the world you are!), but these blue beauties are calling to me. Over the last couple of years I found myself increasingly drawn to bold, chunky sweaters, both for the comfort and the fun they bring. Paired with a cosy knitted hat and some choice accessories; a geometric bracelet here, a shibori clutch there, and you have makings of a bold and beautiful blue collection. (Even if it is a little out of season…)

etsy-tastemaker-button-2

thumb-recipe-palmier

EAT | Sugar & Raspberry Palmiers

So easy to make these Sugar and Raspberry Palmiers; only 3 ingredients!

Leave it to the French to come up with something as brilliant as palmiers. Essentially a pastry cookie in a butterfly type shape. these crispy delights are crazy easy and only require 3 ingredients to make! If there’s one thing the French do well (and lets face it, they do a lot of things very well!), pastries would have to be in the top 5! But you don’t need to travel to Paris to give these treats a try whenever you like! It’s so easy and C’mon! Don’t act like I didn’t already have your undivided attention at ‘pastry cookie’.

Of course,  you can go all out and make your own pastry like a pro (this is a great recipe!) But my favourite thing about these pastries is the sheer simplicity. It is one of many recipes that are in my ’emergency entertaining’ arsenal. Frozen pastry and sugar are two of the most common ingredients found in your average kitchen. So if you ever find yourself with unexpected guests and nothing to serve them; you can whip these up on the spur of the moment, and impress them with your ‘fancy’ French pastries! How awesome are you!

So easy to make these Sugar and Raspberry Palmiers; only 3 ingredients! So easy to make these Sugar and Raspberry Palmiers; only 3 ingredients!

Sugar & Raspberry Palmiers

Ingredients

  • 2 sheets of frozen puff pastry
  • 1 cup of white sugar
  • 1 punnet of raspberries

Instructions

  1. Unwrap the puff pastry and lay it on a benchtop to thaw until flexible and soft. Cover with a tea towel to prevent the dough from drying out.
  2. Spread 1/4 of sugar across the surface of each of the dough sheets in an even coat. Gently run a rolling pin over the pastry, pressing the sugar into the dough. Carefully turn the pastry sheets over and repeat on the opposite sides.
  3. Place the raspberries in a blender and pulse to break up and release juices.
  4. Take the first sheet of pastry and fold or roll into the centre from each side until they meet in the middle. Wrap securely in plastic wrap and place in the refrigerator for 20 - 30 minutes.
  5. With the remaining pastry, pour the raspberries onto the surface and spread across the sheet before repeating the above step.
  6. Meanwhile, pre-heat the oven to 220° celcius.
  7. Remove the rolled pastry from the fridge and using a sharp knife, slice the roll into cookie slices (approx. 2-3cm thickness). Place the cookies onto a baking tray lined with baking paper, alllowing room in between for expansion.
  8. With the base of a glass, flatten each cookie so it forms into a smooth disc. Sprinkle with additional sugar.
  9. Bake for 18-20 minutes, until the sugar caramelises slightly and the pastry is golden brown.
  10. Remove from the oven and carefully (they will be hot!) flip the cookies over to separate from any excess caramelised sugar. Allow to cool on the tray for 10 minutes before transferring to a wire rack.
  11. Serve while still warm or store in an airtight container for a few days. The cookies will lose their crisp the longer you store them.
http://www.highwallsblog.com/2015/01/eat-sugar-raspberry-palmiers/

So easy to make these Sugar and Raspberry Palmiers; only 3 ingredients! So easy to make these Sugar and Raspberry Palmiers; only 3 ingredients! So easy to make these Sugar and Raspberry Palmiers; only 3 ingredients!

thum-diy-bead-garland

DIY | Simple Bead Garland

It only takes 5 minutes to make these simple wooden bead garlands!

Now that we are officially into the new year,  its time for the Christmas decorations to come down. What a bummer! The house always seems so boring and dull once you take away the tinsel and baubles, so this year, instead of taking away all the fun, I am merely swapping it out for something a little more simple and a little less ‘seasonal’.  These beaded garlands are super cheap and only take a few minutes to make, which is perfect, because I already spent all my ‘decorating patience’ on taking down my beloved Christmas decorations…

It only takes 5 minutes to make these simple wooden bead garlands!    It only takes 5 minutes to make these simple wooden bead garlands!

All you need  is some plain wooden beads and bakers twine and of course some strong tape or pins to secure it all once you’re done.

Cut a long length of thread (long enough to string across your chosen area, plus an extra metre. Thread three beads onto the string and push to the centre of the string. Tie off a large knot at either end of the beads, securing the beads from moving along the string. Thread another three beads onto the string and line up around 15-20cm from the first group. Tie off as you did previously and repeat along both sides of the string until you have filled it completely. String up and secure with strong hold tape or some push pins. Too Easy!

It only takes 5 minutes to make these simple wooden bead garlands! It only takes 5 minutes to make these simple wooden bead garlands! It only takes 5 minutes to make these simple wooden bead garlands!

Oh Etsy | 2015 Calendars & Planners

oe-calendar2015
Life Planner | Mountain CalendarAstrology Wall Calendar | Weekly Planner

It happens every year. Other folk buy their calendars and diaries in December, so come January 1st - they are ready and rearing to go! Me? I procrastinate until the first week of January and then proceed to um and ahh about what I want (and of course, complain about my indecision here!) It’s not my fault if you really think about it. If everybody would stop making so many gorgeous designs, then I wouldn’t have to worry about making a choice!

I’ve narrowed it down to these four choices. I’m pretty sure I may have shared some of these before but that’s just how much I love them! That Astrology Wall Calendar is so damn pretty, but I love the clever design in the Mountain Calendar, how the dates line the peaks and valleys (check it out in it’s full glory - this little thumbnail doesn’t do it justice!) What do you guys think? Or do you have even better designs to share? Leave me a link in the comments, I’d love to check them out :)

  etsy-tastemaker-button-2

thumb-recipe-diy-lemonade-bottled

Bottle your own Home Made Lemonade!

Download these FREE Lemonade Bottle Labels PLUS a recipe for the best home made lemonade!
After the holiday celebrations we found ourselves with a surplus of empty bottles, and in particular, these glass soda water bottles caught my eye. So naturally, I liberated them for some home grown recycling.

After a soak in some warm soapy water, their ugly store labels scrubbed right off, leaving them clean and ready for something a little nicer. It only takes 5 minutes to print a set of these adorable Home Made Lemonade labels (Print onto an A4 sheet of adhesive paper) and give your cheap-o supermarket bottles a new lease on life!

Fill your pretty ‘new’ bottles with some home made lemonade (you wouldn’t want that label to be a lie, now would you?) and your done! I’ve even supplied my favourite recipe for classic home made lemonade below! Take them to work or send them to school with your little ones, just generally show em off! Convince your friends you have your own exclusive brand. I wont tell ;)

click-to-dowloadDownload these FREE Lemonade Bottle Labels PLUS a recipe for the best home made lemonade!

Homemade Lemonade
 
Ingredients
  • 1 cup of freshly squeezed lemon juice (around 6-8 lemons)
  • 6 cups of water
  • 1 cup of white sugar
  • Soda water (optional)
Instructions
  1. Place the lemons on a hard flat surface and with the palm of your hand, firmly roll the lemons back and forth to soften the insides. Cut each lemon in half two and using a citrus juicer, extract the juice into a bowl and set aside.
  2. Place the left over lemon rinds into a large bowl and set aside also.
  3. Meanwhile, bring 4 cups of water to the boil.
  4. Place the sugar in a bowl and pour over 1 cup of boiling water. Mix until the sugar has dissolved.
  5. Pour the remaining boiling water over the lemon rinds, cover and allow to sit for at least an hour.
  6. Discard the lemon rind and combine with the sugar water, lemon juice and an additional 2 cup
  7. Cover the lemon rinds with the other 3 cups of boiling water and let this sit for about an hour and you will have lemon infused water. Discard the rinds.
  8. In a large pitcher, combine the lemon juice, the dissolved sugar water, the 3 cups of lemon infused water and the remaining 2 cups of water (or substitute for soda water if you prefer more fizz!). Mix well before decanting into your prepared glass bottles.
  9. Chill this in the refrigerator for a few hours or overnight before serving for a deeper flavour or else serve with a few extra wedges of lemon to garnish.

Download these FREE Lemonade Bottle Labels PLUS a recipe for the best home made lemonade!Download these FREE Lemonade Bottle Labels PLUS a recipe for the best home made lemonade!

Download | Happy New Year!

FREE Desktop Download! A clean and simple background for 2015!

Happy New Year Everybody! I never intended to take a break from blogging over the holidays, but it’s been a couple of weeks and here we are! I hope you all had a fantastic Christmas and New Years. This year was my first holiday season away from my family and it was actually pretty awesome. We had dinner parties for both of the big celebrations and cooked a ridiculous amount of food! I have to admit, I’m finding it hard to get back into the swing of things after a couple of weeks of nothing but eating and relaxing.

So, let’s ease into this shall we? Its a new year so let’s start it with something simple; a fresh desktop for 2015. Slap it on your desktop (it comes with a handy calendar for those of you like me who are struggling to keep up with the year already!) or get your iPhone and iPad looking fly with the calendar free version. Or put it on all three! I’m never one to dissuade anyone from getting all matchy-matchy with their style!  

desktop-dl-button   iphone-dl-button   ipad-dl-buttonFREE iPhone or iPad Download! A clean and simple background for 2015!

As always, if you have a device that wont fit one of these backgrounds, leave me a comment! I am more than happy to post sizes for other devices!

thumb-recipe-choc-sugar-cookie

EAT | Chocolate Sugar Cookies

One for the Gingerbread haters: Chocolate Sugar Cookies! They might look like gingerbread, but they are SO much better!

Regardless of how old I get, I will always make cookies for Santa. There is something ingrained in me that ignores the very real fact that I am the one who eats said cookies, and not a jolly bearded man doing a well intentioned B&E. I can’t even tell you where this impulse comes from because it sure as hell is not a result of my childhood! My step-father, the brilliant man that he is, convinced childhood me that a slice of chocolate cake and a cold beer was more appropriate to leave out for Santa. After all, he had been visiting all those other houses, whose children had been leaving milk and cookies. Gotta give the old man a bit of variety, right?

My parents were clearly diabolical geniuses.

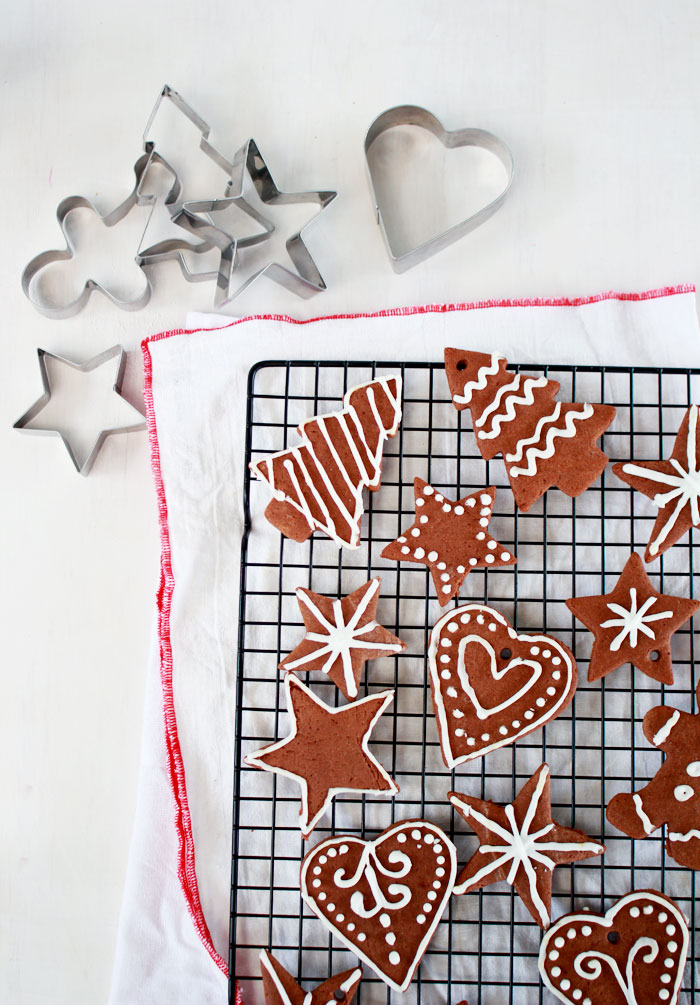
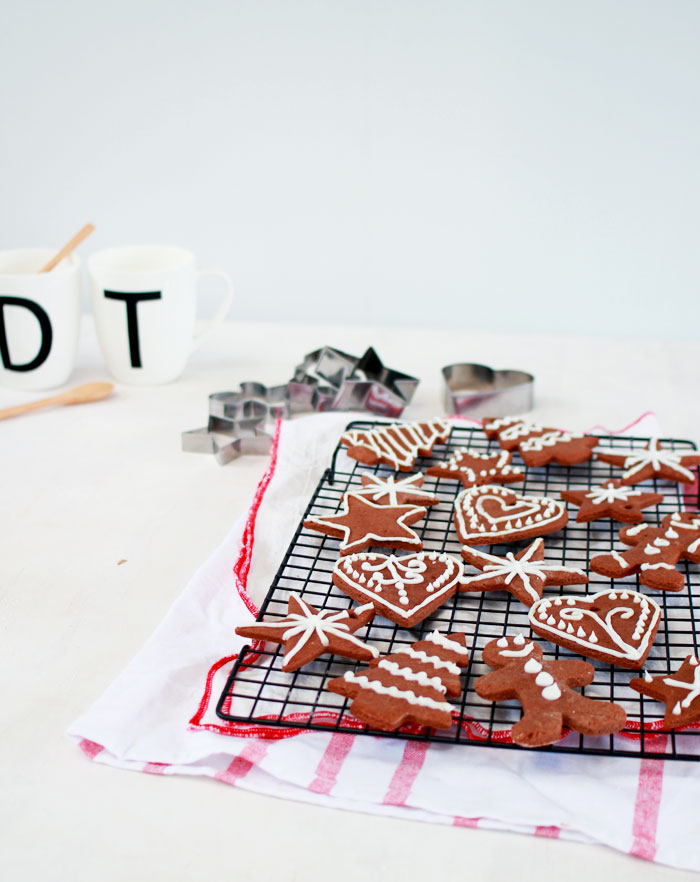
Childhood deception aside, I still am totally on board with the idea of cookies for Christmas eve. Every year I make the usual sugar cookies, or chocolate chip cookies, but they are never as festive as I would like. What I really want is some gingerbread cookies. You know the ones; with the white, patterned frosting lovingly piped onto each snowflake and star shape. There’s only one problem. I absolutely, positively, cannot STAND gingerbread. It’s one of the few baked goods that I will actually hide in my napkin and throw away later, rather than have to struggle to choke the damn thing down! They look so pretty but taste so bleh! I know  I’m probably one of the few who feels this way about gingerbread, but I still feel like I need to help my fellow haters out!

Never fear - Chocolate sugar cookies are the answer my friends. Dress em up right and they look just like gingerbread cookies, except exponentially better. Because, you know, they aren’t gingerbread cookies! Just like their vanilla counterpart, they hold their shape when you bake them into your favourite festive form. Pipe on a little white royal icing and BOOM! Faux Gingerbread cookies! Santa won’t even know the difference! Who knows, he might be thankful for the ‘variety’….

One for the Gingerbread haters: Chocolate Sugar Cookies! They might look like gingerbread, but they are SO much better!   One for the Gingerbread haters: Chocolate Sugar Cookies! They might look like gingerbread, but they are SO much better! READ MORE

Last Minute Edible Gifts

Last Minute Gift Ideas that you can make from ingredients in your Pantry!

Uh oh! Guys, Christmas is in 5 Days! FIVE. DAYS. Have you finished all your Christmas shopping yet? Are you like me, who thought she’d done all her shopping and then realised she’d forgotten someone. Noooooo! What’s a girl to do? Rather than braving the stores for something less than personal, let’s make something! These little gifts only take a few minutes to make and you can tailor them for who you are giving them too. Share your favourite cookie recipe with your friend at work, or make a pretty bottle of vanilla extract for your foodie friend. They will love it!

READ MORE