
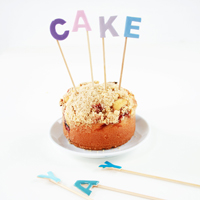
DIY |Candy Colored Letter Cake Toppers

Confession time: I have the most ridiculously huge collection of (mostly unused) nail polishes! When my collection went from normal to excessive is unknown, but the end result is the same: a drawer full of vibrant colours out of which I probably only use around 4 or 5 (but let me tell you - those babies are on high rotation!) Every time I open the drawer I feel a twinge of guilt for my poor neglected colours. So, rather than let them sit there gathering dust, I’ve been on the hunt for other uses for my trusty nail polishes…
My favourite thing about using nail polish on surfaces other than actual finger nails, is how glossy and opaque the colour is. It reminds me almost of hard candy coating, which was my inspiration for these letter toppers! After I shared my recipe for mini strawberry crumb cakes, a few of you asked about the letter cake toppers featured along with the crumbly dessert. What better time to share my first nail polish related project? Ask and ye shall receive! (I’m so good to you guys!)

You’re going to need at least one set of small wooden letters; I picked up a packet of letters made from balsa wood for a couple dollars from my local craft store. Remember that most packets will only have one of each letter so you may need to get more than one packet if you want multiple vowels etc. You will also need bamboo skewers, super glue and of course; nail polishes - in as many colours as you desire!


1. Sort out your letters and group them into the words you want to make. Put the rest of the letters away for another time.
2. Pick out your nail polish colours (if you only want one colour you can skip this step), I found it best to experiment with colour combinations by pairing each colour with a letter before actually painting.
3. Clean away any rough edges and loose strands of wood around the edge of the letters. If you need too - use a nail file or a small piece of sandpaper to smooth any edges that are extra rough. Set your letters down on a flat surface with a piece of paper underneath to catch any drips and make sure that they are somewhere you can leave the letters to dry for a few days without them being disturbed.
4. One letter at a time, paint the top surface of your letters with a generous coating of nail polish - it is easiest to let the polish drop onto the surface and gently spread it to cover the whole letter rather than painting in strokes. Don’t worry about the sides of the letters - try to keep the paint on the top. Allow to dry.
5. Once dry repeat step 4, but this time drip more polish onto the letters! Now that you have the base coat down the polish should be easy to add more too and should stay on the previously painted surface. (Drip the polish closely to the letter as shown above with the purple polish)
6. Allow to dry for a couple of hours and then repeat the previous step again. You want to keep adding more and more thick layers of polish to your letters to build up the colour into a lovely rounded, hard candy looking coating. I found it best to add a layer in the morning and then again at night every day over a week, allowing 12 hours to dry in between each coat. It’s up to you how many coats you want to do. You can see above the difference between the ‘G’ and ‘D’ letters; one has only one coat of colour and the other has multiple!
7. Once you are happy with finish allow to dry for an additional 24 hours just to be safe. Then you can attach to your bamboo skewers by adding drop of super-glue onto the back of each letter and pressing the skewer into the glue to secure. Once dry youte can use your new letter cake toppers to bring extra fun to your cakes!
————————————————————————————————————————-
A Few Tips:
- Choose solid, opaque colours over sheer shades!
- To add additional decoration - dip the flat end of a skewer into a drop of a contrasting colour to stamp on polka dots or even add on a coat of glitter polish over the top.
- Beware drying times on these guys - the polish may seem touch dry, but can still be dented or marked if the under-layers are not completely dry! Make sure you leave plenty of time before you want to use your cake toppers!
- These cake toppers can be wiped down with a damp cloth and stored in a jar for later use.


honestly, b.
April 9, 2014 at 1:23 amThis is so cool! I love the glossy, “candy” look the polish gives to these. What an amazing idea. Maybe I will have some time to make these for my niece’s 1st birthday party this weekend :) Thanks for sharing! xo
Kyla
April 9, 2014 at 2:31 amThis is so much fun! A lot of my friend’s birthdays are coming up this month, and having some fun cake toppers like these would be really cute to add!