
From the Garden to the Table: DIY Terracotta Dinnerware

Ever since I made that Terracotta Food Cover a few weeks ago, I’ve been having these strange dreams. Dreams of terracotta pots as dinnerware. Strange huh? Pots (with the exception of the aforementioned food cover) are not really the most practical of items to have at ones dinner table, so what gives? I wasn’t really sure what my brain my trying to tell me.
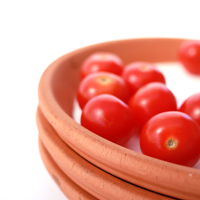
Then I spotted these terracotta bases being used as plates and suddenly it all made sense. As soon as I saw them I thought, ‘now there’s an idea!’ Bri was using the bases with baking paper to separate the food at the base, but I wanted something a little more permanent, so I came up with a cimple method of sealing the inside of the saucers so that you can eat straight off em!
This project takes a little patience and the right materials,but in the end you will have a lovely set of unique plates to add to your kitchen. I chose to start with a trio of medium sized bases as I think these work best as serving dishes. A paint and acrylic base will protect your plates from food etc, but with use you will start getting marks from knifes and forks so I would avoid serving steaks off of them (Besides, have you ever scraped cutlery over terracotta? Yikes! I can’t stand that sound!) Foods that can be eaten with your hands or a simple spoon or fork are probably best bet to ensure the longevity of your new plates.

What You Need:
Terracotta Bases - you cant get these from your local gardening or hardware store
Enamel Paint (or clay glaze if you have it)
Liquid Acrylic
What You Do:
1. Take your terracotta bases and give them a thorough wash. As discussed before, unsealed terracotta is super absorbent so you want to wash it with hot soapy water and rinse thoroughly before using to make sure there is no dirt or nasties going to get in your food. Allow to dry completely before going on to the next step.
2. Using a large flat brush, paint the inside of the plate with a thin even layer of paint. You can paint the whole inside up to the outer rim or just the base as I have done. Don’t worry too much about making it perfect, the look of the ‘plates’ lends itself to a rough, imperfect feel, so just paint it on free hand. Repeat with as many coats as necessary until you have an even solid colour.
3. Mix together your acrylic as per the instructions on the bottle; mine is a simple 1:1 parts of each mix. Pour a small amount onto the center of the plate and using the back of a spoon or a spatula, gently move it outwards until the whole of the painted area is covered (add more acrylic to the center as needed). Go slowly around the edges – any acrylic that comes into contact with the unpainted terracotta will discolour so try to stop at the edge of the painted area.
If you find you still have any air bubbles gently pop them with a tooth pick and smooth the area over. The acrylic should settle and smooth out after a couple of minutes of sitting. Leave to dry completely overnight or longer.
———
I loved how my first set of plates turned out. I’m already planning a couple more. My next set will include little palm sized bases for serving herbs and spices, in a range of colours. I may even make a few sets to give away as gifts, they look so lovely on the table. (Stay tuned for this weeks recipe to see these babies in action!)


McKenna Lou Ryan
June 19, 2013 at 1:32 amSo cute! This is the perfect way to display treats at a garden party too! xx. McKenna Lou
http://www.lynnandlou.com
p.s. Today is the last day to enter into our giveaway for an Anthrpologie gift card! Have you entered?
Here’s the link: http://www.lynnandlou.com/2013/06/how-to-perfectly-frost-cake-25-anthro.html
Emily B
June 19, 2013 at 3:14 amFabulous idea; these would be so cute for an outdoor meal in the Summer :)
Isabelle
April 6, 2015 at 9:34 amHi! These look FABULOUS. I would like to try this and I can report back with pictures. I was wondering, since it’s been more than a year since you wrote this, how the dishes held up and if you did any other experiments? Any other improvements you’d recommend? Is it safe to serve hot food in? Thanks! - Isabelle
Dani
May 30, 2015 at 11:35 pmThanks Isabelle! The dishes held up really well (they are still going strong!) The acrylic base isn’t infallible, so there are a few dings a scratches here and there. I wouldn’t use these for meals requiring knife and fork for this reason, but finger foods and as serving plates they are great!
The one thing I would recommend is not using these plates for foods that are sauce based - the terracotta is very absorbent, and will soak up liquids along with their color, which can stain them. Also, using a good quality acrylic is a must!
I hope this helps! Let me know how you go if you try this project out :)